FMLA Setup and Use
This article provides guidance on using the FMLA screen in the Human Resources module of ReadyPay Online (RPO). Information about the law is available from the U.S. Department of Labor at https://www.dol.gov/general/topic/benefits-leave/fmla.
ReadyPay's default FMLA Computation method is "Standard" (i.e., for a calendar year). If you want to use the "Rolling" option (i.e., a 12-month lookback period), use the Defaults tab in ReadyPay (Master Company Setup) before continuing the setup process.
Click on any image to view a larger version of it.
Company Setup
1. Add standard FMLA Codes
Standard FMLA leave codes must be added in RPO under Company > HR Setup
Status/Filters > FMLA, as shown in Fig. 1.
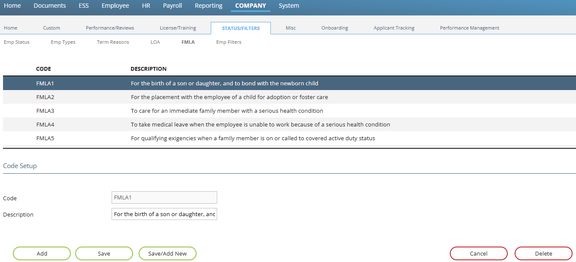
Fig. 1
Standard leave codes are coded like the example entries shown below:
- FMLA1 — For the birth of a son or daughter, and to bond with the newborn child
- FMLA2 — For the placement with the employee of a child for adoption or foster care
- FMLA3 — To care for an immediate family member with a serious health condition
- FMLA4 — To take medical leave when the employee is unable to work because of a serious health condition
- FMLA5 — For qualifying exigencies when a family member is on or called to covered active duty status
- FMLA6 — To care for a covered service member with a serious injury or illness
2. Add FMLA Earning Code(s)
ReadyPay will calculate and maintain employees' Available Hours for FMLA. To reduce the Available Hours when FMLA time is used, at least one earning code using the "Regular FMLA" earning type must be added and used in payroll.
Go to Company > Earnings & Deductions > Earnings (as shown in Fig. 2) to add a new code using the Earn Type "Regular FMLA". One earning code can be used with one or more FMLA leave codes. Some end clients may wish to use different earning codes for different FMLA leave codes.
- Uncheck the Worked box when setting these codes up to prevent the hours from showing up erroneously in other calculations/reports.
- DO NOT use the MemoFMLA earning type as it will not count towards the employee's Hours Taken.
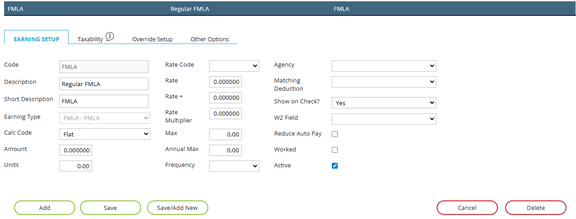
Fig. 2
3. Verify all Earning Codes' "Worked" setting
ReadyPay will calculate each employee's Hours Worked total for FMLA eligibility as long as you do the following:
- Check the "Worked" checkbox for all earning codes that are to be used to count hours worked.
- Enter hours for each "Worked" earning code used on each employee's check.
Before you pay any employee with the FMLA earning codes, check that all payroll verifications for zero-dollar checks or missing rates allow the end user to approve the warning. Employees on FMLA will have checks with earning hours and no rate or gross pay.
Employee Setup
This section begins by explaining what each subtab does. The section concludes by outlining the steps for adding, updating, or deleting an employee's FMLA request.
FMLA screen
The FMLA screen (shown in Fig. 3) is located under HR > Leave of Absence. This screen stores information regarding absences by the employee. The screen offers multiple subtabs for managing eligibility, requests, storing tracking information, and documentation.
The buttons at the bottom of the screen (i.e., Add, Save, Save/Add New, Cancel, and Delete) save changes to the FMLA instance selected at the top of the screen. Some subtabs allow for multiple records per FMLA instance. Those subtabs have separate icons to change, view, or edit each item on the subtab.
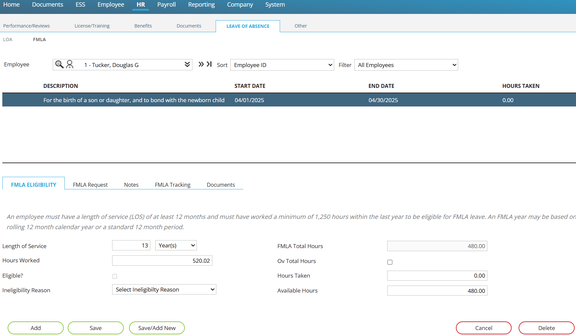
Fig. 3
FMLA Eligibility subtab
This subtab (shown in Fig. 4) displays details about the employee and whether they have worked long enough (Length of Service field), worked enough hours (Hours Worked field), and if they are eligible (Eligible? checkbox). This information will only appear once a request has been entered for the employee and the second subtab, FMLA Request, has been completed. The "Eligible?" checkbox will be marked for anyone who has met the 12-month and 1,250 hours worked requirements. You may uncheck this checkbox and select an Ineligibility Reason from the pull-down. The standard 480 hours available to an FMLA-eligible employee will display on the right side of the subtab and will be shown as FMLA Total Hours and broken down into Hours Taken and Available Hours to ensure the employee is only taking off what they are eligible for.
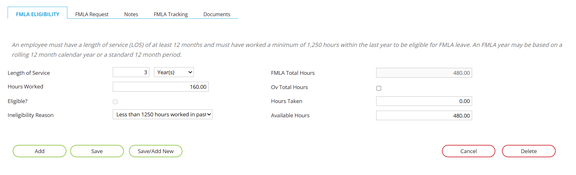
Fig. 4
FMLA Request subtab
The FMLA Request subtab (shown in Fig. 5) stores information about the employee's request for FMLA leave.
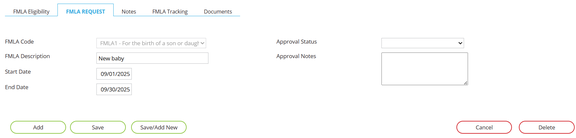
Fig. 5
Notes subtab
The Notes subtab contains an open text field that you can use for storing notes about the FMLA instance.
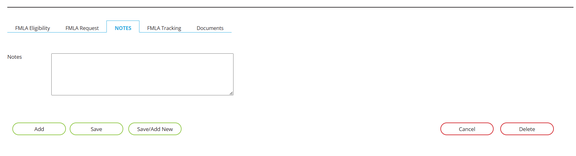
Fig. 6
FMLA Tracking subtab
The FMLA Tracking subtab (shown in Fig. 7) is used to store events that may occur during the employee's FMLA instance. This provides end clients with a quick view of the status of an employee's FMLA leave. All information on this subtab must be manually entered. This subtab can store multiple events related to the employee's leave. You must use the icons to the left of each event to save changes or delete the event.
The Event Type field contains a hard-coded list containing the following event codes:
- LvRequested — Employee requested leave
- CHCPRequest — Employee's leave request has been sent to employee's health care provider
- CHCPReceived — The end client has received the employee's health care provider's response
- DueDate — Due date for paperwork
- LvReqResponse — HR's response to leave request
- AcReturnDate — Employee's actual return date
- ExReturnDate — Employee's expected return date
- Payment — Used to record any payments to the employee during FMLA leave
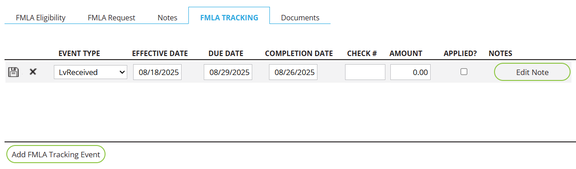
Fig. 7
Documents subtab
The Documents subtab (shown in Fig. 8) is available to attach any supporting documentation for the FMLA instance. Documents are listed in the order they were uploaded. This subtab can store multiple documents per FMLA instance. You must use the icons to the left of each document to edit it, download the document, or delete the document.
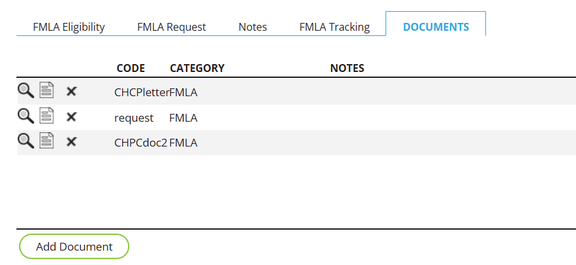
Fig. 8
4. Add an FMLA request to an employee
- Navigate to the HR > Leave of Absence > FMLA page and select an employee.
- Navigate to the FMLA Request subtab.
- Click the Add button.
- Select an FMLA Code.
- Enter a description (optional).
- Enter a Start Date for the employee's first day of leave.
- Enter an End Date for the employee's last day of leave.
- Select an Approval Status.
- Enter any approval notes (optional).
- Click the Save button to save the record.
Once you have saved the record, you can navigate back to the FMLA Eligibility subtab to view the FMLA Total Hours, Hours Taken, and Available Hours fields.
The FMLA Total Hours may be overridden by first checking the Ov Total Hours checkbox, then entering a new number in the FMLA Total Hours field, and lastly clicking the Save button.
5. Add Notes to an FMLA request (optional)
Enter any notes to the selected FMLA instance, and then click the Save button.
6. Add events with the FMLA Tracking subtab (optional)
- Select the FMLA instance you want to update.
- Click the Add FMLA Tracking Event button to open the event details modal (shown in Fig. 9).
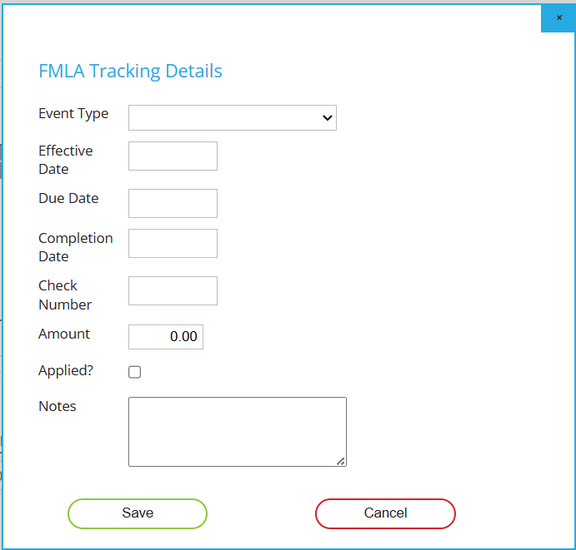
Fig. 9
- Select an Event Type from the list.
- Choose an Effective Date.
- Choose a Due Date.
- Choose a Complete Date if known. You can also come back and edit it later.
- Enter a check number (only used for Benefit Payment events).
- Enter an amount (only used for Benefit Payment events).
- Check the Applied? checkbox if applicable.
- Enter any notes that are specific to the event (optional).
- Click the Save button.
- If you don't want to save the tracking event, click the X in the upper-right corner of the modal.
- Once the tracking event is saved, you can edit the fields directly. Click the disk icon to the left of the event to save any changes.
- Click the X icon to the left of any tracking event that you want to delete.
7. Add documents with the Documents subtab (optional)
Click the Add Document button to open the file upload modal (shown in Fig. 10). You can select one file at a time to upload.
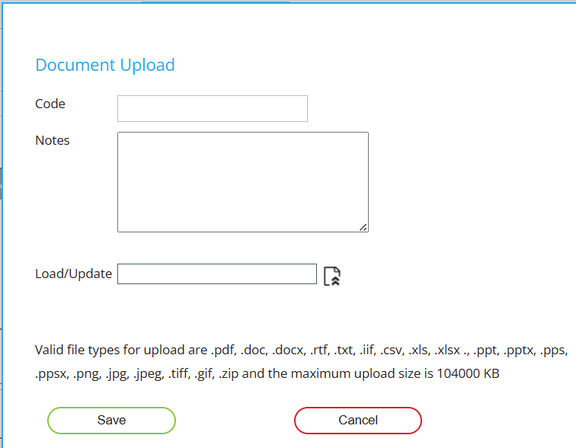
Fig. 10
8. Create checks using the FMLA earning code(s)
Employees who have checks with the FMLA earning codes will automatically see their Hours Taken increment and the Available Hours reduced. See Fig. 11 and 12 below for examples.
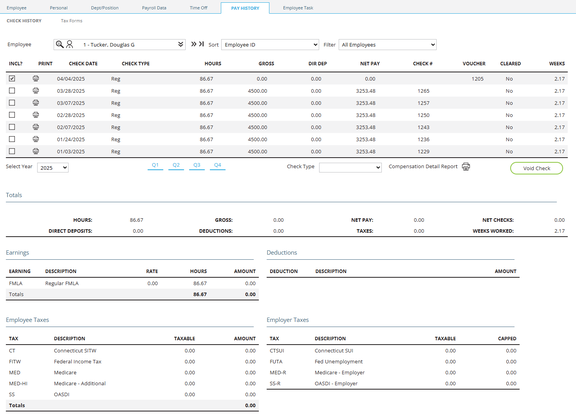
Fig. 11
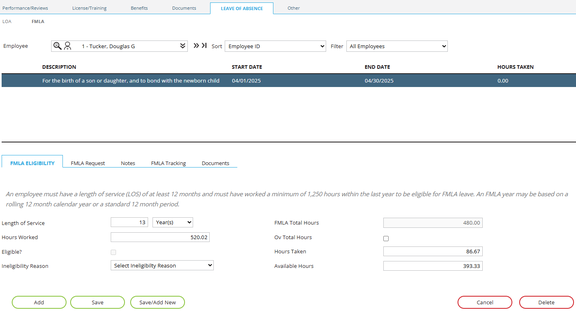
Fig. 12
Reporting
Reporting on employees using FMLA is done in one of two ways:
- Use the employee screen and subtab to view complete details of an employee's FMLA leave.
- Use the Basic Report Writer to create summary reports showing a list of employees with FMLA leave.
Questions?
Contact your Payroll Service Provider.