Client-Controlled User Security
This document provides guidance on setting up Security Roles and Users so that company administrators can add users for their company on their own. Multi-company users must be set up by the service bureau. Some setup must be done in ReadyPay Desktop, as detailed in this document.
Role setup
When Security Roles are added to the system, by default they cannot be used by company administrators when adding new users. This prevents Roles from inadvertently being used in error and providing a user with too much, or too little, information.
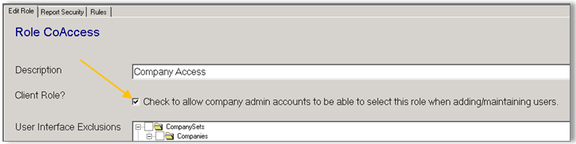
In ReadyPay Desktop, go to System | Security | Roles, select a Role you would like to give companies access to use, and click Edit. On the Edit Role tab that appears, mark the Client Role? box to allow company administrators to use the selected Role when adding or maintaining users.
Company administrator setup
Once you have determined and set company administrator access on Roles, you must then set each company administrator as the correct User Type.
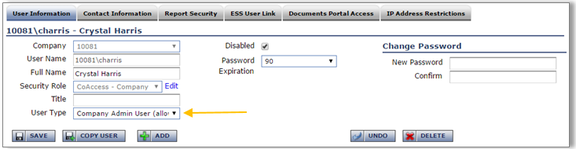
Under Company | Security | Company Users, select someone you wish to allow client-controlled security access for. In the User Type pull-down menu on the User Information sub-tab, select Company Admin User (allows user administration). This is the setting that turns on the client-controlled security functionality.
Company security setup
A company administrator will have additional access to Company | Security. The Company Users tab shows all of the users currently set up with access to the company. This page allows for creating new users and changing and updating existing access.
Adding new users
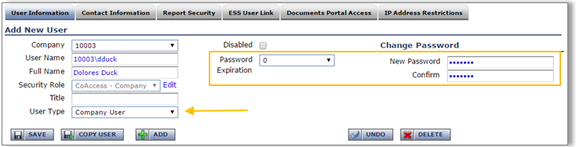
To add a new company user, click the ADD button. When the fields open for completion, enter the User Name to be issued and the user's Full Name.
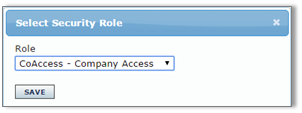
To select the Security Role for the user, click the Edit button and choose the Role from the pull-down in the box that appears. Then click SAVE.
Next, set the User Type (typically Company User) and set the appropriate Password Expiration timeframe. The final setup step is to create the user's New Password and confirm it in the Change Password section. Then click the SAVE button to finalize the user account.
The User Type may also be changed to Company Admin if the new user should also have access to user security.
The user is prompted on their initial login to create a new password, and (when set up for the company) to establish two-factor authentication details.
Updating users
At any time, updates can be made to a user's account to provide more or less access by changing their Security Role or User Type according to the level of access being granted.
If a user has locked themselves out of their account (by entering the wrong password multiple times), the Disabled? box must be unmarked and the Change Password button may be used so they can gain access again.
If a user should no longer have access to the system, select them in the list on the Users page and click the DELETE button.
Questions?
Contact your Payroll Service Provider.