Report Writer Overview — Advanced Report Writer
This is the initial screen displayed when you add an Advanced Report Writer. There are no Report Types as in Basic Report Writer.
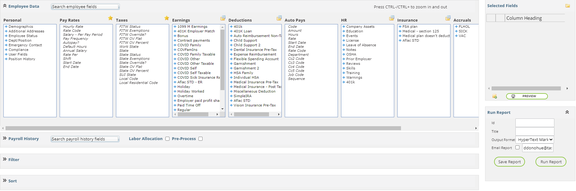
The screen is divided into four sections.
- Personal: Houses Employee Setup information, including Demographics, Rates, Taxes, Earnings, Deductions and so on. Use the slide bar to see the additional options.
- Payroll History: Houses historical pay information (hours, earnings, taxes, etc.).
- Filter: Use this to control which employees are included in the report (Active only, certain departments, certain earnings, etc.).
- Sort: Controls the order in which the report is displayed. Only fields used in the report can be used to sort the report.
Personal
The Personal Section lets you pick data from a wide variety of categories. Use the slide bar at the bottom of the Personal section to see all available categories.
Some categories have a Plus (+) sign next to them. This indicates there is a pick list available for that category.
Click the Plus (+) sign to display the items in the pick list. Scroll bars are provided to move within the list.
Before proceeding, click on the Plus for each item so you can familiarize yourself with where certain fields are stored.
The fields available in the Earnings, Deductions, HR, Insurance and Accruals categories are based on the Company Setup specific to the company you are working in.
At the far right, there is a section called Selected Fields. Clicking on a field from the Categories will add it to the Selected Fields grid. Example: Open the Demographics group under Personal. Next, click on the Employee ID field. It is added to the Selected Fields box and also highlighted in Green to show it is in use in the report.
Double-clicking on a field will add the field twice.
![]()
You can change the default column header by double-clicking on the Column Header field and entering a new value. Use this option to save space on your report.
Continue adding the fields you need for your report. At any time during this process you can preview the report using the Preview button located below the Selected Fields grid.
![]()
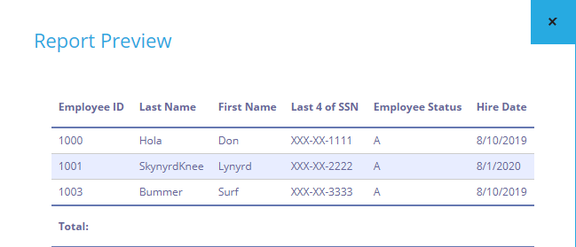
Preview as often as you like to review the layout, headers, etc.
Changing the Field Display Order
You can change the display order of the fields on the report with the three bars at the very left of the field list.
By holding down the left mouse button, you can move the field up or down within the list.
Use the X next to the Column Heading to delete a field from the report.
Payroll History Section
![]()
Historic Payroll Data can be accessed using the three options shown above: Payroll History, Labor Allocation and Pre-Process. You cannot use more than one option in a report.
The option you choose is dependent on your report's requirements.
Use this section when your report requires earnings, deductions and taxes data. Select which option you need, then click on the >> field to expand and access its contents. Items displayed are based on the company setup.
-
Payroll History — access to employee and historical payroll data. Does not include Employer Taxes.
-
Labor Allocation — access to employee and historical payroll data from Labor Distribution; includes Employer Taxes.
-
Pre-Process — same selection options as Payroll History but based on your unprocessed payroll input.
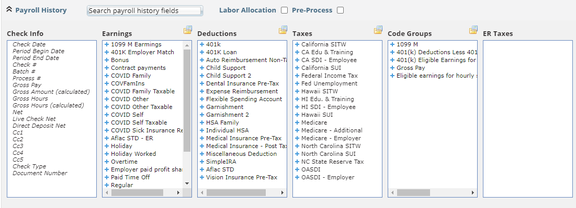
Click the blue plus (+) sign to see the data fields available for Earnings, Deductions, Taxes and Code Groups.

If using the Labor Allocation option, ER Taxes data is available as well.

Add data by finding the item needed for the report. Click on the blue plus key, then click on the appropriate field.
The field is highlighted in green and added to the report.
![]()

Continue adding any other fields needed for the report. Save and Preview frequently.
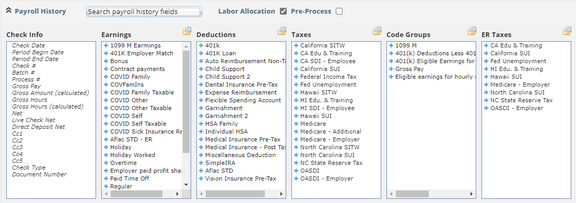
Payroll History Additional Data Fields Option
There are additional data fields available in all of the Payroll History options (Payroll History / Labor Allocation / Pre-Process).
![]()
To the right of the headings (except for Check Info), note the item that looks like a document overlaying a file folder.
Clicking this option will display the "Select a Display Group" dialogue.
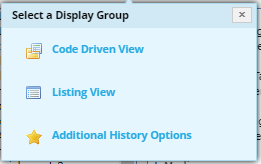
-
Code Driven View: This is the original field display method and no new fields are available.
-
Listing View: Changes the available fields. The new fields are detail-level items you would find in the EPayHistDetail and ELaborDist tables. The Display Group item icon changes to a Document icon.

-
Additional History Options: Provides access to MTD, QTD and YTD values for the field you are working with. The Display Group item icon changes to a Star icon.


Numeric Field Formula Option
Any numeric field added to your report will have the Equation field available to the right of the Column Heading field.
![]()
Click on it to display the Edit Report Field Expression dialogue box.
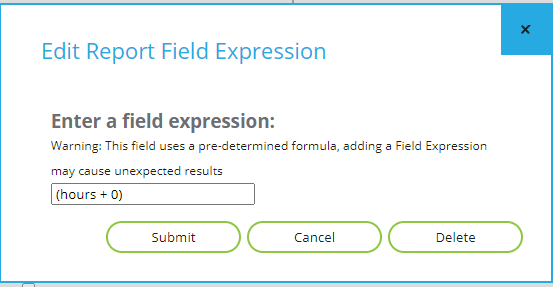
The field name provided depends on whether the field in use is an hours or amount field.
Valid math operators are + (plus), - (minus), / (divide), * (multiply).
Due to how they are stored in the database, Taxable Wages is an hours field and Capped Wages is a Rate field for equations.
If the Equation Symbol is RED, there is an equation in use on that field.
![]()
Filter Section
The Filter Section is used to control what data or employees are included in your report. Click on the >> symbol to access it.

The Filter Section is now displayed.
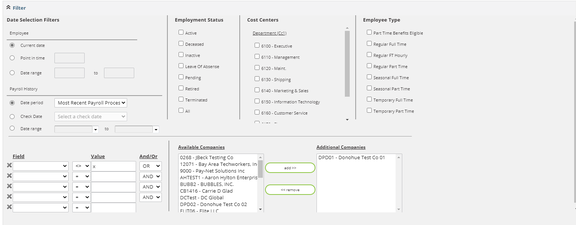
The Filter Section contains several sections for filtering options.
The Employment Status, Cost Centers and Employment Type are specific to the company you are accessing in ReadyPay Online.
The Date Selection Filters are used to control the time frame used when running the report.
The Employee section allows you to specify the date to use when selecting employee specific data:
- Current Date looks at current employee data.
- Point in Time looks at data that was active on that date. This is typically used for items with start and end dates like deductions, taxes, etc.
- Date Range works the same as Point in Time but reports items dated between the dates entered. As a result, multiple items may be reported.
The Payroll History is used to set the date or date range to use to collect payroll-history-related data.
- Date Period provides several options for reporting timeframes. Click the drop arrow to see the options.
- Check Date allows you to select from the client's processed check dates.
- Date Range allows you to select a From — To check-date range.
At the bottom left of the Filter Section you will see fields called Field, Value and And/Or.
Use these fields to filter the report based on fields in the report. To be a filtering item, the field must be in the report.
You cannot filter on Regular Hours if it is not a field in the Selected Fields list.
Use the Field option to select the basis of the filter.
The next field is untitled. It provides several options as the basis of the filter (= equal to / <> not equal to / > greater than).
The Value field defines the final basis of the filter.
Some typical filter examples are:
Reg Hours > 0CC1 = 200EmpType = FullTime
The And/Or field is used when your filter has multiple conditions:
Reg Hours <> 0 AND cc1 = 250— Include data where Reg Hours not equal to zero and cc1 is 250.cc1 = 100 or cc1 = 200 or cc1 = 300— Include data when cc1 equals 100 or 200 or 300.
The Available Companies box will display the company codes the user can access via Security.
Additional Companies allows the user to include data from other company codes in the report.
Click a company code in Available Companies to include it in your report. Note the code is now displayed in Additional Companies and is removed from the Available Companies list.
Sort Section
The Sort Section allows you to control the order in which the report is displayed.
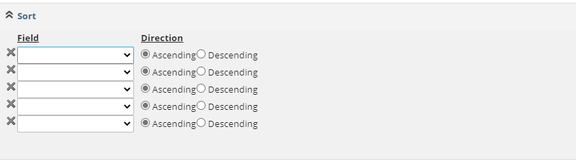
Five sort levels are supported with options to sort in ascending or descending order.
Sort options are based on the fields used in your report.
If you require sorting by a specific field, it must be included in your list of Selected Fields.
There are no totals provided at the end of each sort. There are only Grand Totals.
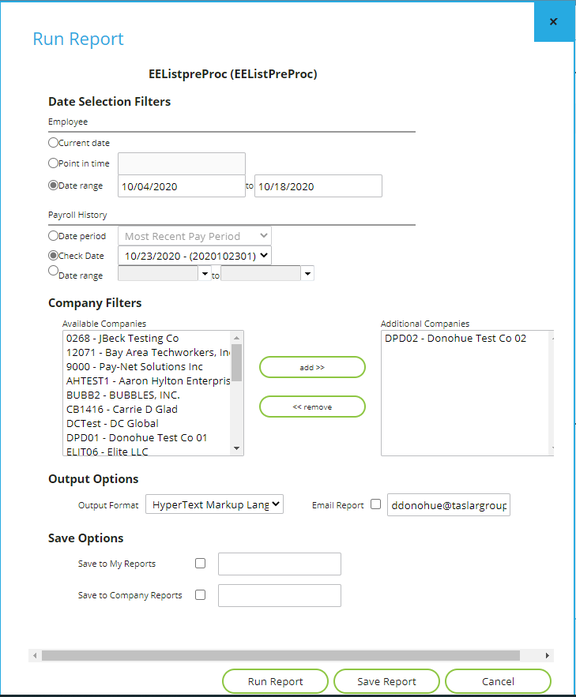
Run Report Section
Use the Run Report section to permanently save the report in the system and to run it as needed.

To save a report setup, click on the Save Report button.
You may also use the >> option to access the Save Report dialogue.

Enter a Report Title. This title will be displayed when you initially access the Advanced Report Writer section.
Assign an Output Format. The options are Hyper Text Markup Language (HTML) and Excel Spreadsheet.
Click the check box and enter an email address if you need to email the report.
Click Save Report after completing these options.
If you need to reset the Report Options, click the >> option. This will open the Options dialogue box.
Change as needed and click Save Report.
Working with Existing Report Writer Reports
Once you save a Report Writer report, it will be listed on the screen when you first access Advanced Report Writer.

The screen displays the Report Title, Report ID and the Output Format for each Report Writer.
To the left of the Report Title, there are three icons: Printer, Pencil and X.

-
The Printer icon lets you run the report with the saved options.
-
The Pencil is used to access the report setup for changes, additions, etc.
-
The X is the delete report function. If selected, the following message is displayed to confirm you wish to delete the report.

Clicking on the actual Report Title field in the grid will open a Run Report option.
Use this option to override the saved run report options. Your new options are saved for the future.
Questions?
Contact your Payroll Service Provider.