Employee: Personal | Demographics
The Demographics page houses a number of informational fields regarding the employee.
This page is initially populated with data from when the employee is entered as a New Hire.
You cannot setup a new employee from this tab . That is done via the various new hire options available within the system.
This tab is used for maintenance after the employee has been added to the system.
The Demographic Tab is divided into eight sections housing various data about the employee.
The sections are:
- Name
- Personal Information
- Employment Status
- Address
- Foreign Address
- Contact Info
- Time Clock
- Employee Memo
Unlike the Information Tab, the data on this tab can be updated as needed.
Name Section
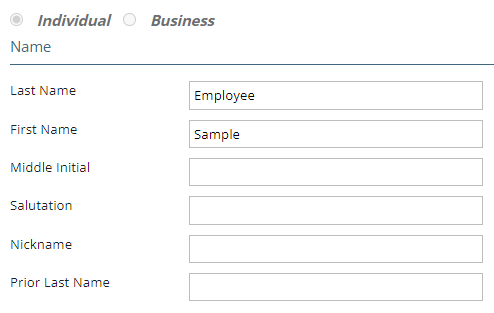
Individual and Business Radio Buttons: For a W2 employee, the Individual Button is selected. Both buttons are inactive and cannot be changed.
In the case of a 1099 employee, both buttons are available. The appropriate button should be selected.
If Business is selected, The First Name and Middle Initial fields (Name Section) become unavailable.
The format of the SSN field (Personal Information Section) is changed to that of a Federal EIN.
Last Name: Employee's last Name
First Name: Employee's First Name
Middle Initial: Optional. Employee's Middle Initial.
Salutation: Optional. Enter if needed.
Nickname: Optional. Enter if needed.
Prior Last Name: Optional. Enter if needed
Personal Information Section
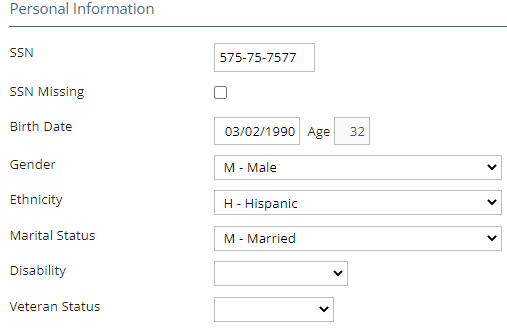
SSN: Employee Social Security Number. This is a multi-purpose field. If the employee is identified as an Individual (top of the Name Section), data is entered in nnn-nn-nnnn format. If the employee is identified as a Business, the format is the same as a Federal EIN (nn-nnnnnnn).
SSN Missing: Use to indicate the employee Social Security Number is unavailable. Checking this box sets the field to a value of 000-00-0000 and cannot be updated. When the SSN is obtained, uncheck the box. The SSN field is now available and can be updated.
Birth Date: Employee's Date of Birth
Age: System generated Employee Age.
Gender: Select the Gender from the Drop List.
Ethnicity: Select the employee's Ethnicity from the Drop List.
Marital Status: Select the employee's Marital Status from the Drop List. The entry here is for reporting purposes only. It does not affect tax withholdings.
Disability: Use the Drop List to indicate the employee's Disability.
Veteran Status: Use the Drop List to indicate the employee's Veteran Status.
Employment Status
Contains various fields used to determine the employee's employment status.
Wizards are provided to facilitate updating certain fields in this section.
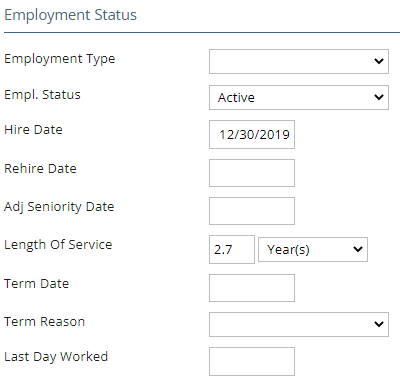
Employment Type: Use the Drop List to assign an Employee Type value.
Empl. Status: Indicated the employee's employment status. Use the available Drop List to change.
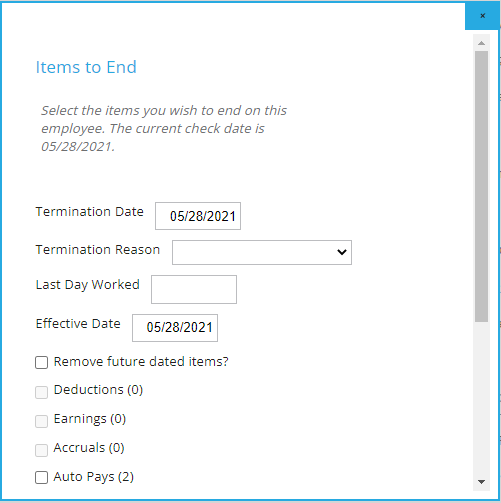
Changing the Status of an Active employee will invoke the "Items to End" Wizard. Use accordingly as not all employee status options indicate the employee is permanently leaving service.
Changing the Status of a Terminated employee will invoke the "Rehire Employee" Wizard.

Enter a Rehire Date and check the re-report new hire if appropriate.
Select Review Employee. You are taken to the employee's Demographic Tab. Make any necessary updates to the rehired employee's setup.
Hire Date: Employee's Hire Date.
Rehire Date: If applicable, Rehire Date of a previously employed individual.
Adj Seniority Date: In cases of bridged service, this is the date the employee's benefits start.
Length of Service: Employees Length of Service based on Hire Date. Use the Drop List to set the displayed value to Years, Months or Days.
If there is an Adj Seniority Date present, LOS uses that field as its basis.
Term Date: Employee's Date of Termination.
Term Reason: Select a Term Reason from the Drop List.
Last Day Worked: Optional. Enter employee's last day worked.
Address Section
The Address section houses the employee's local address.
The data in the Address Section is used on the employee pay documents, tax forms and reports including address information.

Address 1: Main section of the employee address.
Address 2: Use for additional address information. (Apt #, Building, etc.)
City: City of employee address.
State: State of employee address. Use the Drop List to select a state.
Zip: Zip Code of employee address.
County: County of employee address.
Country: Country of employee address. Use Drop List to select a country. Selecting a country other than US will activate the fields in the Foreign Address Section.
Change Address
Click the Change Address field (in blue below the Country field) to access the Change Address Wizard.
Use of the Change Address Wizard is optional. Changes can be made directly to the fields in the Address Section.
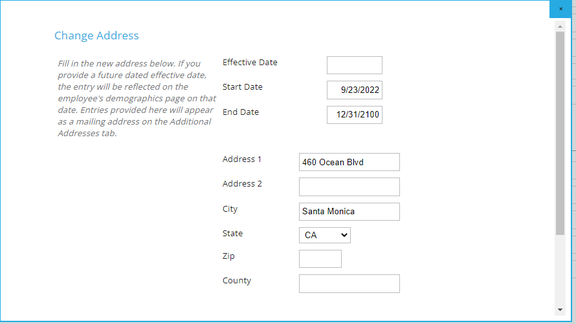
The fields in the Wizard are populated with the current data from the Address Section.
Update them accordingly.
The Effective Date defaults to the check date selected in the Payroll Module. Change as appropriate.
Click the Save Button at the bottom of the wizard to save the changes.
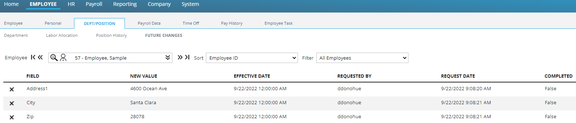
Entries for the changes are created in The Employee Future Changes tab. The changes become effective when the Effective Date of those records is satisfied. The changed fields are not available on the Demographics tab until the date of the Future Change is satisfied. You may view any future dated changes by using the Future Changes Tab found under the Dept/Position section.
Foreign Address Section
The Foreign Address section is used to store an out of country address, if needed.
The country field in the Address Section must be a country other than US (or blank) to activate the fields in the Foreign Address Section.
The Foreign Address data is informational. It can be accessed via Report Writer.

Address 1: Main section of the foreign address.
Address 2: Use for additional address information. (Apt #, Building, etc.)
City/Town: City of the foreign address.
Province/Region: Currently not supported
Other Province/Region:
Postal Code: Postal Code of the foreign address.
There is no Change Employee Address Wizard for the Foreign Address data.
Contact Info Section
Use of the Contact Info section is optional.
The Contact Info section contains multiple fields that house the employee's contact information.

Home Phone: Employee's Home Phone Number
Work Phone: Employee's Work Phone Number
Ext: Extension (if any) of e mployee's Work Phone Number
Cell Phone: Employee's Cell Phone Number
Work Email: Employee's Work Email Address
Personal Email: Employee's Personal Email Address
Time Clock Section
Houses fields used when the client uses a time clock system.
Clock/Badge #: The clock or badge number assigned to the employee for the timeclock system.
The following fields (Pay Class, Clock Group, Sched Pattern) are used with the AOD Integration routine. Prior to use, the Drop List for each field must be prepopulated using the options found under the Misc Tab of Company Setup.

Work with your AOD representative for instructions on the setup and use of these fields.
Pay Class: Pay Class as defined by AOD.
Clock Group: Clock Group as defined by AOD.
Sched Pattern: Schedule Pattern as defined by AOD.
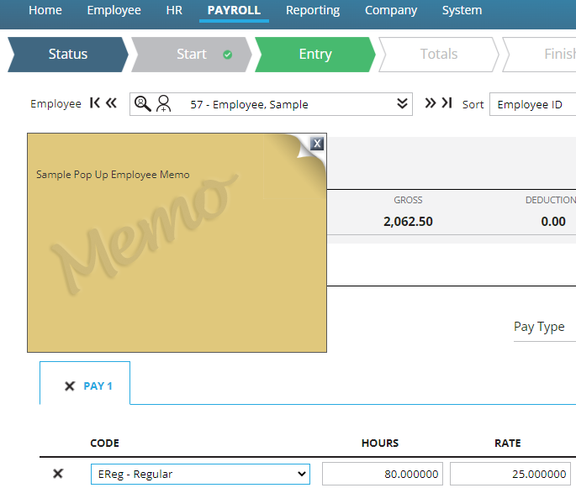
Employee Memo Section
Free Form text field for entering memo information about the employee.
There are no formatting or spell-checking options with this field.

Use the Check Box title "Popup in Pay Entry" to display the memo while working with the employee in Payroll.
Sample of Popup Memo in Payroll Section