Employee: Payroll Data | Deductions
The Deductions tab is found under the Payroll Data section in the Employee Module.
Use the Deductions tab to manage an employee's recurring deductions. Recurring indicates the deduction(s) occurs over a period of time and at scheduled intervals. Intervals can be every pay period, monthly, etc. One-time deductions MAY be setup here, but it is easier and faster to simply enter them while inputting payroll.
Working with the Deductions Tab
![]()
When accessing this tab, any active Deductions are displayed in the upper section of the tab. Select an entry in the top section to display the various fields that control how the deduction is calculated.
Tab Buttons
![]()
Show all Deductions: Use to display inactive deductions. A deduction is inactive if the current check date in the Payroll Module is before the Start Date or after the End Date of the individual deductions.
![]()
Add (*): Use to add a new deduction to the employee.
![]()
Save | Save/Add New | Cancel: These buttons become active when the process of adding a new deduction is initiated. Save: Saves the newly created deduction
Save/Add New: Saves the newly created deduction and moves the cursor initiates the addition on another deduction.
Cancel: Click the Cancel Button to undo the entry you are working on.
Delete Button
![]()
Delete an existing deduction from the tab. You can delete deductions that have already been used in payroll history. If a historical view of the employee's deductions in required, do not delete obsolete deductions. Use the End Date field to control when they are no longer used. Use the "Show all deductions" check box to display inactive deductions.
Adding a New Deduction
Click the Add Button to display the "Select Code to Continue" Box. Use the Drop List on the Code field to display a list of the active Deduction Codes setup at the Company Level. Company level deductions must be marked as Active to be included in the list of available deductions.
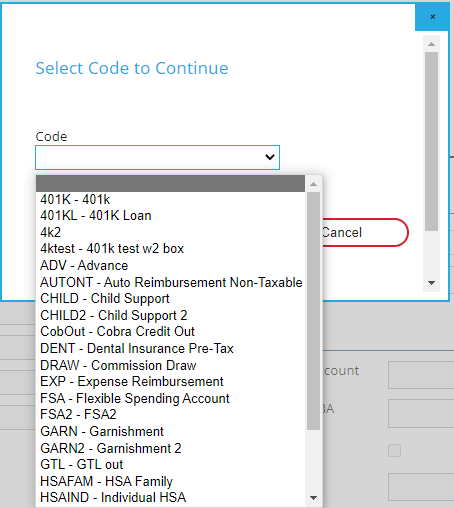
Select the appropriate code from the list. Select the Continue Button. The deduction is added to the employee.
Populate the various fileds on the Sub Tab as needed to have the deduction calculated properly.
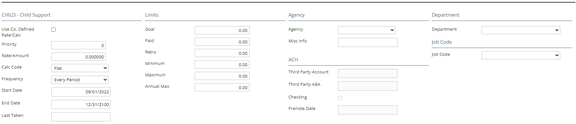
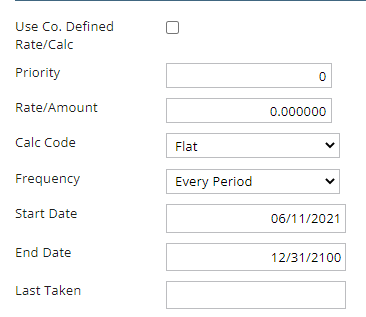
Use Company Defined Rate/Calc: Checking this box locks in the Company Level defaults of this deduction for the following fields: Calc Code, Rate/Amount, Frequency, Agency, Minimum, Maximum and YTD MAX. If those defaults are changed at the company level, the employee level deduction is changed as well. Note the following example.
Priority: Use this numeric field to override the order in which this deduction is taken in relation to other deductions set up on the employee. Deductions with a priority of 0 (zero) happen first while adhering to the rules in the following section called "Company Level Deduction Priority". A deduction with a Priority of 1 (one) happens after those with a 0 (zero) priority and before those with their priority set to 2, 3, 4, 5, etc.
Company Level Deduction Priority: This numeric only field is used to set the order in which deductions are taken on an employee's pay. The order deductions are taken is as follows:
If there are no pre-tax deductions on the company and all deductions have a priority of zero, the deductions occur in alphanumeric order based on the deduction code.
If any of the deduction codes have a Priority value, the deductions happen in Priority order.
If there are pre-tax deduction codes, those deductions occur first in alphanumeric deduction code order, Next, non pre-tax deductions occur in deduction code order.
Pre-tax deductions happen first (in priority order), even if they have a higher priority that a non pre-tax deduction.
Rate/Amount: The amount to be withheld for this deduction. This field may be left at zero if a Calc Code that calculates the deduction amount is used.
Calc Code: Optional. If appropriate, select and assign a Calc Code from the Drop List.

Company specific Calc Codes are housed in the Calc Codes section of both the Company Deductions and Earnings Tab. There are also System wide Calc Codes. These are housed in the Calc Codes option of the Misc tab under System > Setup. These Calc Codes are available to all company codes.
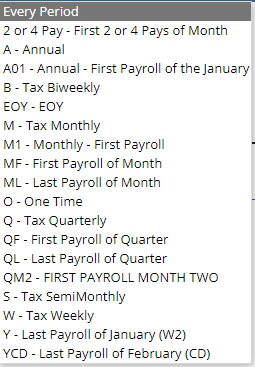
Frequency: If the deduction should occur every payroll, leave this field blank. Otherwise, use the options in the Drop List to assign the appropriate frequency. Do not use the single digit tax code Frequencies.
If setting up a One-Time deduction here, set the Frequency to O (One Time). DO NOT ENTER A LAST TAKEN DATE .
The presence of a Last Taken date indicates to the system that the One-Time deduction has already been taken.
Note: Setting up a One-Time deduction is much simpler if entered into the payroll grid for the employee.
Start Date: Star Date of the deduction. This field is automatically populated based on the settings for Employee Start Dates on the Master Company Setup > Defaults tab OR the settings in the Rate Effective Date Options section of the Master Company Setup > Pay Rate Options Tab.
End Date: End Date of the deduction. The system sets a default value of 12/31/2100 when the deduction is first added.
Retro:
Last Taken: This field is populated by the system as the deduction is taken during payroll. When first adding a deduction, it can be left blank in most cases. If the deduction has a Frequency, populate this field with the date that equals when it would have last been taken.
Limits Section

Goal: Wage garnishments often stipulate an amount owed. Enter that amount here.
Paid: If a Goal amount is present, the system will populate this field with the amount of the deduction. As more deductions occur, this field is updated with a running total of the deduction amounts. When the Paid Amount equals the Goal amount, the deduction automatically stops.
Retro: Amount that could not be collected during previous payrolls
Minimum: The minimum amount this deduction can be. Usually used in conjunction with a calc code.
Maximum: The maximum amount this deduction can be. Usually used in conjunction with a calc code.
Annual Max: The calendar year limit that can be taken for this deduction. DO NOT USE WITH THE VARIOUS RETIREMENT DEDUCTION TYPES . Those limits vary by year and are controlled by the software.
Agency Section

Agency: If needed, use the Drop List to select the appropriate agency to whom this deduction must be paid. The list of agencies is found on the Agencies Tab in Company Setup.
Misc. Info: This field is free form in use. It is most commonly used to record account number information for garnishments and child support deductions. if the deduction is attached to an agency payment, the data in this field is included on the check stub of the agency check.
ACH Section

The fields in this section are typically greyed out. They are used when the deduction is to be paid to a third party via ACH.
To make them accessible to the user, go to the specific Deduction Code on the Deductions Tab under Earnings & Deductions in the Company area. Check the box titled "EE Portion paid via ACH.
![]()
The fields are now available to be populated.

Third Party Account: Account Number of the Third Party's Bank Account.
Third Party ABA: Transit/ABA of the Third Party's Bank Account.
Checking: Leave checked if the third-party account is a checking account. Uncheck for savings accounts.
Prenote Date: Leave blank if you want this item to be prenoted. To force it to be live enter a back dated entry far enough in the past to satisfy the value in the Employee Prenote Days filed on the Defaults Tab in Master Company Setup.
Department Section

Use this area to charge the deduction to another location other than the employee's home location or to charge to a specific Job Code.
There can be five possible choices for overrides. These are based on the Organizational Levels found on the Departments Tab in Company Setup. Our sample company has one level called Department.

Note the display for a company with three organizational levels.

Each level will have a Drop List reflective of the entries for that level on the Departments Tab in Company Setup.

Job Code Section
If the client uses Job Costing, the employee deduction can be charged to a specific Job Code by using the Drop List available with the Job Code field.

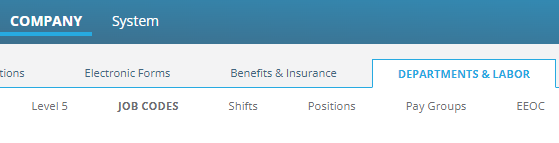
Job Codes are found on the Job Codes Tab under Departments & Labor section of Company.