Applicant Tracking Setup Guide
Applicant Tracking — A Service Bureau's guide to setup and configuration
This document has two main purposes. First, educate you on the steps required to set up ReadyPay Online to use the Applicant Tracking module. Second, how to configure a client company so that your end client may use the service. The intended audience is Service Bureau personnel.
Applicant Tracking setup and configuration
The Applicant Tracking module of ReadyPay Online gives you the ability to offer employers an easy-to-use way to keep track of job applicants. Setting up Applicant Tracking requires several steps. Applicants apply for jobs. Jobs are tied to positions within the company. Employers will often have standard questions that they want to ask applicants, and these questions may vary by job. The hiring workflow will need to be defined for each job and may vary by position. Applicant Tracking can be used in conjunction with the ReadyPay Online Onboarding module. Together, these modules let you offer your clients a full recruiting to hiring toolset.
This document will outline the steps you or your client must take (and the order in which they must be performed) to successfully use the Applicant Tracking module to post jobs that people can apply for.
Setup takes place on several pages in ReadyPay Online. You will generally work from one page to the next starting with the left-most page and moving right. On each individual page you will generally work from the top to bottom of each page.
All steps are required unless otherwise marked as optional. You should read this document in its entirety before planning how your service bureau will offer Applicant Tracking.
General navigation and icons
| Icon | Meaning |
|---|---|
| Underlined items, like an employee's name, are links. Clicking on a link takes you to a different area of the system. The down-arrow in a box indicates a drop-down list of values is available for this field. Click on the drop-down arrow to see your selections. An empty box indicates a field that you can type in your own values. Click in the box to enter or edit a value in it. | |
 | Checkboxes indicate a value is selected (checked) or not selected (unchecked). N.B.: Some checkboxes are read-only and will be shown "grayed out". Boxes with words in them are "buttons". Click on buttons to perform the action listed. This Add button is inactive. Inactive buttons will appear "grayed out" and do not allow you to click on them to perform the action listed. Lists that contain multiple items may display a red or black "X" next to each item in the list. Click on the "X" to delete an item. |
| Lists that contain multiple items may display a disc icon next to each item in the list. When you make a change to one of the items in the list, click the disc icon to save that change. Click the envelope icon to have the system send an email to the listed email address. Click on the Information Bubble to get help information on the field. |
API Server Setup
Applicant Tracking requires you to install and configure the RPO API Authentication Server and API Authorization server. These components are usually installed and configured on your ReadyPay Online web server. The API setup must be completed before any client company can be configured to use the Applicant Tracking module.
Use this link to access setup instructions for your API Server Setup:
Prepare the company to use Applicant Tracking
For the remainder of this document, ReadyPay Online will be referred to as RPO.
This section defines the steps to configure a company to use the Applicant Tracking module. All the steps below are required unless otherwise marked as optional.
Add the ApplicantTracking service
The Applicant Tracking pages that you will use to configure the service are enabled by adding the ApplicantTracking service to the company.
- Navigate to the Status & Services page under Company > Master Company Setup.
- Click the Add button.
- In the Service dropdown, select the ApplicantTracking service.
- In the Service Level dropdown, select Full. a. You can use the service level of "Setup" if you want to complete the setup portion of Applicant Tracking before your clients are able to see the Applicant Tracking screens.
- The Start Date field will be prepopulated with today's date. Change the Start Date if you want. a. The Start Date must be on or before the company's current check date in order for the Applicant Tracking service to be active.
- The End Date field will be prepopulated with 12/31/2100. We recommend you leave this date as-is.
- Click the "Save" button when done.
Add information about the company
There are several pieces of information about your client's company that they can display to all job applicants. Gather and enter this information before you start configuring a client company's Applicant Tracking module. This information can either be entered by the Service Bureau, or the End Client. The information covered in this section is located within the Demographics, Media, and Social Media pages of the company (see Fig. 1).

Fig. 1
Company Bio (optional)
These items are found below the Demographic information for the company you have selected in RPO.
The Demographics page has 3 sections: Demographics, About [company name], and Industry(s).
By default, the Company Career Posting page and Job Posting page display the Company Name and Company Address from the Demographics page. You may override the address by adding a Company Address record with the address type "AppTracking". Adding an address record must be done in ReadyPay.

Fig. 2
Use the >> to the left of About or Industry(s) to expand or collapse those sections.
The "About" section on the Demographics page is where you or your client can store a company Bio that will appear in all job postings. Use the Full Bio section (Fig. 4) for this purpose. The Full Bio has a 10,000-character limit. Extra formatting (Bold, underline, italics) will count towards the 10,000-character maximum.
The Brief Bio is not used in Applicant Tracking.
![]()
Fig. 3
Each button (Fig. 3) toggles that format on or off. For example, if you want to underline some of the Bio, you can do one of the following:
- Click the U to turn underline on, type what you want underlined, click the U to turn the underline off.
- Select text you have already typed, click the U to underline the selected text.
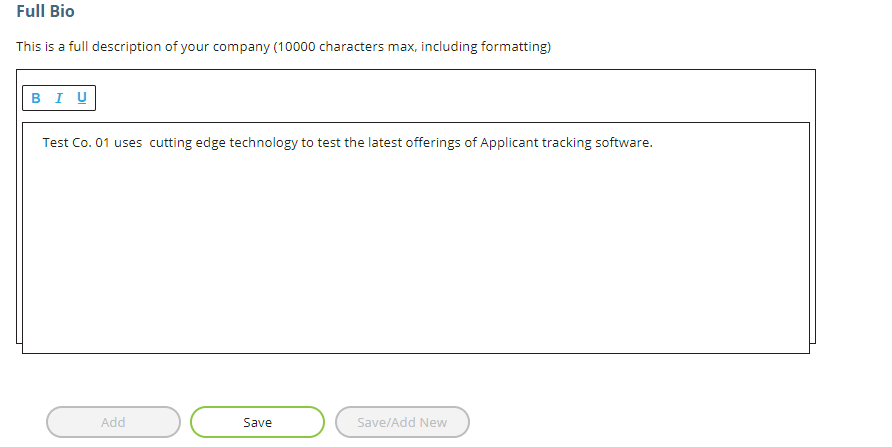
Fig. 4
- Type the text you want in the area underneath the formatting bar.
- Click the Save button to save your Bio.
The Bio is a company-wide setting that will be shown on all job postings. Anytime you change a Bio, the new verbiage is immediately and automatically shown on all job postings.
Logo file for the company (optional)
The Media page (Fig. 5 and 6) allows you to upload a logo that will be displayed at the top of every job posting.
The recommended logo size is 600 x 350 pixels (width x height).
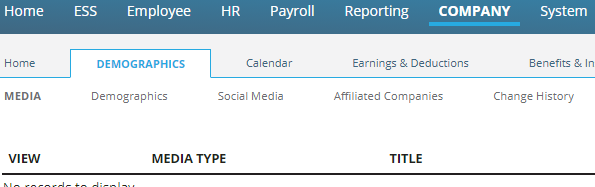
Fig. 5
- Click the Add button.
- Select Application Logo option from the Media Type dropdown.

Fig. 6
- Enter a Title and brief Description for the logo.
- Click the Choose File button to select a file to upload.
- Click the Save button.
The media types of logo and photo are used on the Company Posting page, which is discussed at the end of the document.
Social Media links (optional)
The Social Media page (Fig. 7) lets you build a list of social media links using the predefined list of Social Media Sites.
To Add a new site:
- Use the Social Media Site dropdown to select which site to use.
- Enter a full website URL for the company.
- Click the Save button.
To Update the URL of an existing entry:
- Edit the value of the URL field.
- Click the disc icon to the right of the Url to save the change.
- To Delete an existing entry, click the "X" next to the item you want to delete.

Fig. 7
Social Media links are a company-wide setting that will be shown on all job postings. Anytime you change the Social Media information, the new information is immediately and automatically shown on all job applications.
Define contacts for your company
There are two types of contacts used with Applicant Tracking. Interviewer, which is required and ATContact, which is optional. You must define at least one Interviewer for the company. Interviewers become an applicant's point of contact when they are scheduled for an interview. Optionally, you can define an ATContact. This type of contact gets notified when someone submits an application. The same person can be marked as both types of contacts.
Use the Company Contacts page (Fig. 8) under the Master Company Setup section in Company > Home to define your contact(s).

Fig. 8
Add a contact:
- Click the Add button at the bottom of the page.
- The following fields on the Contact Info sub-tab are required: a. First Name b. Last Name c. Contact Type d. Email Address e. Active checkbox must be checked.
- Use the Attributes sub-tab to establish the contact as an Interviewer by: a. Entering the number 1 in the Custom Field 1 to the right of the "Interviewer" Attribute. b. Click the checkmark to the left of "Interviewer" to save the entry.
- Use the Attributes sub-tab (Fig. 9) to establish the contact as an ATContact by: a. Entering the number 1 in the Custom Field 1 to the right of the "ATContact" Attribute. b. Click the checkmark to the left of "ATContact" to save the entry.
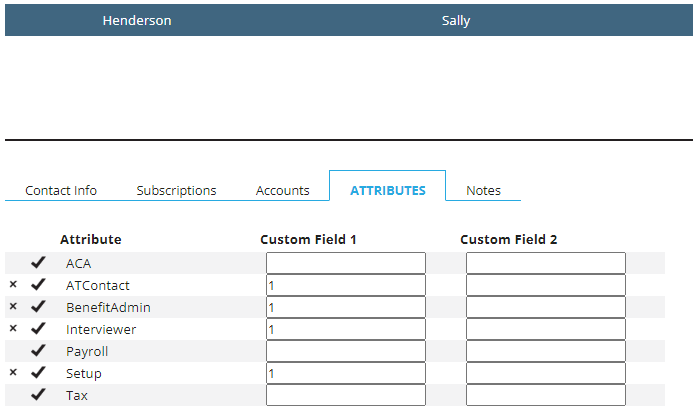
Fig. 9
Use the X to the left of either checkmark to cancel the user from being an Interviewer or ATContact.
Configure company positions
Job postings are tied to positions within the company. You must add and configure your positions on the Positions page (Fig. 10) in Company > Company Setup > Departments & Labor.

Fig. 10
Within each position, there are 3 sub-tabs that contain information on the position: Edit Position, Description/Requirements, Depts (Fig. 11).

Fig. 11
Position information can be used for purposes other than Applicant Tracking. The fields covered in this section are the ones that are used in Applicant Tracking.
Positions that have been used in Applicant Tracking can only be made inactive. Furthermore, you must close all open Job Postings that use a Position before you can make the Position inactive.
Edit Position fields
Position: This field is for the position code and can store a maximum of 20 characters. It will be used when posting open jobs by the employer. The Position will be shown at the top of the job posting as the first line under the "Job Title" heading.
Title (optional): This field is used for the full job title and can store a maximum of 50 characters. It will be shown on the job posting as the second line under the "Job Title" heading.
Active?: Use this checkbox to make the position active. Only Active jobs are available for job postings.
Available for Applicant Tracking?: Use this checkbox to make the position available for Applicant Tracking. Positions must be Active and Available for Applicant Tracking before they can be used to create a job posting.
Description: Use this field to add a short description of the position. This description is shown when creating a job posting.
Description/Requirements fields
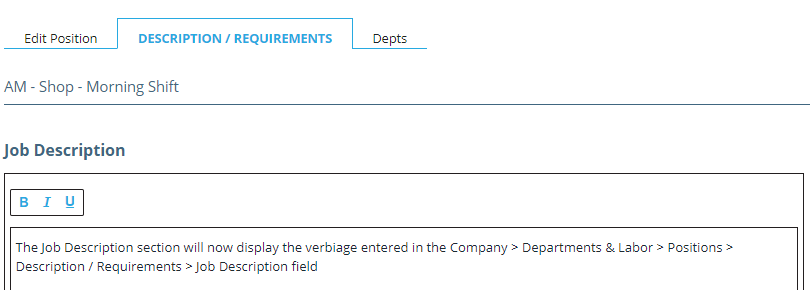
Fig. 12
Job Description (optional): This field (Fig. 12) is used to store the job description, up to 7000 characters. Formatting options (Bold, Italics, Underline) count towards the 7000-character limit. For example, a long job description that makes frequent use of different types of text formatting may only let you use 5000 characters.
The Job Description section (Fig. 13) is the second section of the job posting that an applicant sees. It appears under the company information and job title.
Job Requirements (optional):

Fig. 13
This field is used to store the job requirements. The character limit and formatting options are the same as the Job Description field.
The Job Requirements section is the third section of the job posting that an applicant sees. It appears under the Job Description section.
Even though both fields are optional, the Job Description and Job Requirements section headers are always displayed on the job application.
Depts (optional):

Fig. 14
Use the Depts tab (Fig. 14) to associate the Job with the appropriate cost center for the client.
Configure Applicant Tracking
The previous section of this guide concentrated on the steps required to get the company ready for Applicant Tracking. In this section, we will concentrate on configuring the Applicant Tracking module itself. Once the Applicant Tracking module has been configured for the company, you will be able to begin posting jobs for applicants to respond to. Click on Applicant Tracking Setup (outlined in green in Fig. 15) to get started.
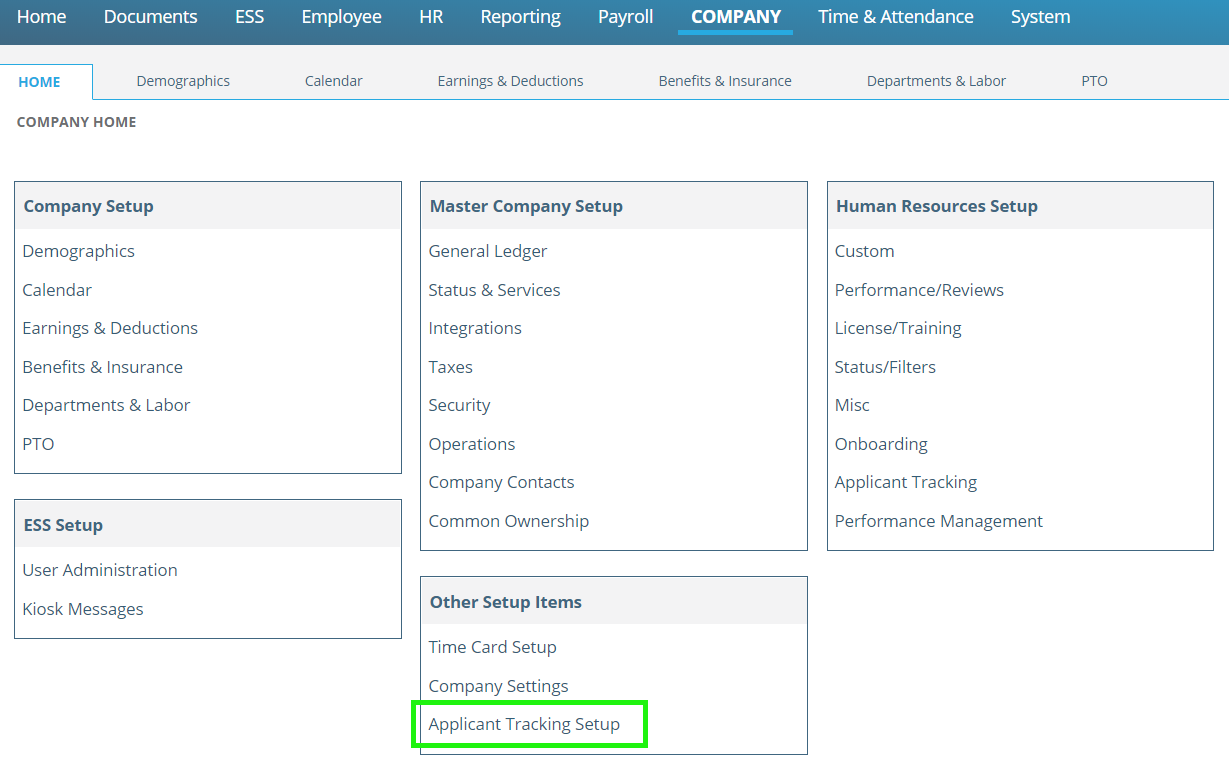
Fig. 15
Applicant Tracking Setup consists of 5 screens. You will use these sections to define:
- Steps for applying for a job through to hiring or rejecting an applicant.
- The questions you want to ask applicants.
- Templates for job postings.
- Email templates for notifying applicants.
Company Applicant Tracking Setup
Use this page (Fig. 16) to define the workflow from application submission through rejecting or hiring a candidate. This page has 3 sections: General Setup, Application Events, Application Rejection Reasons. The options on this page apply to all job postings within a company. Use the >> to open each section.
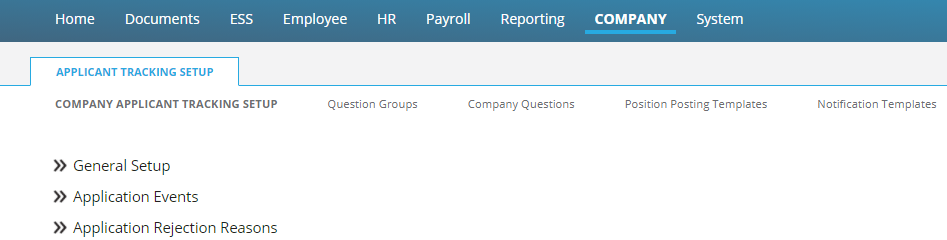
Fig. 16
General Setup
Use this section (Fig. 17) to define the number of years you want to retain each application. Some states mandate how long employers must retain applications. You may leave the Retention Period Years set to '0' to keep the applications for an indefinite period.

Fig. 17
Application Events
Use this section (Fig. 18) to define the company's application workflow. Application events are steps that the employer takes in the application process from application to rejection or on-boarding. Application events are not visible to job applicants.
Add an Application Event:

Fig. 18
- Click the Add button within the Application Event section.
- Enter an Event Code (up to 20 characters). The Event Code should be meaningful to the company.
- At a minimum, every company must have the following three event codes. Adding the ApplicantTracking service automatically adds the codes for a. and b. a. An Event Code that uses the Base Event Code "Started". This denotes that an application has been started by an applicant. b. An Event Code that uses the Base Event Code "Submitted". This denotes that an application has been submitted by an applicant. c. An Event Code spelled "Accepted" that uses the Base Event Code "Offer". This denotes an applicant who has accepted a job offer.
- Enter a Description (up to 200 characters). This is the description for the Event Code.
- Select an Event Base Code from the drop down list (Fig. 19). The Event Base Code provides a standard list of event types that you use to associate to the custom created Event Code.

Fig. 19
- Sequence (optional) is a numeric field that lets you define the order of events. The numbers should sequential. For example, Application Started could have a Sequence of 1. Application Submitted could have a Sequence of 2. Application Review could have a Sequence of 3.
- Required? (optional) lets you define whether the event is required. For example, Application Submitted would usually be required. Reject Candidate would usually not be required. This is reserved for future use.
- Click the Save or Save/Add New as applicable button within the Application Event section.
Application Events, once saved, cannot be edited. If you need to redo one, you must delete and re-add it.
Delete an Application Event:
- Click to select an Event Code.
- Click the Delete button within the Application Event section.
Application Rejection Reasons
This section is used to define reasons for rejecting applicants. This information can be used for internal reporting purposes. Rejection reasons are not displayed to applicants.
Add an Application Rejection Reason:
- Click the Add button within the Application Rejection Reasons section.

Fig. 20
- Enter a Rejection Code (up to 20 characters). The Rejection Code should be meaningful to the company.
- Enter a Description (up to 200 characters). This is the description for the Rejection Code.
- Select a Rejection Base Code from the drop list (Fig. 21). The Rejection Base Code provides a standard list of rejection types that you use to associate to the custom created Rejection Code.

Fig. 21
- Click the Save button within the Application Rejection Reasons section.
Edit an Application Rejection Reason:
- Click to select a Rejection Code.
- Update one or more of the 3 fields.
- Click the Save button within the Application Rejection Reasons section to save your change.
Delete an Application Rejection Reason:
- Click to select a Rejection Code.
- Click the Delete button within the Application Rejection Reasons section.
The Undo button can be used to undo an unsaved change when you are adding or editing a Rejection Reason.
Question Groups
Employers will have standard questions that they want to ask applicants. Questions can be company or position specific. Question groups (Fig. 22 and 23) are a way to group questions when the employer needs another option. A minimum of one Question Group is required and can be associated with all Company Questions.

Fig. 22
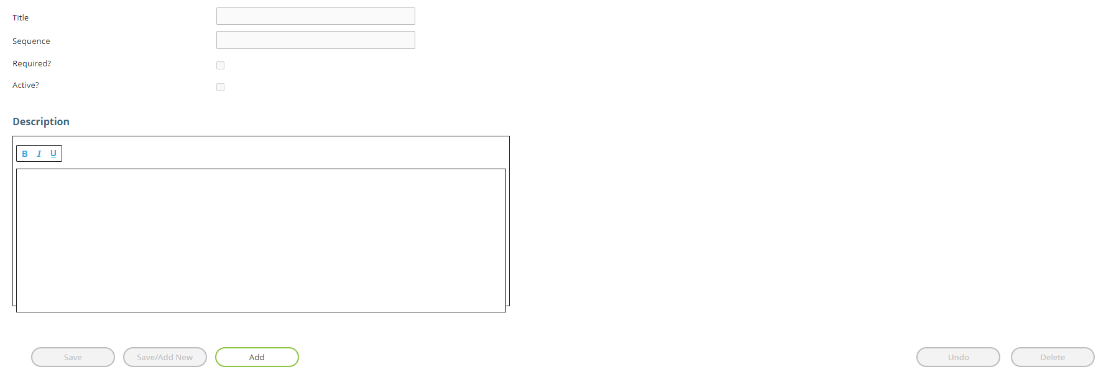
Fig. 23
Adding a Question Group:
- Click the Add button.
- Enter a Title. Your first Question Group should be called "Default Group". a. You will select from a list of Question Groups later in this document when you define Company Questions. Titles can be up to 200 characters, but we recommend you keep them 30 characters or less, so they fit within the dropdown in Company Questions.
- Enter a number in the Sequence field. Your first Question Group must have a Sequence of negative one (i.e., -1).
- Check the Required? checkbox for your first Question Group. a. Additional Question Groups do not have to be required.
- Check the Active? Checkbox for your first Question Group. a. Additional Question Groups do not have to be active.
- Enter a Description. a. The Description field is not currently used outside of the Question Groups page.
- Click the Save button.
Edit a Question Group:
- Click to select a Question Group.
- Update one or more of the 5 fields.
- Click the Save button to save your change.
Delete a Question Group:
- Click to select a Question Group.
- Click the Delete button.
The Undo button can be used to undo an unsaved change when you are adding or editing a Question Group.
Company Questions
The Company Questions page (Fig. 24) allows you to define the standard questions that the employer wants to ask during the application process.
Questions can be:
- For all positions, certain positions, or associated with specific question groups.
- Open response text, date driven, select one or more options from a list.
- Conditional on the response of another question.
- Active or Inactive.
- Required or not required.
The Company Questions screen is divided in two sections. The top section contains the list of questions set up on the company and gives you options to filter the list (Fig. 24). The filter fields are explained below.
The bottom section (Fig. 25) is used to add new questions or view and edit the details of the question selected in the top section.
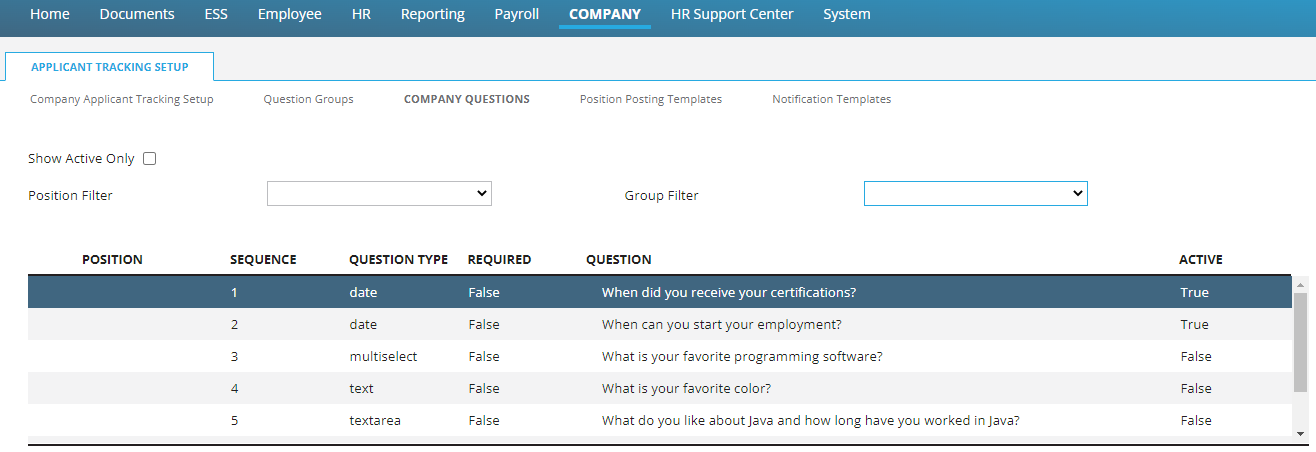
Fig. 24
Show Active Only: This checkbox is used to show or hide inactive questions. By default, all questions are shown (i.e., checkbox is unchecked).
Position Filter: Allows you to filter the Question list to only those pertaining to a specific position. Positions are found in Company > Departments & Labor > Positions.
Group Filter: Allows you to filter the Question list on specific Question Group. Question Groups are found in Company > Applicant Tracking Setup > Question Groups.
Question list: This area shows your list of questions and some basic details about each question. The Position column will show the position code for those questions that pertain to specific positions. Questions that pertain to all positions will show nothing in the Position column.

Fig. 25
Position: Select the option "—Available to all positions —" to make a question available to all positions.
Group: This dropdown is populated by the Question Group(s). See the section on Question Groups for more information.
Type: This dropdown lets you specify the type of answer the applicant must give. The options are:
- Date Field — The applicant needs to enter or choose a date.
- Multi-select Dropdown — The applicant will be provided with a dropdown list of Question Choices. They may select one or more of the choices given.
- Dropdown List — The applicant will be provided with a dropdown list of Question Choices. They may select only one of the choices given.
- Single-line Text — The question expects a short, open response, answer. The applicant is given one line of text to provide their answer.
- Multi-Line Text — The question expects a long, open response, answer. The applicant is given a larger text area to provide their answer.
Required?: The checkbox is used to mark a question as required. Do not mark conditional questions as required.
Conditional?: The checkbox is used for questions which are conditional based on how an applicant answered another question. For example, an employer may ask the applicant for permission to conduct a background check. Applicants that answer "Yes" can then be provided with another question asking for their SSN. The question that asks for the applicant's SSN is conditional, and this checkbox would be checked. Conditional questions require you to also select the Primary Question and Primary Answer that would trigger the system to ask the conditional question. Primary Questions need to have a Type of Dropdown List or Multi-select Dropdown.
Applicants that answer "No" to the background check would not see the question asking for their SSN.
Primary Question: This field is only required with conditional questions. Using the Conditional example above, the question that asks the applicant for their SSN would have the question asking for permission to conduct a background check as the Primary Question.
Primary Question Value: This field is only required with conditional questions. Using the Conditional example above, the question that asks the applicant for their SSN would have the answer to the Primary Question be "Yes".
Knockout: Indicates if this question is a knockout question that will disqualify an applicant.
Knockout Answer Value: The answer that will determine if the applicant is to be disqualified. If the applicant's answer to the Knockout Question matches the Knockout Answer Value, the application will be rejected, and the status code set to the value in this field.
Knockout Status: The status code to set on a disqualified applicant. This is usually "rejected".
Active?: Indicates whether the question is active or not. Only Active questions can be used on new Position Posting Templates and Job Postings. Questions that are not Active are retained for historical recordkeeping. Inactive questions will continue to show on the Position Posting Templates, Job Postings, and submitted Applications that used them before the question was made inactive.
Question: This field accepts up to 2000 characters. As in other areas of Applicant Tracking, this field provides Word Processor font style formatting options. Formatting options add extra characters, and count towards the 2000-character limit. This field becomes read-only once the question is assigned to one or more job postings.
Question Choices: This section (Fig. 26) is displayed only when either the question Types Dropdown List or Multi-select Dropdown are selected.

Fig. 26
One blank Option Value and Option Display Text fields are included at the bottom of the grid for you to add new values. There are Save and Delete icons next to each value you add, which let you edit or delete individual values.
Adding a Question:
- Click the Add button.
- Complete all the required fields, and any applicable optional fields. a. Add and save individual values on the Question Choices grid for question Types of Dropdown List and Multi-select Dropdown.
- Click the Save button at the bottom of the page.
Edit a Question:
- Click to select a Question.
- Update one or more of the 11 fields. a. Use the individual Save/Delete buttons on the Question Choices grid when you Add/Edit/Delete individual values for question Types of Dropdown List and Multi-select Dropdown.
- Click the Save button at the bottom of the page.
Delete a Question:
- Click to select a Question Group.
- Click the Delete button.
- The Undo button can be used to undo an unsaved change when you are adding or editing a Question.
- Once a question has been used in a Position Posting Templates or Job Posting, it becomes read-only. It cannot be modified or deleted. The purpose of this behavior is to retain historical application information.
Samples of Questions as seen by the applicant
Fig. 27 shows a Multi-select Dropdown question. If applicant answers Yes, the section for which additional languages do you speak is displayed.

Fig. 27
Fig. 28 shows a Dropdown List question. Applicant clicks Select to see a list of the available answers.

Fig. 28
Before going live with the Application questions, be sure to thoroughly review them for spelling and/or grammatical errors.
Once a question has been used in the application process, whether the application is still active or not, the question cannot be changed. If the question was asked on an application and that application is closed, that question cannot be changed. If an applicant opens said previous application, they will still see the original question asked. The only time any application will see different questions is when they apply for a new job and the company has added new questions to that application.
Position Posting Templates
The Position Posting Templates page (Fig. 29) is where you bring together most of what you have configured so far. On this page you will select a position, give the template a version date, tie informational Sections to the Position Posting Template, and decide which Application Events to use. Position Posting Templates control what is and is not included when you post the job application. You can add new Position Posting Templates and view existing ones. You cannot edit or delete an existing template.
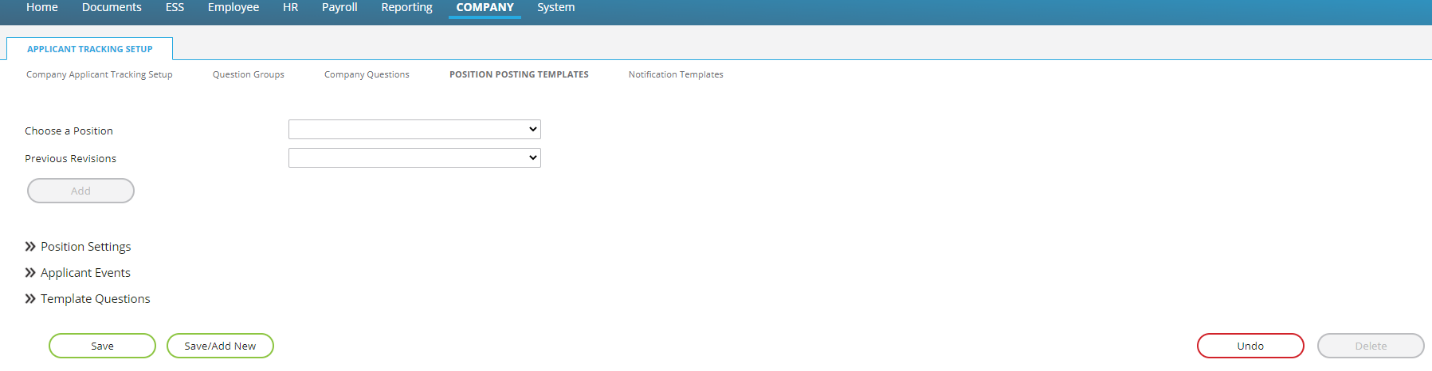
Fig. 29
Add a Position Posting Template:
- Select a position from the Choose a Position dropdown. a. (optional) If you have previously created a template for this position, you can select a version from the Previous Revisions dropdown. Doing so will populate the rest of the fields on this page with the settings you previously used. You can then modify the settings as needed.
- Click the Add button at the top of the page.
- Go to the Version Date field. Click in the field and select the Version date from the calendar. It will be prepopulated with today's date. You can change it if you wish.
- Leave the Editable when posting checkbox unchecked. It is reserved for future use.
- The Keyword List and Skills List are reserved for future use.
- Go to the area called Sections (Fig. 30).

Fig. 30
- Choose the Sections that you want to include and require with the position's job posting. a. Include EEO/AA/OFCCP Compliance Questions can be displayed. These questions will only be displayed to an applicant once a job offer has been made to them. This section cannot be made a required section because employers cannot require employees to answer these questions. b. Employment History, Education History, Documents, and References are all pre-defined Sections in RPO and cannot be modified. c. The Questions section will include/require any Company Questions that you made available to the position. d. Add checkmarks in the Display column next to each Section you want to be included in the job application when you post the job for the position. e. Add checkmarks in the Required column next to each Section you want to be required when you post the job for the position.
- Go to the area called Application Events (Fig. 31).

Fig. 31
a. Choose which Application Events that you want to include and require with the position's job posting. Event Codes are found in Company > Applicant Tracking Setup > Company Applicant Tracking Setup. b. All the Application Events you previously defined will be available on this list. c. Add checkmarks in the Include? column next to each Application Event you want to be included for use with the job application when you post the job for the position. d. Add checkmarks in the Required column next to each Application Event you want to be required for use with the job application when you post the job for the position. 9. Go to the area called Template Questions (Fig. 32).

Fig. 32
Displayed is a list of questions available to this position.
a. Review each question. b. Adjust the settings for "Include?" and "Required?" as needed. 10. Click the Save or Save/Add New button as appropriate.
The page will initially display questions from the Default Group, which are defined on the Question Groups tab. Use the scroll bar to the right of the screen to view additional questions for this job.
View an existing Position Posting Template:
- Select a position from the Choose a Position dropdown.
- Select a version from the Previous Revisions dropdown.
- Scroll down the rest of the page to view the existing settings.
- If modifications are needed, use the following instructions.
Create a new version of an existing Position Posting Template:
- Select a position from the Choose a Position dropdown.
- Select a version from the Previous Revisions dropdown.
- Click the Add button. The Previous Versions field is set to blank.
- Enter a Version Date for the new version.
- Scroll down the rest of the page to view/adjust the existing settings as needed.
- Click Save. This creates a new version of the Position Posting Template.
The Undo button can be used to undo an unsaved change when you are adding or editing a Position Posting Template.
Notification Templates
Notification Templates are used to send email messages and calendar invitations to job applicants at various steps within the application process. Notification Templates work with Application Events to send messages to job applicants as they are moved from one Application Event status to another.
Fig. 33 outlines how each Notification Type relates to the Application Event Base Code.
| When I use an Application Event that has an Event Base Code of: | Applicant Tracking will use a Notification that has a Notification Type of: |
|---|---|
| Interview — Interview | Interview Request |
| Marked Candidate — Marked Candidate | Message |
| Offer — Offer Made | Job Offer |
| Other — Other | Message |
| Prep Onboarding — Prepare for Onboarding | Onboarding |
| Rejected — Application Rejected | Rejection |
| Review — Review | Message |
| Started — Application Started | Message |
| Submitted — Application Submitted | Message |
Fig. 33
The Notification Templates page (Fig. 34) is divided into two halves. The top half of the page contains the list of Notification Templates. The bottom half of the page contains details about the selected template.
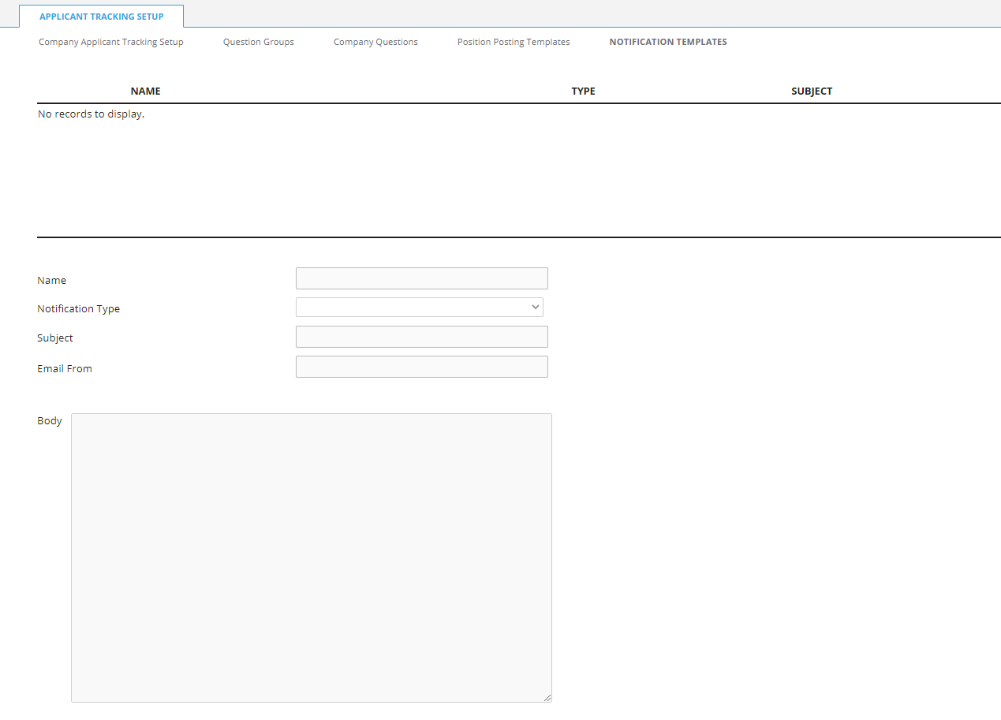
Fig. 34
Add a Notification Template:
- Click the Add button at the bottom of the page.
- Enter a Name for the notification. Names can be up to 200 characters, but we recommend you keep them 30 characters or less, so they fit within the dropdown on the Applicant Tracking Dashboard.
- Select a Notification Type from the dropdown.
- Enter a Subject (up to 200 characters).
- The Email From field lets you use an email address of the employer's choosing. This is a Required Field.
- The Body field is where you create the message body.
a. This field supports variables that allow you to create a general
message that will then be customized when sent. Unless otherwise
specified below, the values for each variable are set during the
Applicant Tracking configuration. The available variables are:
i.
{APPLICANT_NAME}ii.{COMPANY_ADDRESS}iii.{COMPANY_NAME}iv.{COMPANY_PHONE}v.{INTERVIEW_DATE}— The Interview Date is pulled from the location field on the Schedule Interview form that pops up when you change an applicant's status. vi.{INTERVIEW_LOCATION}— The location is pulled from the location field on the Schedule Interview form that pops up when you change an applicant's status. vii.{INTERVIEWER_NAME}viii.{INTERVIEW_TIME_BEGIN}— The Interview Begin Time is pulled from the location field on the Schedule Interview form that pops up when you change an applicant's status. ix.{INTERVIEW_TIME_END}— The Interview End Time is pulled from the location field on the Schedule Interview form that pops up when you change an applicant's status. x.{INTERVIEW_TIME_ZONE}— Required when using the Time Zone field with Interview Requests (added in RPO 1.26.2.1). When not used, the time zone of Interview Requests will be the same as the RPO web server's time zone. xi.{JOB_TITLE}xii.{RATE}xiii.{SALARY}xiv.{SENDER_NAME}b. This field accepts up to 8000 characters. As in other areas of Applicant Tracking, this field provides Word Processor style formatting options. Formatting options add extra characters, and count towards the 8000-character limit. - Click the Save button.
The Interview variables are only applicable to the Interview Request notification type.
Edit a Notification Template:
- Click a Notification Template in the list.
- Edit the fields as needed.
- Click the Save button at the bottom of the page.
Delete a Notification Template:
- Click a Notification Template in the list.
- Click the Delete button.
The Undo button can be used to undo an unsaved change when you are adding or editing a Notification Template.
Posting jobs and working with job applications
The previous section of this guide concentrated on the steps required for the setup for Applicant Tracking within the company. This section will focus on using Applicant Tracking to:
- Post jobs
- Work with Job Applications and Job Applicants
The Post New Job and Applicant Tracking pages used in this section are in the Applicant Tracking area under Human Resources Setup (outlined in green in Fig. 35).
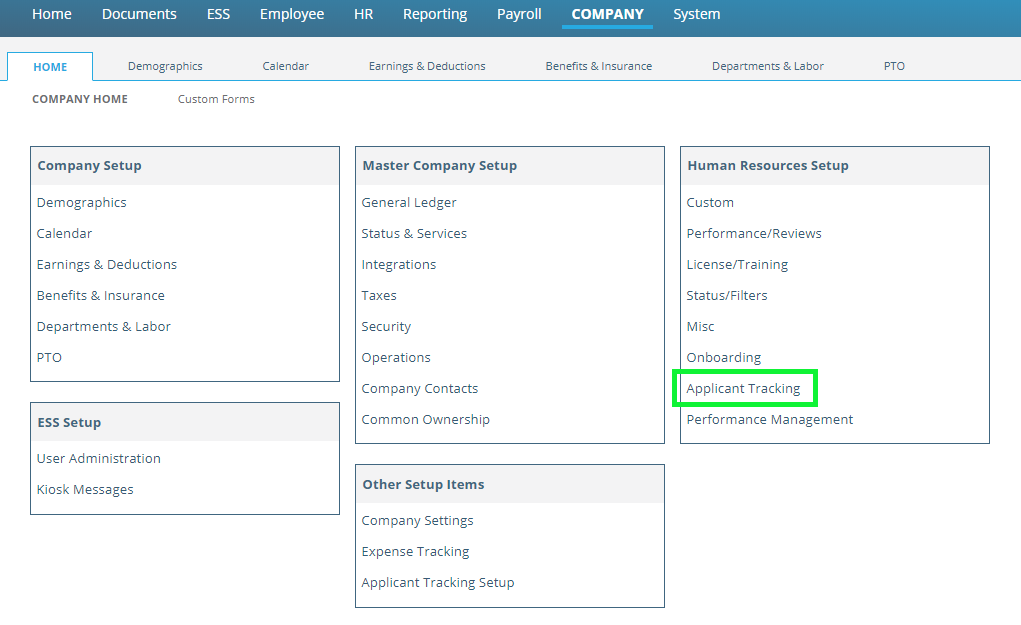
Fig. 35
Post Job
The Post Job page (Fig. 36) is found in Company Setup > Human Resources Setup > Applicant Tracking > Post New Job tab. This is where you create a new Job Posting. Post Job uses the Position(s) from Company > Departments & Labor > Positions tab and the Position Template(s) found the Configure Applicant Tracking section.
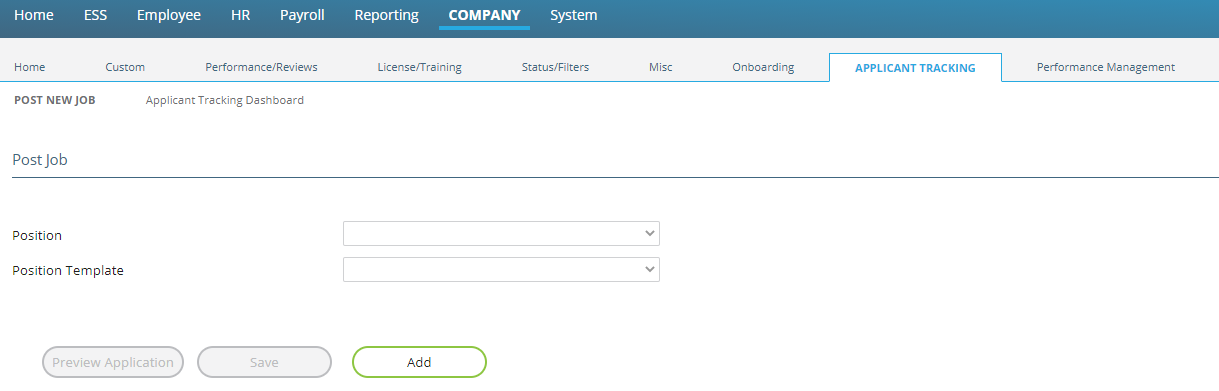
Fig. 36
Adding a Job Posting:
- Click the Add button. The Preview Application and Save buttons become active.
- Select a Position from the dropdown.
- Position will be filled with the Position Code and Position Title from the Position.
- Select a Position Template from the dropdown.
- The Position Listing Detail section will be displayed.
- Enter a Posting End Date. a. :::note You do not need to enter a Start Date for Job Postings. ReadyPay Online will automatically set the start date to the date the posting is created. :::
- The remaining data on the screen is populated from the Position Template you selected.
- Verify the rest of the information is correct. a. If the information is not correct, you must go back through this section and create a new job posting. This most likely means creating a new Position template.
- Preview Application (optional) can be used to look at the layout of your job posting. If the layout is not to your liking, you can go back and create a new template with a different layout. a. The Preview Application page uses a smaller font and section separator bars than what a Job Applicant sees. This was done to conserve space in the preview window.
- Click the Save button.
The Undo button can be used to undo an unsaved change when you are adding a job posting.
Applicant Tracking Dashboard
Once one or more jobs have been posted, the employer can use the Applicant Tracking dashboard (Fig. 37) to view and work with the posted jobs and the applicants for those jobs. The Applicant Tracking Dashboard provides dashboards for Jobs, Applicants, and a link back to the Post Job page (i.e., Add Job).
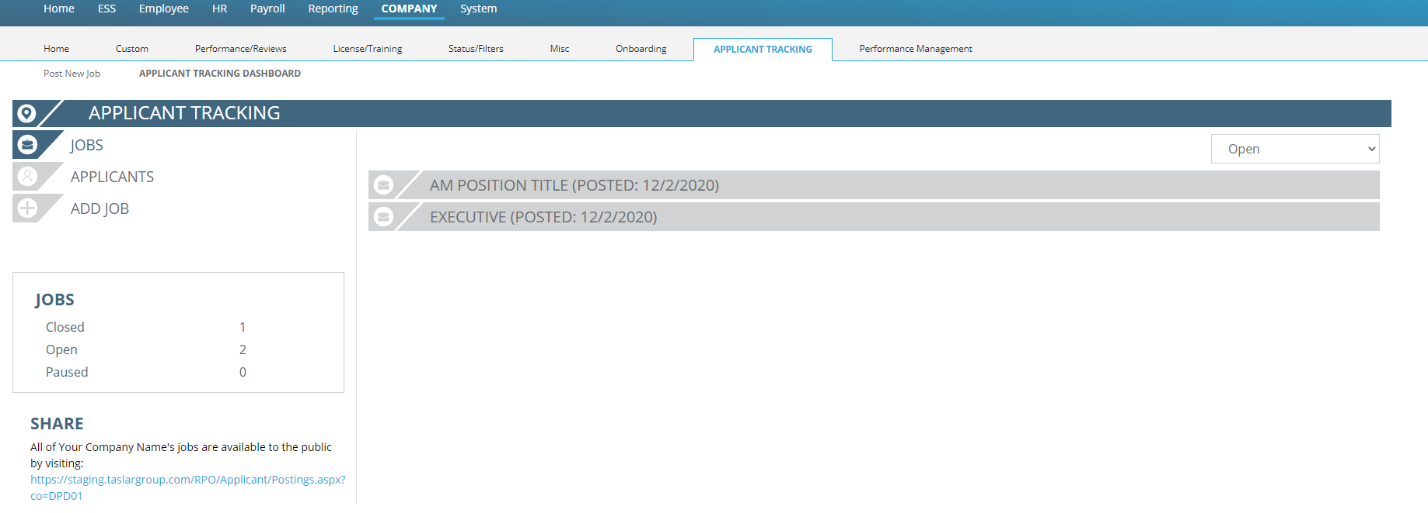
Fig. 37
There is a Jobs Recap on the left of the Applicant Tracking Dashboard (Fig. 38).

Fig. 38
Below the Jobs Recap, there is a section called Share (Fig. 39). The "Share" link provides a page that can be used in lieu of the "Careers" section of an employer's website. Meaning, it shows all jobs currently available for the company. You access the page from the link provided in the section (Fig. 40).

Fig. 39
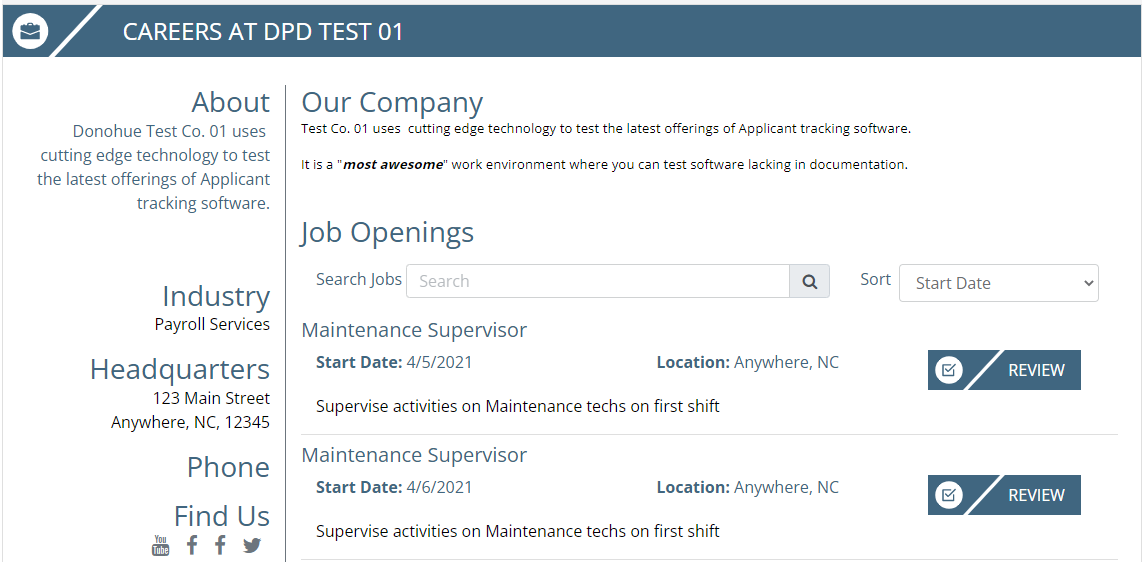
Fig. 40
A button to apply for each job is provided.
Jobs Dashboard
Click on "Jobs" (Fig. 41) to open the Jobs dashboard. All open jobs will be displayed by default.
![]()
Fig. 41
Use the dropdown in the upper right-hand corner of the page (Fig. 42) to filter the jobs shown to either Open or Closed jobs.

Fig. 42
The first job in the list will automatically expand to show all 4 sections. You can click on each job posting banner (Fig. 43) to expand or collapse the details that each job. Each of the 4 sections is explained below.
![]()
Fig. 43
Job Posting section
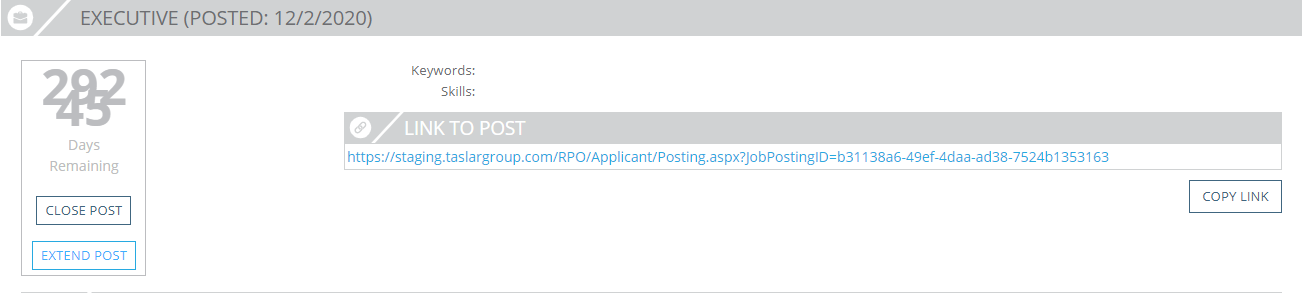
Fig. 44
The Job Posting section (Fig. 44) provides access to:
- The Job Description as entered on the Post Job page and when the job was posted.
- Number of days the post is still open.
- Option to Close Post if you want to close the job posting immediately.
- Option to Extend Post if you want to change the Posting End Date.
- Closed posts give you the option to Copy Post with a new Posting Start Date and Posting End Date.
- Keywords and Skills. These are reserved for future use.
- A link to the job posting with a Copy Link button (Fig. 45).

Fig. 45
- Employers can use the provided URL in the Careers section of their website, or any job board they wish (e.g. Glassdoor, Indeed, etc.). The URL will direct job applicants to ReadyPay Online to create an account and apply for the job.
Scheduled Interview(s) section
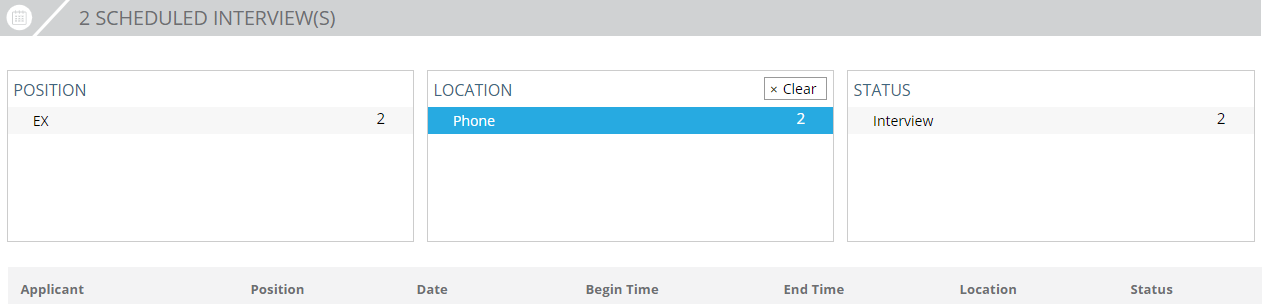
Fig. 46
This section shows:
- The number of interviews scheduled for the posting. This section is populated with applicants whose status is tied to an Application Event Code of "Interview — Interview".
- Three filter boxes for Position, Location, and Status. You can click
entries in any of the boxes shown in this section to filter the list of
applicants. For example, click on "Phone" in the Location box to show
only the relevant applicants in the list.
- Click on the Clear button to clear your selection.
- A list of job applicants who meet the status and filter criteria.
Details of each Applicant
Click on an applicant's name and the dialogue box shown in Fig. 47 appears.

Fig. 47
From here, you can:
- Change the applicant's status.
- Send the applicant a message.
- Resend the original email.
- Reschedule an interview.
Job Offer(s) section
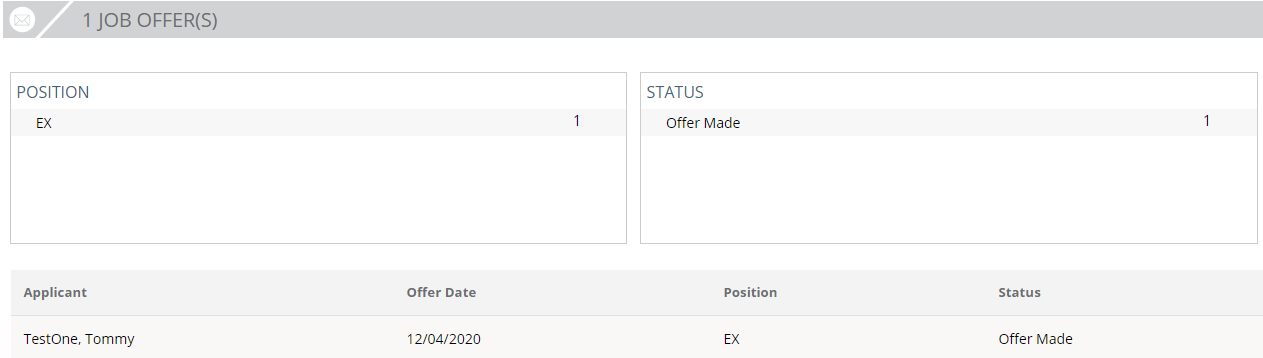
Fig. 48
The Job Offer(s) section shows (Fig. 48):
- The number of offers made for the job posting. This section is populated with applicants whose status is tied to an Application Event Code of "Offer — Offer Made".
- Two filter boxes for Position and Status. You can click entries in any of
the boxes shown in this section to filter the list of applicants.
- Click on the Clear button to clear your selection.
- A list of job applicants who meet the status and filter criteria.
Application(s) section
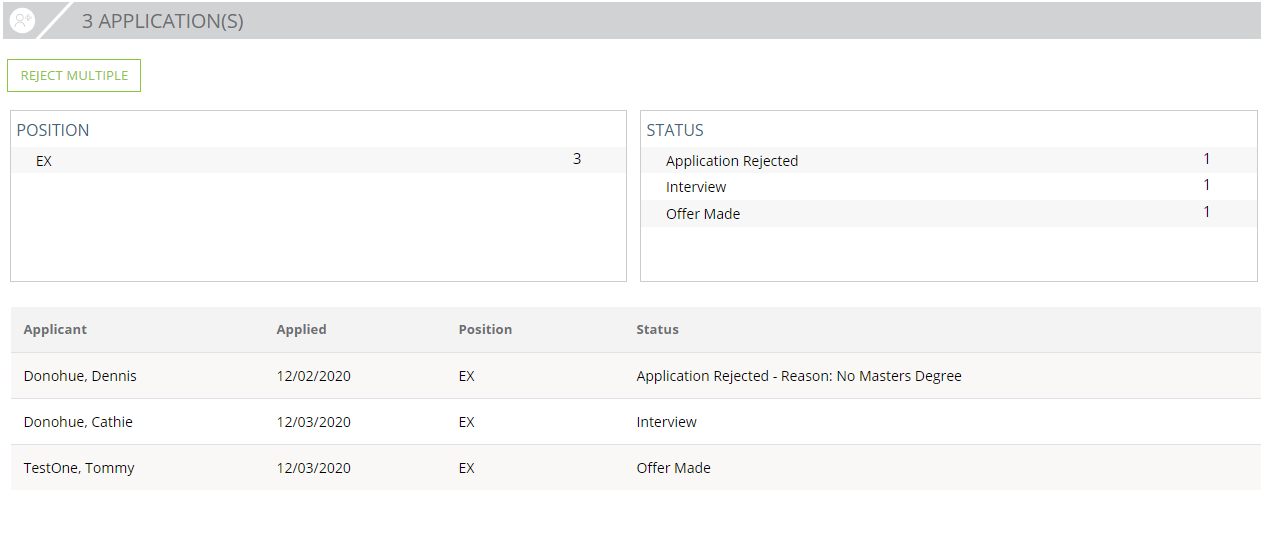
Fig. 49
The Applications(s) section provides (Fig. 49):
- All applicants who have at least started a job application for this position.
- Two filter boxes for Position and Status. You can click entries in any of
the boxes shown in this section to filter the list of applicants.
- Click on the Clear button to clear your selection.
- A list of job applicants who meet the filter criteria.
- Clicking on a job applicant's name will display the Applicant Actions dialogue (Fig. 50).
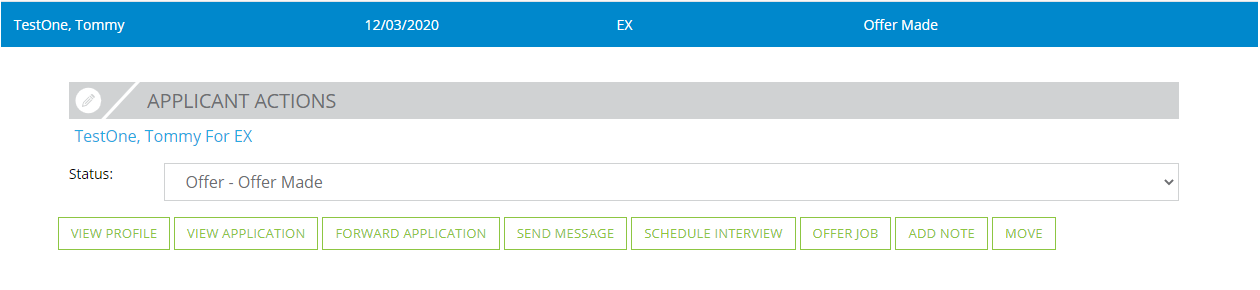
Fig. 50
Choosing an action will display a Dialogue Box specific to the action.
Use the Applicant Actions to:
- Change their Status within the Application process.
- View their profile, which contains demographic information about the
applicant. You can use this form to:
- Print the applicant's profile.
- Add a note to the applicant's profile.
- View their application, which contains the applicant's response to the
sections you included in the application. You can use this form to:
- Print the application.
- Forward the application by email.
- Add a note to the application.
- Forward the application by email.
- Send a message to the applicant. You can use this form to:
- Create a new message.
- Select one of your message Notification Templates.
- Schedule an interview with the applicant. You use this form to:
- Change the applicant's status.
- Send them an email with their interview time.
- Offer Job to the applicant. You use this form to:
- Change the applicant's status.
- Send them their salary or hourly rate.
- Use the Add button to attach documents to the form. Use the Choose File button. DO NOT drag and drop your file(s).
- The Edit and Delete buttons are used to edit or delete documents you previously attached.
- Create a new message or select one of your message Notification Templates.
- Add a note to their application.
- Add a note to their application. This form has a list of predefined note Types for you to select from, plus a comment field.
- Begin OnBoarding: Changing the applicant's status will initiate the OnBoarding Function in RPO. The Prep OnBoarding Dialogue will be displayed (Fig. 51).
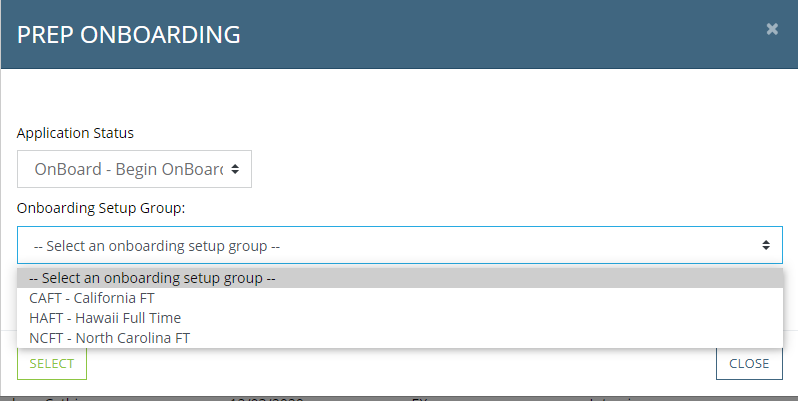
Fig. 51
- Select the appropriate OnBoarding Setup Group. You are then taken to the Onboard New Employee function (Fig. 52).

Fig. 52
Applicants Dashboard
![]()
The Applicants dashboard (Fig. 53) provides ways to view and work with all applicants that a company has in ReadyPay Online, regardless of the job(s) they applied for. The dashboard is divided into 3 sections. Each of the 3 sections is explained below.
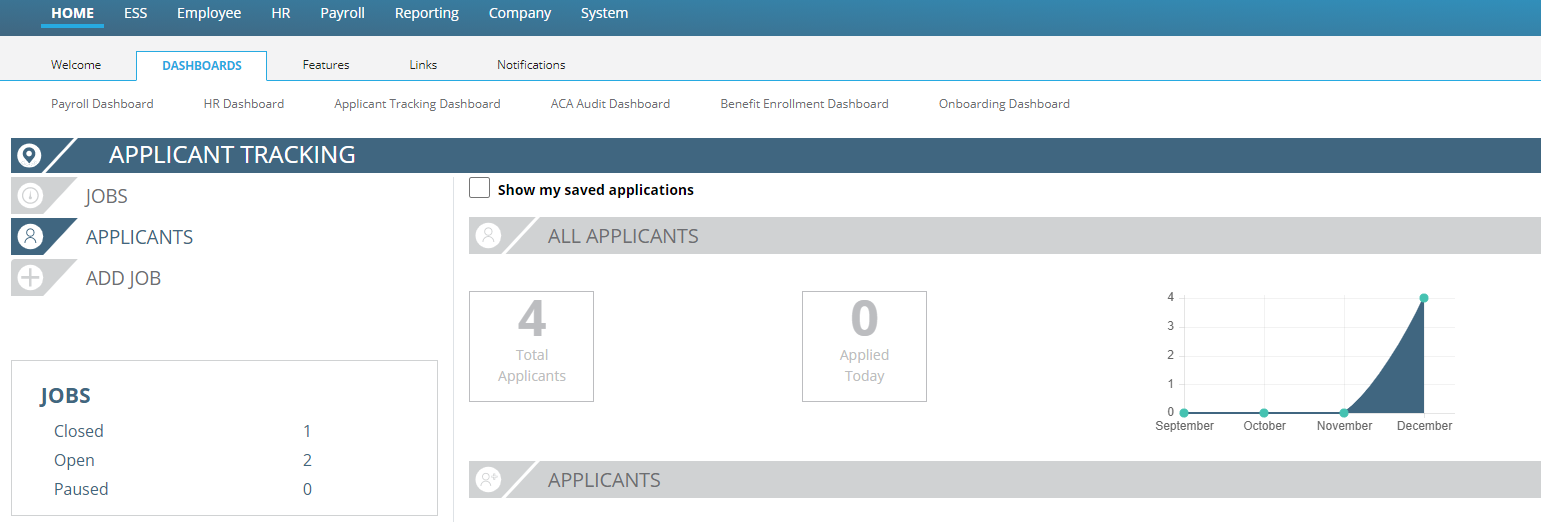
Fig. 53
All Applicants section

Fig. 54
The All Applicants section (Fig. 54) shows:
- The total number of job applicants for the employer.
- The number of people that have applied today.
- A graphic view of the number of applications received over the last several months.
- Check the "Show my saved applications" box to filter the applicants to see only those applications you have saved. Otherwise, all applications are displayed. (See Applications Actions dialogue section for instructions to mark an application as saved.)
Applicants section
The Applicants section shows:
- A list of all job applicants, ten at a time. When there are more than 10 applicants, buttons appear that let you page through the list, 10 applicants at a time.
- You can see which jobs individual job applicants have applied for by
clicking on the >> next to each applicant's name (Fig. 55).
- When you view the jobs an individual job applicant has applied for, you also see information about which job(s) they applied for, when, and their status for each.
- Click to select an individual job the applicant has applied for to show the 3rd section, Applicant Actions. This is displayed below the list of Applicants (Fig. 55).
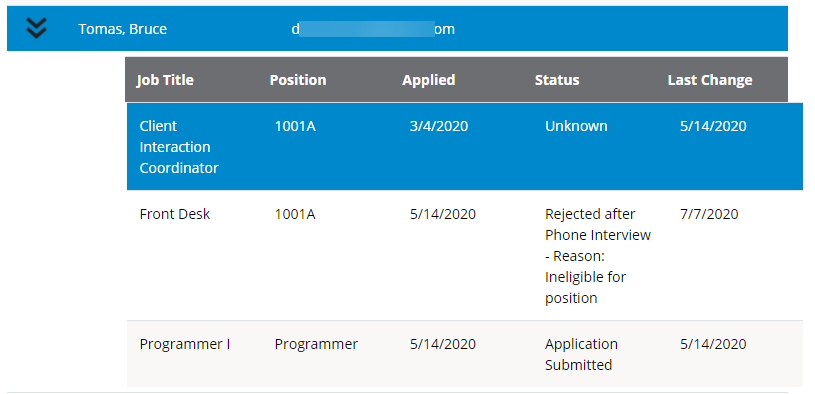
Fig. 55
Applicant Actions dialogue

Fig. 56
Applicant Actions (Fig. 56) provides:
- The name of the applicant you selected in the list and the job the applicant applied for.
- You can use this page to perform the same actions as the Jobs Dashboard's Application Section.
- To mark an application as "Saved", select the View Application action. The Application dialogue box will be displayed. Click the Save box (Fig. 57). The application will be displayed when you use the "Show my saved applications" option. Repeat for all applications you wish to save.


Fig. 57
- To remove applications from your "Saved Applications" list, select the View Application action. The Application dialogue box will be displayed. On a saved application, the Save box is replaced by the Forget Box (Fig. 58). Click the Forget button to remove the application from your saved applications.

Fig. 58
The boxes listed at the top of the Application dialogue box are also displayed at the bottom of the screen. There is also a Close Box.
Applicant Attestation
The application attestation section (Fig. 59) is automatically shown to every applicant. The verbiage is not configurable. Every applicant must check the "I certify that all…" checkbox before they can submit their application. The attestation will be included when the application is Forwarded, Printed, and Viewed.
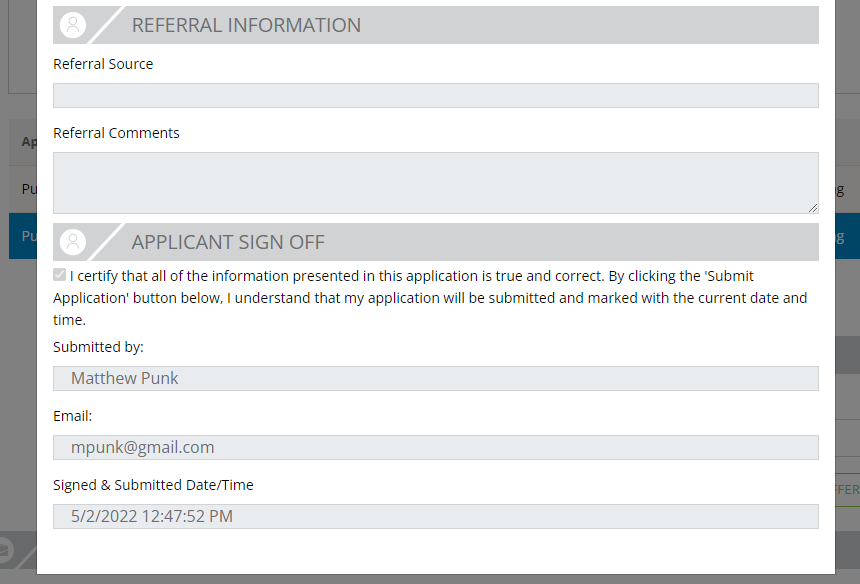
Fig. 59
Conclusion
Now that you have completed the setup of the Applicant Tracking module and posted jobs, you are ready to begin posting jobs for applicants to apply for. We encourage you to setup Applicant Tracking on an internal test company so your service bureau can learn and practice how to use this module.
Copying an Applicant Tracking Setup to another company
Once you have Applicant Tracking setup on at least one company, you can then copy your Applicant Tracking setup to other companies. To do this, use the Import Settings button (Fig 60, outlined in Red).
This function is only available when the company has nothing setup in their Applicant Tracking Setup.
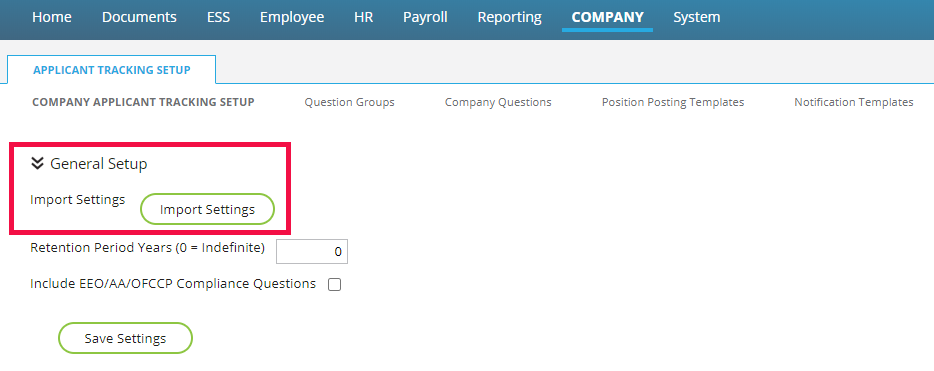
Fig. 60
A message box will then be displayed which contains a list of companies that have Applicant Tracking set up. Select the company you wish to import from and click the "Import" button.

You must complete all items in the section of this document titled "Prepare the company to use Applicant Tracking" before you import settings from another company. If not, the import will be partial, and you will need to complete the rest of the setup manually. For example, your company must have at least one company position. Questions are tied to positions. If you do not have at least one company position on the company, the import process cannot import any Company Questions.
Questions?
Contact your Payroll Service Provider.