Explanation of Commonly Used Navigation/Maintenance Fields
Overview
There is a large number of fields used throughout ReadyPay Online for navigation and maintenance. These fields are found on the majority of tabs in the system.
There are two styles of tabs most commonly used in ReadyPay Online.
Single Record Tabs
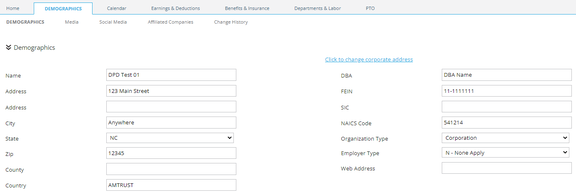
This type of tab contains a collection of fields relevant to the tab topic. Consequently, only one record exists for the tab topic. Examples of this type of tab are Demographics (Company and Employee) and Employee Compliance.
Multi Record Tabs
Multi Record Tabs allow for more than one entry for the topic of the tab.
This type of tab is divided into two sections.
The upper section displays all of the active records for the tab. Use the Show all option on the tab to include inactive records.

The lower section shows the details of the record selected in the upper section. By default, the system selects the first record in the upper section to display.
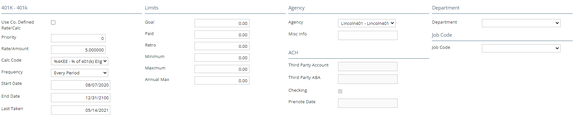
The fields included in the lower section will vary based on the topic of the tab.
Examples of Multi Record Tabs are Employee Deduction and Company Deductions.
There are a number of tabs that, due to their function in the system, are neither Single nor Multi Record format.
Employee List Navigation
When working in the Employee and HR Modules, almost every tab has an Employee List that looks like this:
![]()
The employees contained in the list are based on the user's Security Settings. Only those employees the user can access are included.
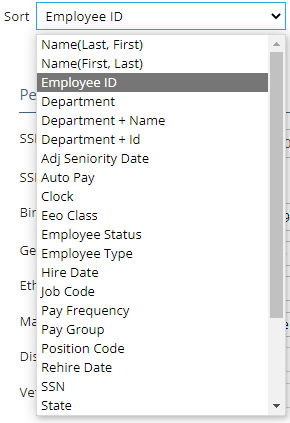
The list is based on the combined settings of the Sort and Filter fields found to the right of the employee field.
Use the Sort drop list to determine in which order the employees are listed.
Use the Filter drop list to determine which employees are included in the list.

Again, the employees contained in the list are based on the user's Security Settings. If you choose the Termed ees filter, only the termed employees of those you can access via Security will be included.
![]()
List Navigation Buttons
The fields between the word Employee and the employee's name are used to move the user towards the top of the list (up).
![]()
Click to move to the first person (top of the list) in the list.
![]()
Click to move to the previous person in the list.
These fields are not available when the user is on the first employee in the list.
![]()
![]()
Used to display all employees in the list based on the Sort Order. The default sort is Employee Id.

![]()
Click to move to the next person in the list.
![]()
Click to move to the last person (end of the list) in the list.
These fields are not available when the user is on the last person in the list.
![]()
Commonly Found Tab Buttons
The following information applies to these buttons throughout the various modules in the system.
Add Button
![]()
The Add button is active on tabs where multiple records can exist (Dependents, Accruals, and others).
It is inactive on tabs where only one record can exist (Demographics, Department, and others).
Save Button
![]()
The Save button is available on any tab where data has been saved or the first record is about to be added. On tabs where multiple records can exist, the Save button is inactive until data is added and can be saved.
Save/Add New Button
![]()
The Save/Add New button is available on any multiple entry tab where records have been saved or the first record is about to be added. On tabs where multiple records can exist, the Save/Add New button is inactive until data is added for the first record and can be saved.
Use the Save/Add New button when entering multiple records to tabs that support multiple records.
Cancel Button
![]()
Use the Cancel button to undo data you've entered on the screen but have not saved.
The Cancel button is active on tabs that house single entries. It is inactive on tabs where multiple records can exist, but no records have been added.
Delete Button
![]()
The Delete button is inactive on tabs where only one record can exist (Demographics, Department, and others).
It becomes active when a record is added and saved to a tab that supports multiple entries.
The following message is displayed each time the Delete button is used.

Select OK to delete the selected record.
There is logic in the system that prevents the deletion of records already in use elsewhere in the software. In these cases, an error message will be displayed, and the deletion attempt will be blocked.
Options to Display Active Versus All Records
On tabs housing multiple records, there will be an option that controls which records are displayed on the tab. Typically, the records that are displayed are active for the current check date in the Payroll Section.
The name and location of this option can vary by tab. Typically, the option is found towards the top of the tab.
The option is most often labeled Show all Tab Name.
See the example from the employee Earnings Tab in the Payroll Data section:
![]()
Questions?
Contact your Payroll Service Provider.