Swipeclock TimeWorks Plus Integration Setup
The Swipeclock TimeWorksPlus (TWP) integration in ReadyPay Online (RPO)
utilizes Swipeclock's TimeWorksPlus web API
(https://twpapi.payrollservers.us/swagger/ui/index). The integration
allows bi-directional communication between RPO and TWP to transfer
employee demographics, pay rates, new hires, and accrual balances. The
communication is single direction but user selectable as to which
direction (RPO → TWP or TWP → RPO). New hires coming into RPO from TWP
go into the pending employee "holding tank" to allow for user review
and approval before being converted to a payable employee in RPO.
Integration options allow for certain fields in TWP to be mapped to
various fields in RPO. The integration also performs validations on
data being brought into RPO.
The Employee Code field in Swipeclock is paired with the Employee ID in RPO. When the integration is configured on a company with existing employees in each system, the Employee Code field must be manually populated in TWP with the Employee ID from RPO and must not contain spaces. When the sync direction is configured to send data from TWP to RPO, new employees set up in TWP must have the Employee Code field populated with a valid Employee ID that is not used in RPO.
Configure Swipeclock Client
Various features and settings should be configured on the client in Swipeclock before configuring and enabling the integration in RPO. Detailed instructions and descriptions can be found in Swipeclock's documentation and are beyond the scope of this article. Bullet points are listed below.
- If the accrual balance data sync functionality is to be used, configure processing rules for Accruals including the categories (bucket names).
- Configure additional user fields for Departments, Home Fields, and Locations, if desired. A maximum number of 10 total user fields of each type are allowed.
- Configure additional Pay Rate fields, if desired. A maximum number of 10 total pay rate fields are allowed.
- Configure Pay Code Translation for the time file downloads.
- Configure Labor Mapping and File Format for the time file downloads, if desired.
- If the SSO (Single Sign-On) feature will be used in the RPO Kiosk for employees, configure the available pages for the Swipeclock ESS (Employee Self-Service).
Integration Configuration — Timeclock
To enable the integration for a company in RPO, follow the steps below.

-
In RPO, navigate to Company > Status & Services. Add the Timeclock service to the company with valid dates, using the SwipeClockTimeWorksPlus service level.
-
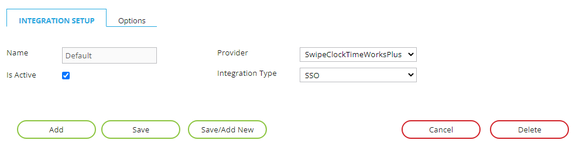
In RPO, navigate to Company > Integrations > Integration Setup. Add the integration to the Integration Setup on the company.
warningLeave the Name field set to "Default". Select SwipeClockTimeWorksPlus for the provider and Timeclock for the integration type.

-
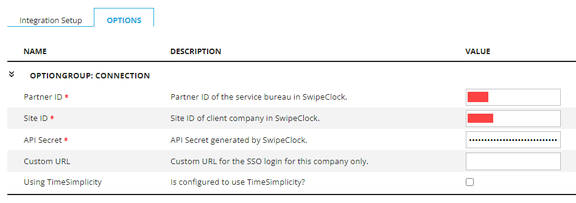
Configure the integration Connection options.
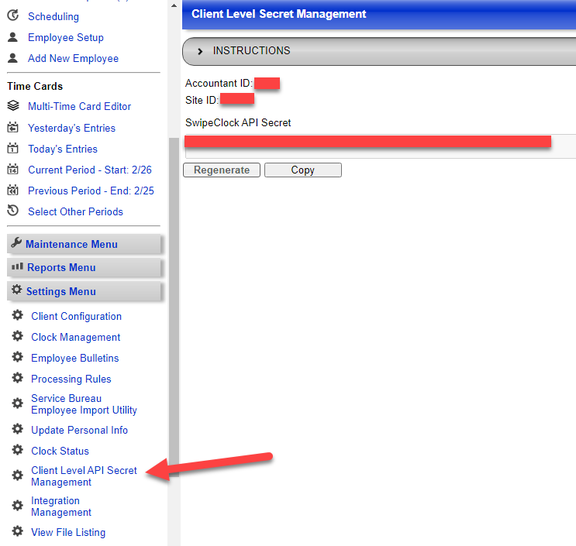
a. Partner ID – Enter the partner ID of the service bureau in Swipeclock. This tells the integration which service bureau (accountant) to connect to and allows for companies within a single RPO database to connect to multiple service bureaus in Swipeclock. The Partner ID in Swipeclock can be found under the Accountant Menu > Accountant Level Secret Management or Client Level API Secret Management.
b. Site ID – Enter the Site ID (Site Code) of the client company in SwipeClock. This tells the integration which company in TWP to pair with the company in RPO for data exchange. The Site ID in SwipeClock can be found on the Client List page in SwipeClock under the Site Code column header.
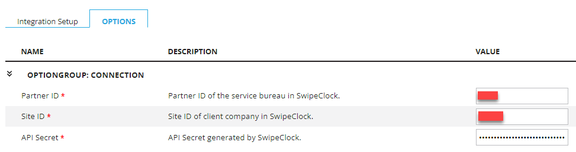
c. API Secret – Enter the API Secret (API key or password) for this specific client. Each client can have an API Secret generated under the Accountant Menu > Client Level API Secret Management in Swipeclock. Click the Generate/Regenerate button and copy/paste this into RPO.
-
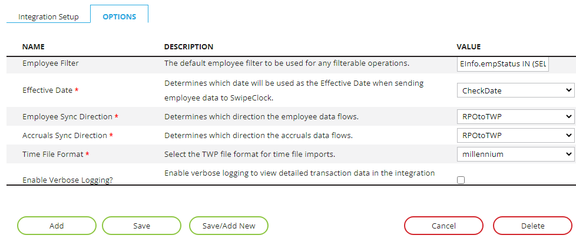
Configure the remaining integration options.
a. Employee Filter – Enter the default employee filter to be used for any filterable operations. This functions as a SQL code snippet similar to the payroll groups and other filtering capabilities found in RPO. The default filter will include only employees with a base status of Active.
b. Employee Sync Direction – Determines which direction the employee data flows. The selections are RPO to TWP, TWP to RPO, and Disabled.
c. Accruals Sync Direction – Determines which direction the accrual balance data flows. The selections are RPO to TWP, TWP to RPO, and Disabled.
d. Time File Format – Select the format of the time files that are imported into RPO from Swipeclock via the payroll time import function. The default is "millennium".
e. Verbose Logging – This setting controls detailed transaction data in the integration log. When the box is checked, all data sent to and from Swipeclock is logged in the Integration Log, along with individual employee results. When the box is not checked, only errors and summary entries are logged. During setup it is wise to check this box so you can troubleshoot any errors. After your setup is complete remember to uncheck the box as this will reduce the amount of logging and aid in performance.
-
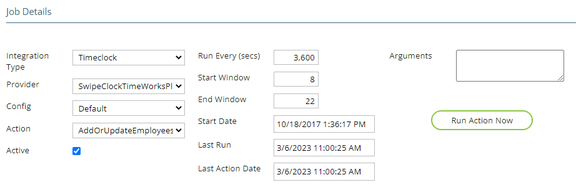
In RPO, navigate to Company > Integrations > Integration Schedules. If the employee data sync functionality is to be used, add a new entry on the Integration Schedule page.
a. Integration Type =
Timeclockb. Provider =SwipeClockTimeWorksPlusc. Config =Defaultd. Action =AddOrUpdateEmployees(This action only applies to this integration and is not functional for any other integration.) e. Run Every (secs) = The interval at which the integration should run. It is recommended to run no more than every hour (3600 seconds). f. Start Window = This allows you to control when the integration should start running each day. Enter hour number in 24hr format (e.g.,8= 8am). g. End Window = This allows you to control when the integration should stop running each day. Enter hour number in 24hr format (e.g.,22= 10pm).
-
If the accrual balance data sync functionality is to be used, add a new entry on the Integration Schedule page.
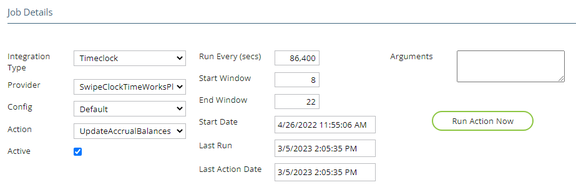
a. Integration Type =
Timeclockb. Provider =SwipeClockTimeWorksPlusc. Config =Defaultd. Action =UpdateAccrualBalances(This action only applies to this integration and is not functional for any other integration.) e. Run Every (secs) = The interval at which the integration should run. It is recommended to run no more than once per day (86400 seconds). f. Start Window = This allows you to control when the integration should start running each day. Enter hour number in 24hr format (e.g.,8= 8am). g. End Window = This allows you to control when the integration should stop running each day. Enter hour number in 24hr format (e.g.,22= 10pm).
Integration Configuration — Code/Field Mapping
Configure the integration code and field mappings for both the employee and accrual balance data sync. Any fields that are left un-mapped will be ignored by the integration.
To prevent dirty data or orphaned records in RPO, all RPO mapped fields that have data dependencies or special requirements are validated when the employee data sync direction is set to TWP to RPO.
Example 1: The CC1Code field in RPO is mapped to Department in
TWP. The integration will verify that the code being passed in to RPO
from TWP exists on the company level. If it does not exist, a
validation error will be logged to the integration log and that data
will not be imported.
Example 2: The EmpType Description field in RPO is mapped to
EmployeeType in TWP. The integration will verify that the text being
passed in to RPO from TWP matches an employee type description on the
company level in RPO. If it exists, the corresponding employee type
code will be set on the employee in RPO that matches the description.
If it does not exist, a validation error will be logged to the
integration log and that data will not be imported.
Example 3: The AutoPay field in RPO is mapped to a Home Field in
TWP. The integration will verify that the text being passed in to RPO
from TWP matches either "Hours" or "Salary". If the text does not
match either of these, a validation error will be logged to the
integration log and that data will not be imported.
-
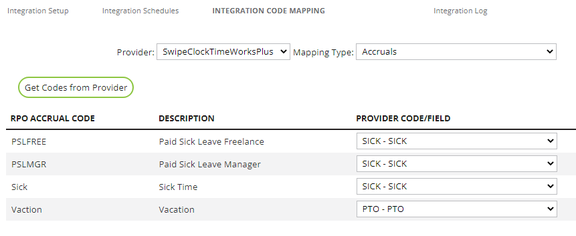
In RPO, navigate to Company > Integrations > Integration Code Mapping. Select SwipeClockTimeWorksPlus in the provider drop-down list.
-
If the accrual balance data sync functionality is to be used, select Accruals in the mapping field drop-down list. Click the Get Codes from Provider button to get the current list of active accrual categories from Swipeclock via the API. For each RPO accrual code, select the corresponding accrual category from Swipeclock. Click the Save Mappings button.
-
Select Departments in the mapping field drop-down list. If additional user fields have been configured in SwipeClock beyond the default single Department field, click the Get Codes from Provider button to get the current list of additional Department fields. For each Department field in the right column, select a field from RPO to which the SwipeClock field should be mapped. Click the Save Mappings button.
-
Select Home Fields in the mapping field drop-down list. If additional user fields have been configured in Swipeclock beyond the default 3 Home Field fields, click the Get Codes from Provider button to get the current list of additional Home Field fields. For each Home Field field in the right column, select a field from RPO to which the Swipeclock field should be mapped. Click the Save Mappings button.
-
Select Locations in the mapping field drop-down list. If additional user fields have been configured in Swipeclock beyond the default single Location field, click the Get Codes from Provider button to get the current list of additional Location fields. For each Location field in the right column, select a field from RPO to which the Swipeclock field should be mapped. Click the Save Mappings button.
-
Select Other Text Fields in the mapping field drop-down list. For each field in the right column, select a field from RPO to which the SwipeClock field should be mapped. Click the Save Mappings button.
-
Select Other True/False Fields (Checkbox) in the mapping field drop-down list. For each field in the right column, select a field from RPO to which the Swipeclock field should be mapped. Click the Save Mappings button.
-
Select Pay Rates in the mapping field drop-down list. If additional pay rates have been configured in Swipeclock beyond the default 3 pay rates, click the Get Codes from Provider button to get the current list of additional Pay Rate fields. For each RPO rate code, select the corresponding rate code from Swipeclock. Click the Save Mappings button.
Integration Configuration — Employee Kiosk SSO
The TWP SSO authenticates using the TWP client's API secret along with the employee's code (which is linked to ID in RPO). When an employee logs in to the RPO Kiosk and the SSO service and integration have been configured on the company in RPO, the employee will see the Swipeclock tab in the Kiosk. Clicking the tab will automatically log the employee in via the TWP SSO mechanism. Therefore, login information to be collected from the employee is not necessary, nor is there a need to sync any employee credentials between the systems.
To enable the SSO (Single Sign-On) integration for a company in RPO, follow the steps below.

- Add the SSO service to the company with valid dates, using the SwipeClockTimeWorksPlus service level.
-
Add the integration to the Integration Setup on the company. Leave the Name field set to "Default". Select SwipeClockTimeWorksPlus for the provider and SSO for the integration type.
-
Optional: Configure the integration Connection options.
a. Partner ID – Enter the partner ID of the service bureau in Swipeclock. This tells the integration which service bureau (accountant) to connect to and allows for companies within a single RPO database to connect to multiple service bureaus in Swipeclock. The Partner ID in Swipeclock can be found under the Accountant Menu > Accountant Level Secret Management or Client Level API Secret Management.
b. Site ID – Enter the Site ID (Site Code) of the client company in SwipeClock.
c. API Secret – Enter the API Secret (API key or password) for this specific client.
d. Custom URL – Enter the custom URL to be used for ESS (Employee Self-Serve). If a custom URL is configured for the service bureau (accountant) in Swipeclock, it can be found under Accountant Menu > Site Branding and Colors. The URL should begin with
https://. If this setting is populated, the SSO in the RPO Kiosk will use this URL instead of the generic Swipeclock URL.e. Using TimeSimplicity – If the client is configured to use the Time Simplicity scheduling module in Swipeclock, this box needs to be checked to ensure it displays correctly on the Kiosk.
Integration Configuration — Payroll User/Administrator SSO
The SSO within RPO for TWP is slightly different from the old Swipeclock Classic SSO mechanism.
-
After enabling the SSO service and integration on the company, the payroll user/administrator must log in to RPO and click the gear icon at the top-right to navigate to their user settings page.
-
The user must then enter their Swipeclock login user name.
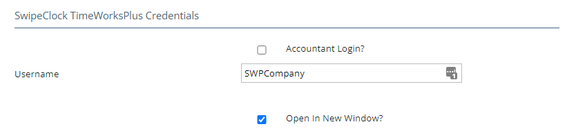
- If you are entering an accountant level login (usually a service bureau user) you must check the box (the page will refresh and display the password field). You must then enter your password.
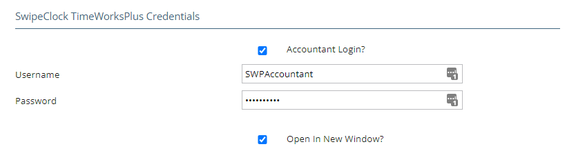
- After the user's credentials have been entered, a Time & Attendance link will appear in the main menu of RPO. Clicking this menu item will redirect the user to Swipeclock in the same tab and auto-login. If you wish to ensure that it opens in a new tab simply check the box labeled Open In New Window?.

Employee Data Flow
Once the integration schedule is enabled for the AddOrUpdateEmployees
action, the data flow will begin on the first poll. Depending on the
configured data flow direction, the data that is exchanged will differ
slightly.
RPO to TWP
The first run of the schedule will send all employees to TWP that fall within the configured employee filter, regardless of last change date. Mappings are applied to the data sent to TWP.
Once the first run is successful, the integration will then only send
employees that have changes since the last SUCCESSFUL run of the
integration each time, including rate changes
(CIntegrationActionSchedule.lastActionDate column).
If the Run Now button is clicked on the Integration Schedule page
in RPO and the action is successful, then the date/time stamp on this
manual run (CIntegrationAction.executedDate column) will be used if
the date/time is more recent than the last SUCCESSFUL action date on
the schedule record.
Rates
Since Swipeclock is pay period based and payroll is check date based, when rate additions and updates are sent from RPO to TWP, the effective date of the rate in TWP is set to the pay period begin date of the calendar entry in RPO that overlaps the start date of the rate in RPO. Example: Rate start date in RPO is 2/1/2018. The company calendar contains a check date of 2/1/2018 with pay periods 1/15/2018 to 1/31/2018. The effective date sent to TWP for this rate is 1/15/2018. This causes the new rate to be used in TWP when the pay period starts rather than start on the check date.
All of the employee's rates configured in the integration mapping options will be sent to TWP so as to create a historical list in TWP, including future-dated rates. Only rates that are set up in the integration mapping options will be affected.
TWP to RPO
Since TWP has no way to pull only changed employees from their system, a full list of employees is pulled each time and compared to RPO. Mappings and data validations are applied to the data received from TWP.
Rates
Since Swipeclock is pay period based and payroll is check date based, when rate additions and updates are brought in to RPO from TWP, the start date of the rate in RPO is set to the check date of the calendar entry in RPO that falls within the pay period dates of the calendar entry in RPO. Example: Rate start date in TWP is 1/15/2018. The company calendar contains a check date of 2/1/2018 with pay periods 1/15/2018 to 1/31/2018. The start date used in RPO for this rate is 1/15/2018. This causes the new rate to start in RPO based on the check date rather than start on the period begin date.
The method that pulls data from TWP includes the employee's rates that are effective as of "today" and fully in to the future. This allows for the timeclock administrator to put in a future dated rate in TWP and that rate will flow into payroll and be effective on that future date. Any rate changes are handled appropriately in RPO by end dating existing rates and inserting the new rate, thus keeping a proper rate history that matches TWP. Only rates that are set up in the integration mapping options will be affected.
Accrual Balance Data Flow
Once the integration schedule is enabled for the
UpdateAccrualBalances action, the data flow will begin on the first
poll. Depending on the configured data flow direction, the data that
is exchanged will differ slightly.
RPO to TWP
Since Swipeclock is pay period based and payroll is check date based, when accrual balances are sent from RPO to TWP, the effective date of the accrual balance in TWP is set to the most recently processed payroll's pay period end date plus one day. The payroll must not have "Block Accruals" checked for it to be considered. If no payrolls have been processed (perhaps a new client), then the currently selected calendar entry's pay period begin date is used. If no payroll is selected (perhaps a new client) then today's date is used as the effective date. Example: The most recently processed payroll's period end date is 1/31/2018. The effective date sent to TWP is 2/1/2018.
The first run of the schedule will send all employee accrual balances to TWP that fall within the configured employee filter, regardless of last change date. The "available hours" field in RPO for the mapped accrual code is used to update the employee's current accrual balance in TWP.
Once the first run is successful, the integration will then only send employees that have changes to their accruals' available hours since the last run of the integration each time.
TWP to RPO
Since TWP has no way to pull only changed accrual balances from their system, a full list of accrual balances is pulled each time and compared to RPO. The "available hours" field will be updated in RPO for the mapped accrual code.
When pulling accrual balances from TWP in to RPO, it uses the last day of the current pay period as effective date. If no calendar entry is selected (new client), it uses "today".
Time Card Data and Manual Accrual Balance Import Process
Once the Timeclock integration has been configured, time data and accrual balances may be imported during the payroll entry process.
Finalizing a payroll in TWP is not a requirement for time or accrual downloads. The finalizing of payroll data has no effect on the accuracy of the data being pulled via the API.
Configure Time Import
To enable importing time card data from TWP into RPO, follow the steps below.

-
In RPO, navigate to Company > Status & Services. Add a TimeImport service to the company with valid dates, using the Generic service level.
-
Click the Edit button and modify the service properties.
a. Description = Use a description that will identify this time import service as the one to be used with the TWP integration.
b. File Type = CSV.
c. EE Identifier = Employee ID. (The ID field in RPO is linked to the Employee Code field in TWP, but without spaces.)
d. Batch = Optional — enter an existing batch name or a new batch name. If left blank, a new batch labeled TimeImport will automatically be created.
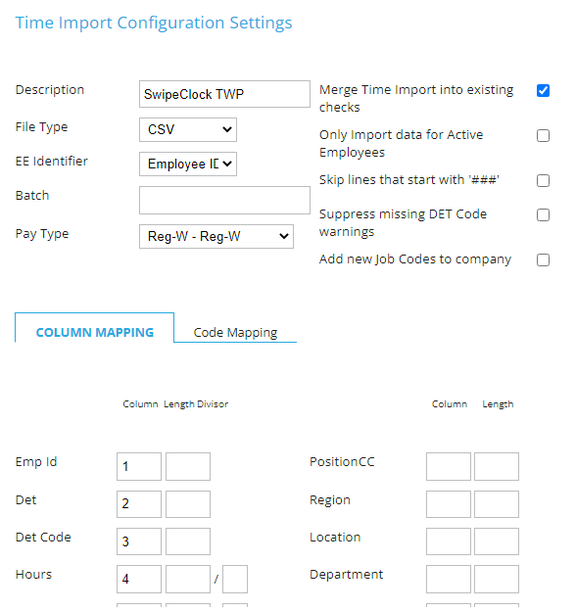
e. Configure the additional checkbox options and column mapping. See screenshot below for an example column mapping that uses the "millennium" time file format from Swipeclock.
Time Import Process
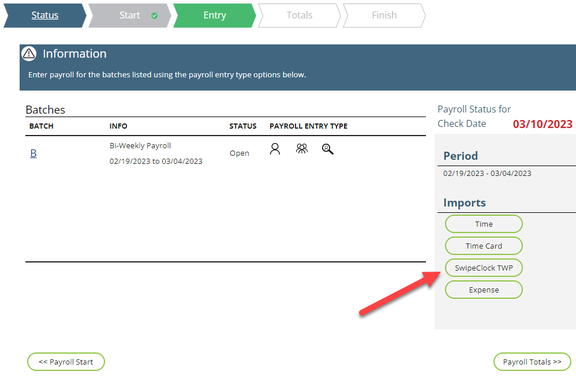
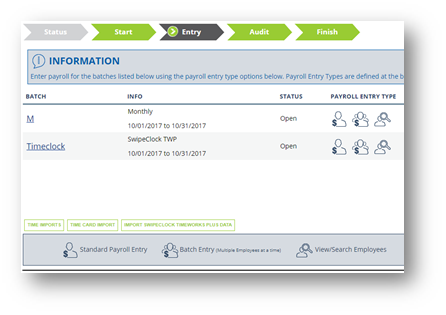
- Once the payroll has been started as normal and all pre-payroll entry steps have been taken, navigate to Payroll > Entry. Click the Import SwipeClock TimeWorks Plus Data button.
- Ensure the period begin and end dates displayed on the screen are correct and cover the time cards that you wish to import. The dates may be manually overridden.
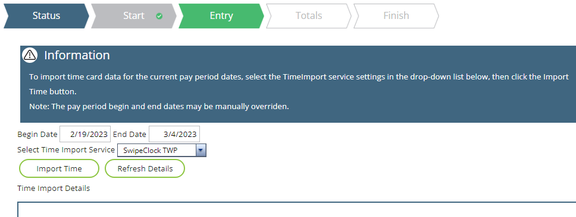
- Select the time import service configured previously then click the Import Time button. The integration will download a time file for the dates selected in the specified format (default "millennium") and start the time import process. Once complete, a message will appear on the screen along with a preview of the imported data. You can then click the Back to Payroll Batches button to review batch details or continue on to the import accrual balances function.
Accrual Balances Import
In order for the Import Accrual Balances button to appear in payroll, the integration option setting for Accruals Sync Direction must equal "TWP to RPO".
- Once the payroll has been started as normal and all pre-payroll entry steps have been taken, navigate to Payroll > Entry. Click the Import SwipeClock TimeWorks Plus Data button.
- Ensure the period end date displayed on the screen is correct and is the "as of" (effective) date for accrual balances in TWP that you wish to import. The end date may be manually overridden.
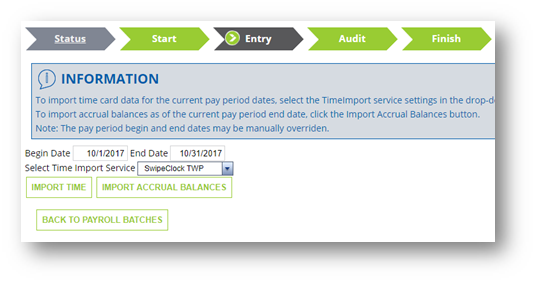
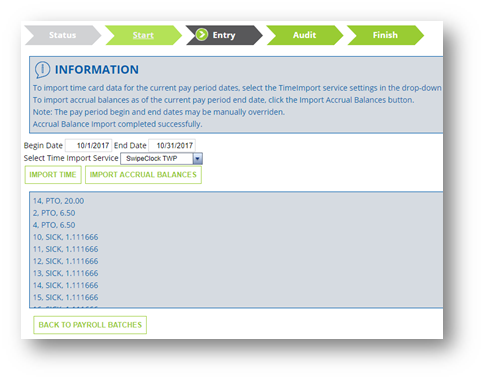
- Click the Import Accrual Balances button. The integration will download accrual balances from the TWP API and apply them to the employees in RPO. Once complete, a message will appear on the screen along with a preview of the imported data. You can then click the Back to Payroll Batches button to review batch details.
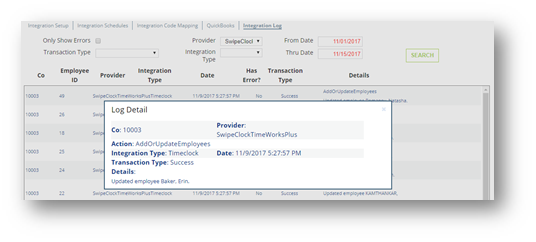
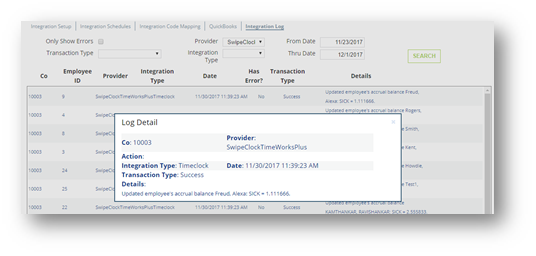
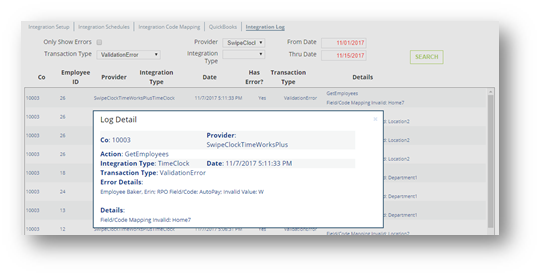
Integration Log
The integration log shows the results of all operations of the integration. (Legacy log files are not created.) Validation errors both from RPO and TWP are logged. When verbose logging is enabled, the actual API requests and responses are also logged.
Questions?
Contact your Payroll Service Provider.