National Crime Search Integration Setup
National Crime Search integration for pre-employment screening and E-Verify.
National Crime Search provides many different types of pre-employment screening and E-Verify services. This integration allows you to offer your end clients automated, position-specific screening options and E-Verify submission using Onboarding. Please read this guide in its entirety before beginning any setup.
This article is divided into three sections:
- The Getting Started at the Service Bureau section reviews what your service bureau needs to do to enable the integration.
- The Set Up Your End Clients section reviews how to set up your end client companies to participate in the program.
- The What a non-subscribing end client sees section covers all the screens updated for National Crime Search and the messages all non-subscribing end clients will see. The messaging shown is hard-coded on the page and not configurable.
Click on any picture in this article to view a larger version.
Getting Started at the Service Bureau
Follow these steps when you first add the integration at your service bureau.
National Crime Search does not require an Integration Schedule (company or system). It is controlled entirely through the EmployeeScreening service. However, a company Integration is required. Integration Setup is covered in this article's "Configure your end clients" section.
Step 1: Establish an account with National Crime Search
If your service bureau does not have an account with National
Crime Search, use this website to establish an account for your service
bureau: https://earnin.nationalcrimesearch.com/partner-signup/. After
completing the signup process, ensure you can access your service
bureau's National Crime Search Admin portal.
If your service bureau already has an account with National Crime
Search and needs assistance, contact support@nationalcrimesearch.com
or call 888-527-3282.
Step 2: Choose the National Crime Search products to offer
Use your service bureau's National Crime Search Admin portal to add the screening products you will offer. The integration supports the following National Crime Search products:
- CBSV SSA ID Validation
- County Criminal Search
- Education Verification — Domestic
- Employment Verification — Domestic
- Enhanced
- Essential
- Expanded
- Motor Vehicle Report
Your service bureau can offer more than the eight screening products listed. However, additional screening products must be added and assigned via your National Crime Search Admin portal. New hires will then be required to complete at least one of the eight screenings available through the integration.
Configure Your End Clients
Follow these steps for each end client you want to add the National Crime Search integration to.
Step 1: Add company positions
The pre-employment screening products available through the National Crime Search integration require at least one company Position.
Positions are not required if you are only using the E-Verify feature.
Step 2: Create a National Crime Search account for the end client
The end client must have an account in the National Crime Search portal. The end client signs up using the service bureau's co-branded NCS partner website. Once the end client's account is established they must:
- Define a primary contact.
- Use the National Crime Search portal to get their API key for Step 3.
- Initiate the E-Verify process through the NCS dashboard. NCS will assist the end client with the setup process.
If the end client intends to use E-Verify, they must also sign up for E-Verify with the federal government independently before enabling this feature. Once signed up, their E-Verify credentials will be configured through their NCS account.
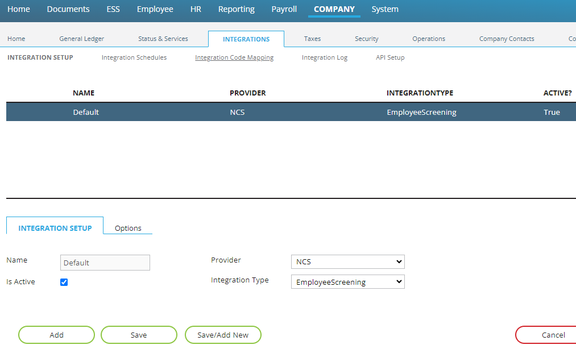
Step 3: Add the NCS integration
Add a company integration for National Crime Search on the Integration Setup page using the settings shown in Fig. 1 and Fig. 2.

- NCS Account Email — The email address used in the National Crime Search portal for the end client's primary contact.
- NCS API Token — The API key the primary contact gets from the National Crime Search portal.
DO NOT add an integration schedule. The data exchange will be handled by the service added in Step 4.
Step 4: Add the EmployeeScreening service
Add the EmployeeScreening service to the company to enable the integration. Choose the appropriate service level based on the end client's needs:
- NCS – Use this service level to enable pre-employment screenings only. This option does not include E-Verify. The standard employer I-9 completion process remains unchanged.
- NCS with E-Verify – Use this service level to enable both pre-employment screenings and E-Verify submission. This adds Send to NCS and Bypass buttons to the employer's I-9 ER step during Onboarding. The end client must be separately signed up for E-Verify with the federal government before using this service level.
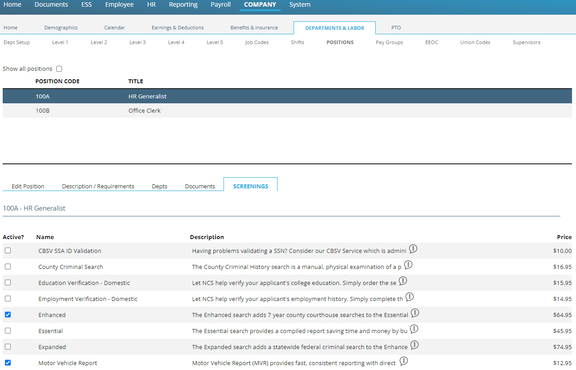
Step 5: Activate National Crime Search products on positions
Use the new Screenings sub-tab to activate one or more pre-employment screening products for each position, as shown in Fig. 3. Screenings are optional. You can choose to offer them on some positions and not others.
This step is only required if the end client will use pre-employment screenings. The E-Verify service level (i.e., NCS with E-Verify service level) does not use Positions. The screening product prices shown in Fig. 3 are examples. The integration will display the prices your service bureau sets in the National Crime Search portal. Your service bureau can offer more than the 8 screening products listed; however, additional screening products must be added and assigned via your National Crime Search Admin portal.

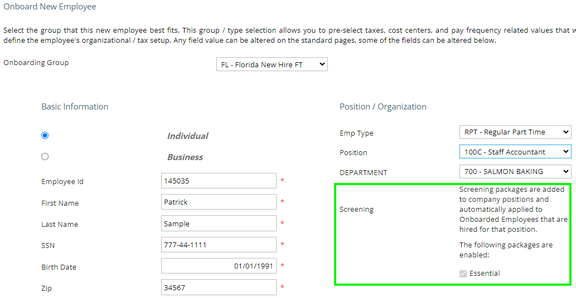
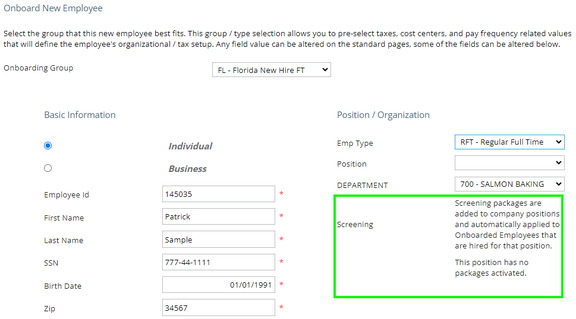
Step 6: Select a position when Onboarding a new employee
When you select a position with one or more active screenings, you will see the screenings listed as outlined in green in Fig. 4. Screenings are read-only on this page.

When you leave the Position field blank or select a position without active screenings, the Screening section will display a "no screenings" message (Fig. 5).
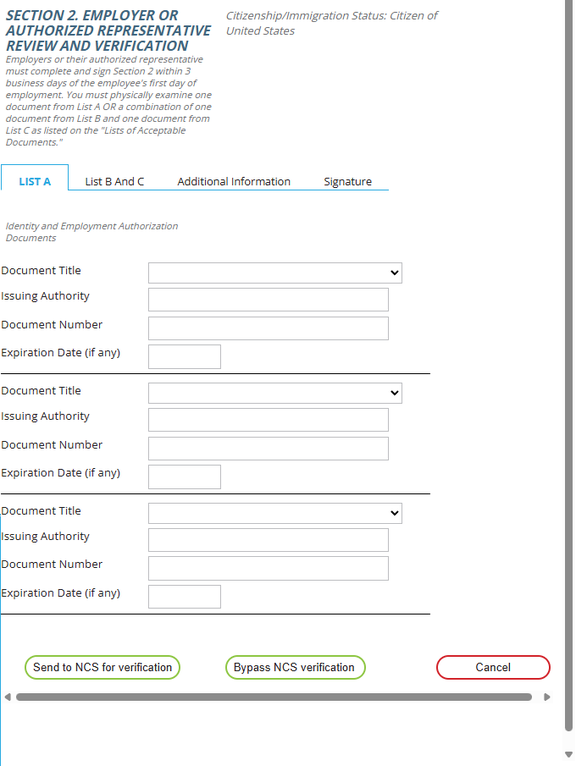
The Employer's E-Verify Submission (E-Verify Service Level)
When the end client is configured with the NCS with E-Verify service level, the employer's I-9 ER step during Onboarding will include two additional buttons (Fig. 5A):
- Send to NCS – Submits the completed I-9 data to National Crime Search, which then forwards it to the federal E-Verify system.
- Bypass – Skips E-Verify submission and completes the I-9 process without sending data to NCS.
Checking E-Verify Status
E-Verify submission is a one-way process. RPO does not receive status updates back from the E-Verify process. After submission, the employer must log in to their National Crime Search portal to check the status of their submission. The Onboarding Dashboard will reflect that an E-Verify submission was made, but no further status updates will be shown in RPO.
Important Limitations
- No resubmission: Once the Send to NCS or Bypass button is clicked, the action cannot be undone. There is no option to resubmit or go back. If the employer needs to redo the E-Verify submission, the only way to do so is by rejecting the employee and creating another new hire packet.
- Employee decline: If the new hire clicks Decline on the Screening step, the Send to NCS and Bypass buttons will not appear for the employer on the I-9 ER step.
- Status support: If the employer requires assistance with E-Verify statuses or outcomes, they must consult their National Crime Search portal or contact NCS directly.
What the New Hire Sees
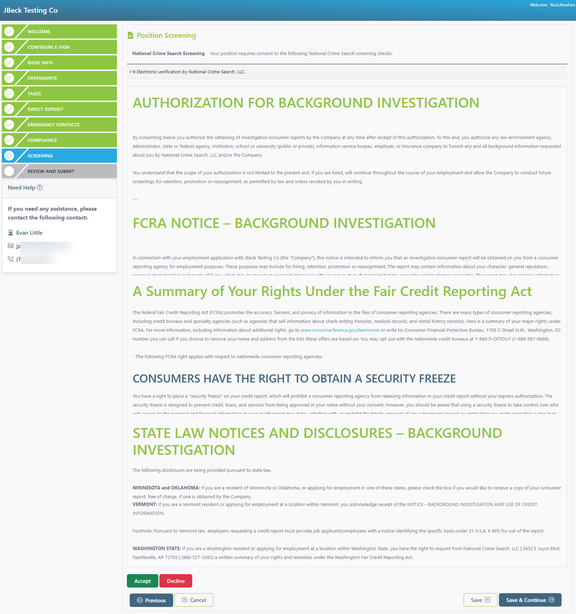
When a new hire's position requires completion of a pre-employment screening, they will have an additional Screening workflow step in their Onboarding packet. Fig. 6 shows an example (the verbiage of each section has been cropped to reduce the image size). New hires must click Accept before they can complete and submit their Onboarding packet.
After a new hire accepts the pre-employment screening, they will receive an email from National Crime Search with instructions for logging in and completing their screening.
The Screening workflow step now includes a mandatory FCRA (Fair Credit Reporting Act) notice that all employees must acknowledge. This notice is displayed regardless of whether any NCS screening packages are active.
The integration sends the new hire's First Name, Last Name, and Email address to National Crime Search. Some screening products require the new hire to enter additional information. In these cases, the Screening workflow step will include additional required fields for the new hire to complete.
If a new hire clicks Decline, they will be unable to complete and submit their Onboarding packet. Additionally, if the end client uses NCS with E-Verify, the Send to NCS and Bypass buttons will not appear on the employer's I-9 ER step.
After the new hire clicks Accept, they must scroll to the bottom of the page and click the Save & Continue button to move to the next step in the Onboarding workflow.
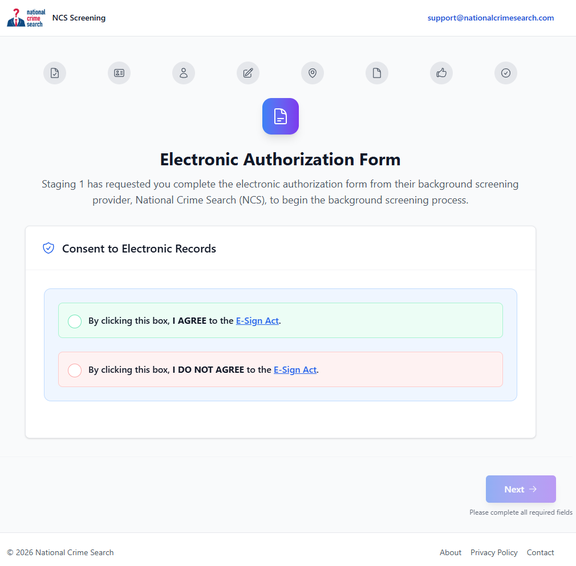
Once the new hire submits their Onboarding packet, they will receive an email from National Crime Search instructing them to complete an Authorization Form Request. The email contains information for the new hire to contact National Crime Search if they have any questions.
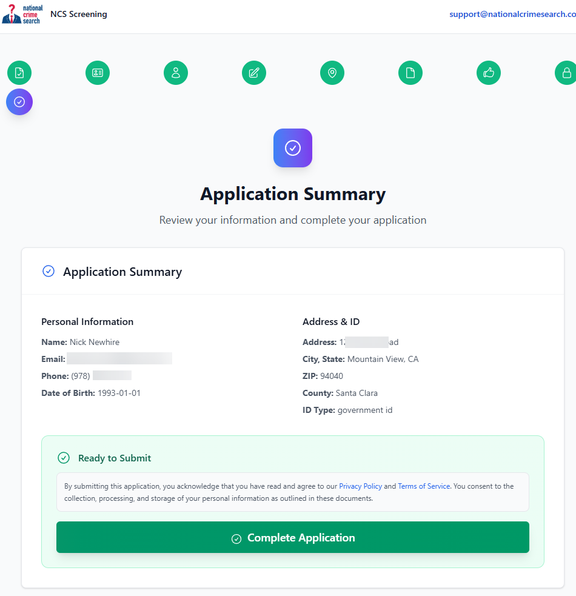
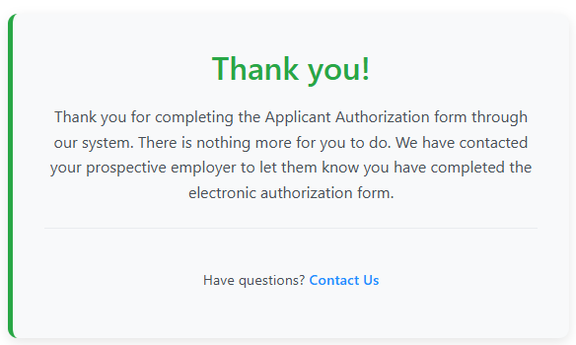
The National Crime Search workflow guides the new hire through several steps beginning with an Electronic Authorization Form (Fig. 6A). Once the new hire has completed the steps in the workflow, they will be shown a summary page (Fig. 6B). After the new hire clicks the Complete Application button, the NCS website will ask them if they want to create an account. This step is optional. Once the employee finishes this last step, the NCS website will display a message that they're finished (Fig. 6C).
The new hire will also receive an email confirming that NCS has received their information, and an email is sent to their new employer notifying them that the new hire has completed the screening.
What a Non-Subscribing End Client Sees
This section describes the changes non-subscribing end clients will see to the company Positions, Onboarding Dashboard, and Onboard Employee pages.
- Company Positions and the Screenings subtab will display a "not subscribed" message (Fig. 7).
- Onboarding Dashboard will display a Screening column (Fig. 8). New hires will display a "Not configured for group" icon.
- Onboard New Employee will display the new Screening section on the right side of the page (Fig. 9).
Questions?
Contact your Payroll Service Provider.