Employee Navigator SSO Integration Setup
Purpose
This document provides instructions for each service bureau to enable single sign-on from Employee Kiosk (ESS) to Employee Navigator (ENav).
Background
The single sign-on ESS feature uses the OpenID Connect standard. Enabling this feature will expose additional ESS endpoints to support a secure sign-in flow from ESS to ENav. Three dependencies are required to support the sign-in flow.
Dependencies
- A client secret to authorize ENav requests to ESS.
- An agreed upon vendorId between the service bureau and ENav. This communicates which service bureau domain ENav initiates its sign-in flow for.
- A designated public-private encryption key to sign and verify security tokens between ESS and ENav.
Prerequisites
Your existing RPO/ESS web server must be running Windows Server 2016 or later.
Step 1. Create a Self-Signed Cert
Run the following as an administrator in PowerShell:
New-SelfSignedCertificate -DnsName rpo-openid-key -CertStoreLocation cert:\LocalMachine\My

Copy the Thumbprint after completing this step.
Self-signed certificates are valid for 1 year by default. You must monitor the expiration date of this certificate and renew it before it expires. Failure to do so will result in your Kiosk site becoming unavailable. Renewal instructions are provided later in this article.
Step 2. Write the Service Provider Configuration to RPO's Database
You will need to replace the values for the following parameters in the
SQL script attached to this article (ENavSSOInserts.sql) before
running it in SQL Server Management Studio.
@signingThumbprint— The Thumbprint from Step 1 above.@navEndpointEnvironment— The ENav environment (prodorqa) to direct customers to. This value should always beprodin a production environment.@enavVendorId— The agreed upon vendorId (this will be provided to you by Employee Navigator when you are ready).@enavClientSecret— ENav client secret (a randomly generated 32 bit key, this can also be provided for you if you wish).
Example:

Step 3. Recycle the ESS App Pool
Recycle the ESS application pool to load the new configuration.
Step 4. Verification
Navigate to the .well-known/openid-configuration endpoint of your ESS
domain and verify a configuration is returned. For example:
https://yourdomain.com/Employee/.well-known/openid-configuration

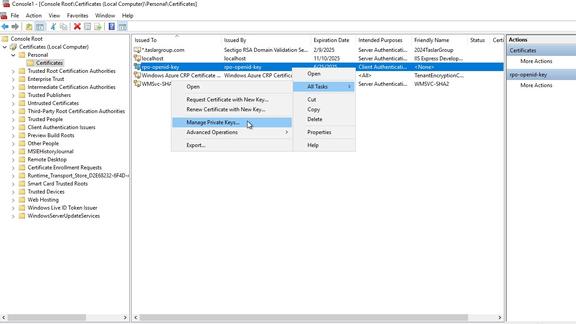
If you receive the error: "Invalid provider type specified" CryptographicException when trying to load private key of certificate:
- Open MMC and browse to the Certificates > Personal section.
- Find your
rpo-openid-key, right click and choose All Tasks > Manage Private Keys. - Add permissions for the account running the ESS application pool.
Renew an Expiring SSL Certificate
You must renew the self-signed SSL certificate before the existing one expires. Failure to do so will result in your Kiosk site becoming unavailable.
-
Create a new self-signed certificate using the instructions in Step 1 above.
-
Record the Thumbprint value.
-
Replace
xxxxxxxxxxxin the SQL query below with the thumbprint value, and run it against your ReadyPay Online database.update SIntegrationProviderOptionset defaultValue = 'xxxxxxxxxxx'where provider = 'ReadyPay.OpenId'and optionName = 'SigningThumbPrint' -
Recycle the ESS App Pool.
Questions?
Contact your Payroll Service Provider.