New Hire Reporting
New Hire Reporting is a federal law enforced by the U.S. Department of Health & Human Services.
HHS outlines the purpose of the law as follows: Federal law requires employers to report basic information on new and rehired employees within 20 days of hire to the state where the new employees work. Some states require it sooner. The information is maintained in the National Directory of New Hires, which child support agencies use to locate a parent who owes child support and issue an income withholding order.
Additional information about the law, employer requirements, reporting agent registration requirements, and each state or territory agency responsible for administration is available here: https://www.acf.hhs.gov/css/employers/employer-responsibilities/new-hire-reporting
Service Bureau Setup
Before you can process New Hire reporting for any end client company, you must first create and define a setup code for each state that you will report to. New Hire reporting can be done by paper or file. For paper filing, use the New Hire Report (RP_260_7201) or New Hire Information (RP_260_7202). For electronic filing, ReadyPay contains file specifications for all 50 states, the District of Columbia, Puerto Rico, and U.S. Virgin Islands. The setup is done in System > Setup > Misc tab > New Hire Setup selection.
Because you are modifying system settings, you must restart your process servers after adding, changing, or deleting any state code setup in this section.
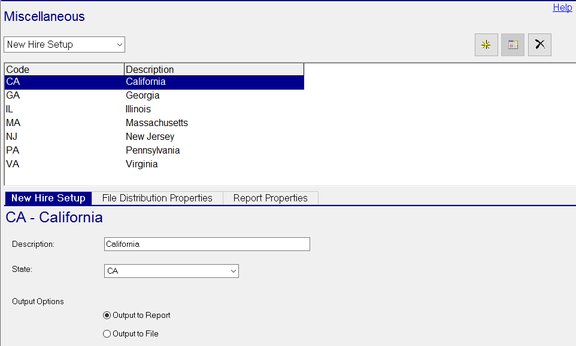
The New Hire Setup screen is shown below. The screen is divided into a list of state codes you have set up and properties for each state code. The properties for each state code are defined on the 3 sub-tabs (New Hire Setup, File Distribution Properties, and Report Properties).
- To add a new state code, click the yellow star button. Enter a short code in the field provided (for example, the 2-character state code). Then click the OK button. Next, complete the appropriate sub-tabs for the type of reporting you will be doing.

-
To delete an existing state code setup, click on the state code in the list and then click the "X" button.
-
To modify an existing state code setup, change the options on the sub-tabs and click the save button (or press F11).
New Hire Setup sub-tab
This sub-tab defines the state and if you will report by Report (paper or PDF) or File (electronically).

Description field: Enter a meaningful description. For example, the full name of the state.
State field: Choose the state or territory from the list.
Output Options field: Select which type of reporting you will use for the state or territory.
File Distribution Properties sub-tab
This sub-tab is only used with the Output Option "Output to File". Otherwise, all fields are grayed out.
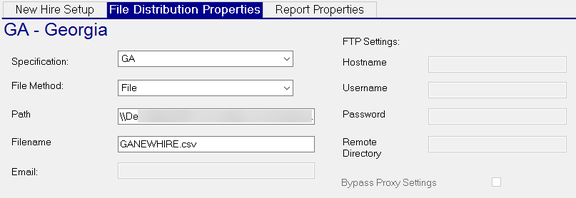
Specification field: Choose the state or territory from the list.
File Method field: Choose the "File" option. FTP is no longer used.
Path field: Enter the file path to the shared folder where the NewHire files will be stored. The format used for this field is the same as the format used for your service bureau's shared folders as shown in System > Setup > Directories settings.
Filename field: Give your new hire file a name that is unique for the state code.
You must verify the file naming convention for each state or territory you will be submitting to.
Email field: No longer used.
FTP Settings fields: No longer used.
Report Properties sub-tab
This sub-tab is only used with the Output Option "Output to Report". Otherwise, all fields are grayed out.
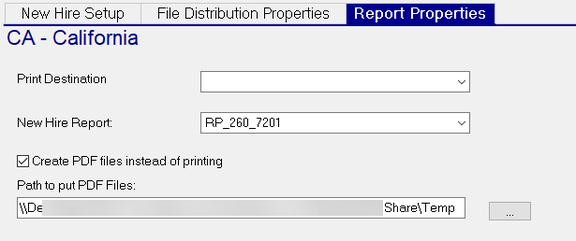
Print Destination field: When you want a paper report to print, use this field to select the destination printer. Otherwise, leave this field blank.
New Hire Report field: Select the New Hire Report (RP_260_7201).
The New Hire Information report (RP_260_7202) is used only when a company's service level is Mini, and is often set up as an Every Payroll report.
Create PDF files instead of printing checkbox: Only use this checkbox when you want the report to go to a PDF and not a printer.
Path to put PDF Files field: Only use this field when you want the report to go to a PDF and not a printer. Enter the file path to the shared folder where the NewHire files will be stored. The format used for this field is the same as the format used for your service bureau's shared folders as shown in System > Setup > Directories settings.
Company Setup
Each company you process New Hire reporting for needs to have the NewHire service added and the properties configured.
Add the service
Go to Master Company Setup > Services tab. Click the yellow star button and select the NewHire service. There are 3 service levels to choose from:
-
Setup — Select this option when a new company is being added to ReadyPay. This will mark all employees you add during implementation as already reported.
-
Mini — Select this option when the end client is responsible for New Hire reporting. This service level requires the client to use the New Hire Information (RP_260_7202) report to report the information to the state. The client's data will not be displayed on the system level New Hire Reporting tab.
-
Full — Select this option when the Service Bureau is responsible for New Hire reporting on behalf of the client.
Configure the service
Click the Edit Properties button to configure the service for the client. This step is required for service levels "Mini" and "Full".

Setup Code field: The list of options will include all the setup codes you created in the Service Bureau Setup section. Select the setup code for the state the end client will have their new hire information sent to.
Recipient Type fields: These fields contain multiple options. The option selected in the first drop-list will determine what other options are available.
Top drop-list options are:
-
Blank — Select this option to use the Employer Contact Information fields. This option is most appropriate when the service bureau does the New Hire reporting.
-
Company Primary Contacts — Select this option when one of the client's primary contacts will be the New Hire reporting contact. Contacts are defined in Master Company Setup > Contacts.
-
Subscription — Select this option when one or more of the client's contacts will be the New Hire reporting contact. This option is most appropriate when the end client does the New Hire reporting and has multiple people doing the reporting. Subscription methods are built in to ReadyPay. Contacts are subscribed to subscription types in Master Company Setup > Contacts.
Bottom drop-list options are:
-
Contact1, Contact2, or Contact3 when "Company Primary Contacts" is selected.
-
All, Audit, Email, EVS, Print, SMS, Texting when "Subscription" is selected.
Employer Contact Information fields: These fields are used when the Recipient Type fields are blank. Any other selection makes these fields read-only.
Processing New Hire Reporting
New Hire reporting data is gathered when each client's payroll is processed. Creating reports and files is done from the System > Operations > New Hire Reporting tab. The service bureau usually performs this process weekly or biweekly. When you first go to the New Hire Reporting tab, none of the unreported (i.e. outstanding) companies will be displayed by default. You must use the "New Hire Setup" filtering option to begin processing your New Hire reporting. Additional filtering options are available. Filtering options are explained below the screen shot.
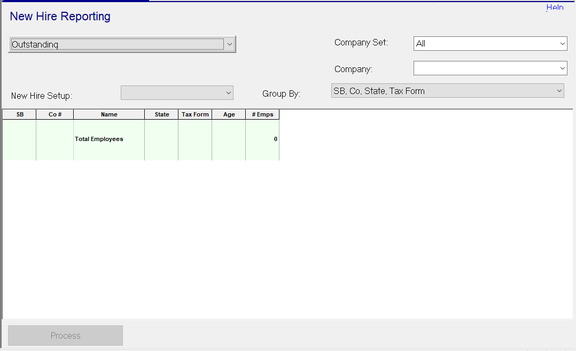
Drop-list field under New Hire Reporting: This field defaults to "Outstanding", which means all unreported New Hires. This field also contains dates of previously processed New Hire reporting in the event you need to go back to a prior date and reprocess a report or file.
New Hire Setup field: This drop-list contains the list of all the system new hire setup codes you created.
Company Set field (optional): This drop-list contains the list of your company sets. It can be used to filter the list of companies shown and processed in the grid.
Company field (optional): This drop-list contains the list of your companies. It can be used to filter the list of companies shown and processed in the grid.
Group By field: This drop-list contains 4 options that allow you to change how companies shown in the grid are grouped. The default grouping is: SB, Co, State, Tax Form.
Company list grid: The middle section of this tab displays a list of companies, based on the filters you set, and summary New Hire information for each company in the list. The grid is read-only. Each of the columns are explained below.
-
SB displays the SBID (Service Bureau ID) associated with the company.
-
Co # displays the company code.
-
Name displays the company name.
-
State displays work state of the New Hires.
-
Tax Form displays the New Hires who are W2/1099M/1099R/1099NEC.
-
Age displays the number of days elapsed since the New Hire's hire date. When there are multiple New Hires for the same category, the oldest age is displayed.
-
# Emps displays the number of New Hires for the category shown.
-
Total Employees shows the total number of New Hires that need to be reported based on the records shown in the grid.
Process button: The Process button is used to process New Hire reporting for all the companies shown in the company list grid. When you select a prior New Hire report date from the drop-list in the upper left corner of the tab, the button's name changes to Re-process.
New Hire Reporting Workflow
The New Hire Reporting workflow varies based on service level (Mini or Full). The most common scenario of each is explained below.
New Hire Reporting — Mini
When a company is set to use the New Hire service level of "Mini", the end client is responsible for their own New Hire reporting. The New Hire Information report (RP_260_7202) can be added to the company's "Every Payroll" report folder for automatic processing by the service bureau.
New Hire Reporting — Full
When the service bureau is responsible for submitting New Hire reports and files for clients, the New Hire Reporting screen is used to process the companies. Processing of outstanding new hires is usually done every one to two weeks. For consistency, you should consider establishing a regular schedule for this process. For example, every Friday after the last payroll of the day has processed.
Step 1
Using the New Hire Reporting tab, select your first new hire setup code in the "New Hire Setup" field.
Companies with locations in multiple states will show multiple times in the grid, once for each state. When this happens, the reporting is done to the state of the company's primary location as shown in Master Company Setup > Demographics. For example, a company is based in GA and has a second location in TN. When this company is processed, all the new hires are processed with and reported to GA. GA is then responsible for reporting the TN new hires to TN.
Step 2
Click the Process button.
Step 3
Check the Job Queue to see if the report or file processed successfully.
Errors will usually prevent a report or file from being created. Warnings may allow the report or file to be created, however the state may reject the report or file depending on the nature of the warning. The source of any error or warning must be fixed and the affected company reprocessed.
Step 4
Repeat steps 1 through 3 until all New Hire codes are successfully processed.
Step 5
Complete your reporting and upload your files to the states you just processed.
Reprocessing
Any time you have to reprocess a report or file for a client, use the same steps that apply to that client's service level. For Full service clients, change the Outstanding option to the date the New Hires were originally reported.
Questions?
Contact your Payroll Service Provider.