Employee Verification Service for RPD
This article provides information on setting up and using the Employee Verification Reporting Service.
Service Bureau Setup
Setup for the service bureau is similar to New Hire Setup. You go to System > Setup > Miscellaneous > Employment Verification Setup.
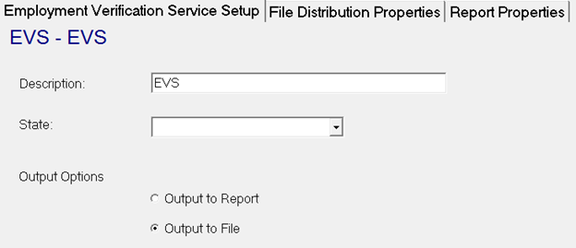
Employment Verification Service Setup Sub-tab
On the Employment Verification Setup Sub-tab, add an entry with Description EVS. Then choose the Output Options for "Output to File."
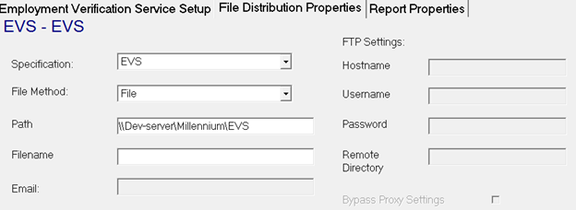
File Distribution Properties
On the File Distribution Properties sub-tab, set the Specification to "EVS" and set the File Method to "File". Lastly, enter a UNC Path for files to be saved to and a Filename for the created files.
Report Properties Sub-tab
The Report Properties Sub-tab is not used.
IRS Setup
To access the IRS Business Services Online website, click this link or open your internet browser and go to https://www.ssa.gov/bso/bsowelcome.htm.
If not already done, a service bureau representative must register with the IRS' Business Services Online. When registering, or if already registered, ensure the Social Security Number Verification Service has been added.
Company Setup
Each company to be included in files should be set up with the EVS Service with a Service Level of "Full".

Processing the EVS Service
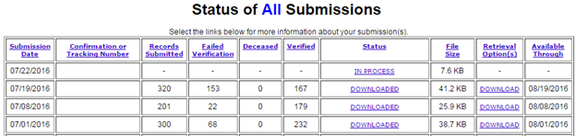
To start the EVS process in ReadyPay, go to System > Operations > Employee Verification. First choose "EVS" in the Setup pull-down on the page and mark the box to "Only Show Paid in Current Year" to filter for current employees only. Companies displayed in the list have the EVS Service and have eligible employees to process. Additional filters Company Set and Service Bureau may also be used in creating files of smaller sets of eligible employees. Then click the Process button to create the file, which is saved based on the UNC path provided in prior steps.

On 11/16/2021, an issue was discovered with the "Only Show Paid in Current Year" checkbox. Using this checkbox results in an empty file (i.e. no employee records).
Submit the file to the IRS
To submit the file to the IRS, you must first log in to the IRS Business Services Online website. Then choose the Social Security Number Verification Service Option.

After you have done that, choose the Submit an Electronic File for SSN Verification option. Please carefully read and continue. Then enter the service bureau EIN and choose the file to submit. You must wait 24 hours to receive the return file.
Retrieve the Return File
To retrieve the return file, log in again to the IRS' Business Services Online website and choose the Social Security Number Verification Service Option. Be sure to choose the View Status and Retrieval Information Option and choose the option that works best for you (Option 3 is easiest if the date range or tracking number is not immediately available).
From here you can download the response file to an appropriate location on your network.
Import Return File
The final step is to import the return file into ReadyPay. Go to System > Operations > Employee Verification and click the Import Return File button in the lower right-hand corner of the page and browse to the response file that was saved in the previous step.

When the file is imported, notifications can be sent to applicable clients by marking the Notify Client box. It sends a notification email to any company contact with the EVS Subscription added. The Notify CSR box can also be marked to send a notification email to the associated CSR set on the Master Company Setup / SB Info page. The email contains a listing of those employees not matching.

Employee Record
Compliance Tab
The Compliance tab is updated with the corresponding EVS Date and Result from the return file.

Resetting a record
If an employee's name, birthdate, or SSN is changed, the EVS result information is cleared and the employee can be resubmitted through the EVS system.
Questions?
Contact your Payroll Service Provider.