Reporting: Using the ReadyPay Reporting Options
Introduction
This article covers how to use the options available for reporting in ReadyPay. There are multiple areas in the system that can be used to run reports manually, and automatically as part of the payroll or operations or tax reporting routines. Access to each area can be limited by the Security role of the user. Some users may have full access to all areas while others may have access to some or none.
Overview
There are three types of reports available in ReadyPay: Crystal Reports, Hard-Coded Reports and Report Writer.
ReadyPay has a standard library of nearly 200 Crystal and Hard-Coded reports used for Payroll, Tax and Employee reporting.
Crystal and Hard-Coded reports are assigned a Category to help identify where they are best used in the system. (Category will be discussed in the Adding Reports section of this document.)
Report Writer allows for on the fly report development. There are no "canned" Report Writer reports in the system.
Reporting Areas
There are four Reporting Areas in the system:
- Company Setup > Reporting
- Reports Icon
- System > Reports
- My Reports
Each area is explained below.
Company Setup > Reporting section
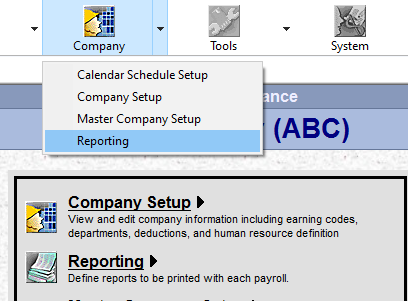
This Reporting area is used to establish what reports are created for a client, how they produce and when they produce.
A series of date driven folders are housed in this area. Reports in these folders are produced based on the Folder description.
This area is available to all users unless precluded by their security role.
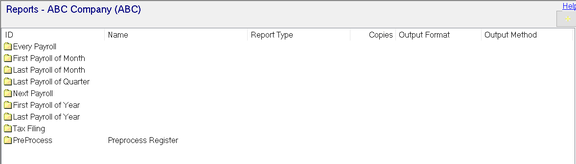
Reports setup in these folders are specific to the selected company and are produced based on the Folder description in relation to the check date of the payroll being processed. For example, reports in the Last Payroll of the Month folder produce when, based on the Company Calendar, the last payroll on the month has processed. If a new last payroll of the month is added to the calendar, the reports will produce again when that payroll has processed.
Clients may want a report every payroll that reflects other than current payroll data, such as year to date values. There is an option to do this on specific reports. See the section on Report Properties > Date Selection tab for instructions.
As this section controls what reports a client receives and when, reports in the various folders should not be modified to address one off client reporting requests (see Reports Icon below for one reporting requests). If a change is made and not reset, the report will run with the incorrect settings until addressed. Use the Scratch Pad or Reports Icon options (discussed below) instead.
Company Setup > Reports Icon

The Reports Icon is available on each company code. It is designed to be used when a report is being run at the request of the client or to research a client issue. Reports found here have no impact on the Payroll or Tax Processing.
This area is available to all users unless precluded by their security role.
System > Reports
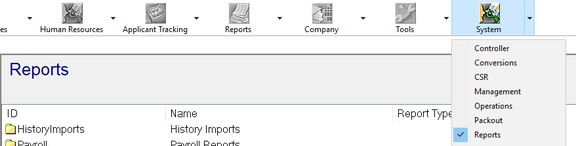
The Reports Area under the System icon is used to produce reports containing system wide data or data for groups of clients. This area is typically used by Operations/Production, Tax and Accounting personnel.
Reports setup in this area are run manually by the various users.
This area is available to all users unless precluded by their security role.
My Reports (aka Scratch Pad)
![]()
My Reports Pad is found at the bottom of the screen in all reporting areas. This area is specific to the user so the contents of this area are only visible to the user. No other user can see what is in another user's My Reports.
The contents of the My Reports vary by user and typically contain reports that they run frequently in their day to day job functions. Client Services users may have Payroll Register, Payroll Summary and other payroll and H/R type reports saved here. Operations users may have any of the system level reports they use saved here.
If you access the My Reports from a specific company code, the reports will run for that company code only.
When accessing My Reports from System > Reports, the reports run here should be system type reports. They are identified in the software by a category of Internal Service Bureau reports. Company data type reports will not run here as no company code is available in this area.
Adding Reports
The technique to add a new report is the same, regardless of which area you are in. The area to add the report is determined by the purpose of the report. A new report that the client wishes to receive would be added in one of the folders found in the Company Setup > Reporting section. Reports used for research can be added in the Report Icon or My Reports areas.
To add a report, go to the area in the system where you wish to add it. If Company Setup > Reporting section, you must navigate to the proper folder before adding. Right mouse click anywhere inside the area. Choose New from the displayed options, then choose Standard Reports.
This article focuses on the options available with Crystal and Hard-Coded reports. If adding a Report Writer, select Report Writer and see the documentation regarding how to build a Basic Report Writer.

A Dialogue Box called "Add New Report" will display.
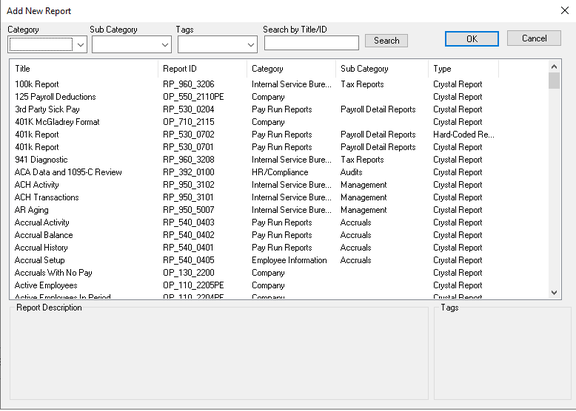
The list initially displays in Title order. Click on any of the Column Headers to resort the list.
Filters (Category, Sub Category, Tags, Search by Title/ID) are available to facilitate your search.

Click on the report you want to add. It will be highlighted in Blue. Click on the OK Button to add the report.
If you want to add multiple reports, hold down the Ctrl key and then click on each report you want to add. Then click OK.
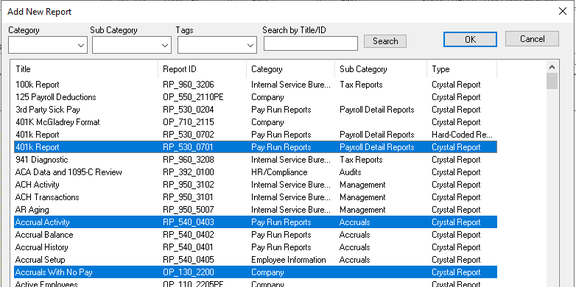
Use the Up/Down arrows on the right of the screen to change the display order of the reports.
![]()
To delete a report, right mouse click and choose Delete from the list of options.
Configuring Reports
To configure a report, right click on the report and choose Properties. This will display the Report Properties Box. The default is to the Report Info tab.

The tabs displayed in the Report Properties box are the same for every report.
The options on each tab are the same for all reports except for the Additional Formulas and Date Selection tabs. (These will be discussed later in the article.)
When a report is added, it uses a system level template (called an RPF File) to assign the report's default values on all the tabs.
Report Info tab
This tab is used to control the various printable items on a report.
All the fields on this tab are default values. They can be changed as needed (except for the Report File value).
The Report File field points the system to the Crystal report setup, or in the case of hard coded report, the program that builds the report.
Print Options
This tab controls the options for copies and print format.
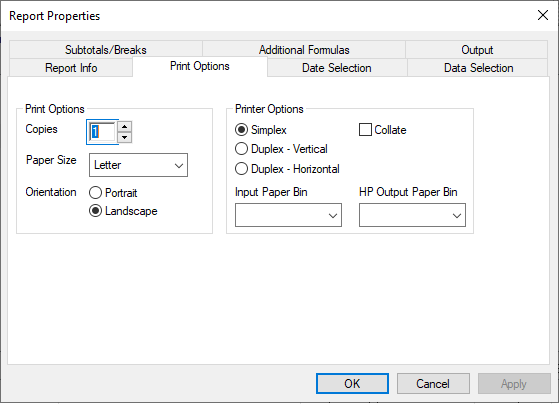
All of the values on this tab may be changed. However, the defaults are preset to match the report design and orientation so changing them may be problematic.
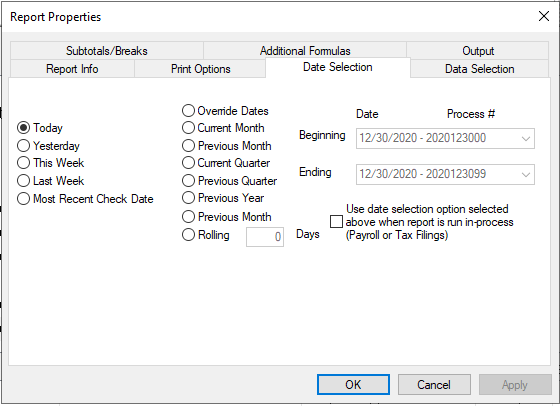
Date Selection
Use the Date Selection to tell the report what historical data to include (if relevant). For example, Employee lists are not historical as they include current employee information.
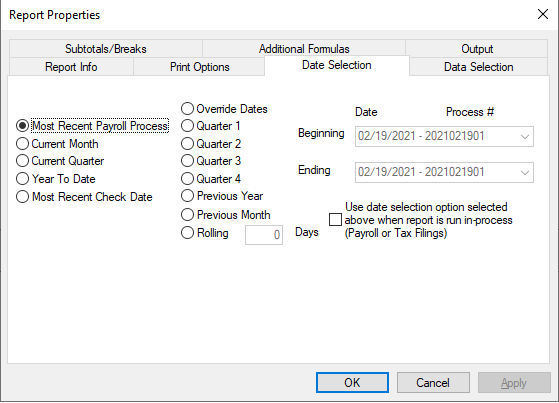
- Most Recent Payroll Process: Uses the most recent process number if a check date has multiple processes.
- Current Month: Selects the begin and end days of the month based on the check date of the last processed payroll.
- Current Quarter: Selects the begin and end days of the quarter based on the check date of the last processed payroll.
- Year To Date: Selects the begin and end days of the year based on the check date of the last processed payroll.
- Most Recent Check Date: Uses the most recent check date. Sets the Beginning Date to CheckDate01 and Ending to CheckDate99. For example, an 11/25/2020 Check Date would use 2010112501 through 2020112599 as process numbers.
- Override Dates: Select the Radio button to manually enter a range for your report to use. Beginning and Ending fields become active Drop Lists that display all processed check dates.

- Quarter 1, Quarter 2, Quarter 3, Quarter 4: Selects the Quarter Begin and End Date based on the check date of the last processed payroll. Allows for all process numbers in that date range.
- Previous Year: Selects the dates for the previous year based on the check date of the last processed payroll.
- Previous Month: Selects the dates for the previous month based on the check date of the last processed payroll.
- Rolling: Enter a number of days and the report will include data for the most recent check date and check dates that are within the timeframe of current check date minus # of Rolling Days. For example, Current Check Date is 02/19/2021 and Rolling value is 60. Report will include check dates between 12/19/2020 and 02/19/2021.
Use data selection option selected above when report is run in-process (Payroll or Tax Filing). Check this option if your report includes data that is not covered by the Reports Folder where the report resides. For example, you want to run a YTD Labor Distribution report in the Every Payroll folder. Set the date option to Year to Date and check this option.
The Date Selection Tab is different on reports that are used for system wide reporting. The date options are oriented to identifying a place in time to report on. They use the system date to determine the appropriate Beginning and Ending Date values (based on the selected radio button).
Data Selection
Use this sub-tab to filter the report by the various data options provided.
The options found in the Range 1, Range 2, From and Thru vary based on which report you are using and the setup of the company. (System type reports typically have no Data Selection options.)

Range 1 and Range 2 are Drop Lists that let you filter the report.
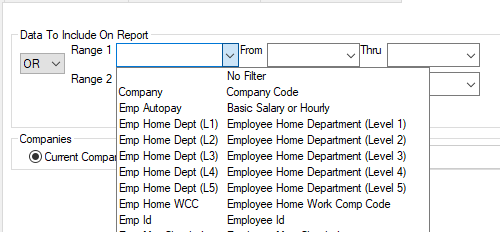
The From and Thru fields have Drop List options that are based on values in the Range 1 or Range 2 fields.
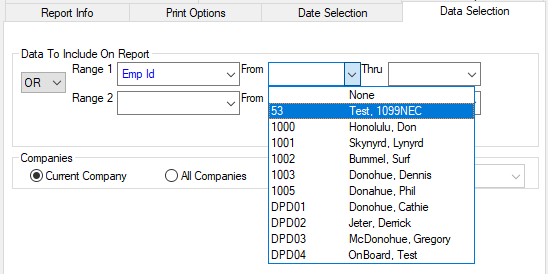
Complete the values for the Range 1 line. To select one value, enter it on both the From and Thru fields.

To select a range of values, set the Thru value to something sequentially higher than the From value.

If you need multiple Data Selections, select the appropriate value (AND/OR) from the Drop List in the field called OR.
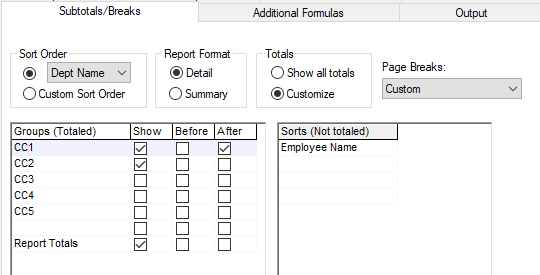
Subtotals/Breaks
This tab allows you to configure how the report will sort and whether there will be totals and/or page breaks. Reports can be detail or summary (totals only — no employee detail).
Sort Order
Use the options under Sort Order to control how the report will sort and be totaled.
The Sort Order options vary from report to report and are consistent with the type of data the report is capturing.
The following Sort Order options are most common and found on a large number of reports.

If the Sort name starts with Dept, the report will sort on every level of the company as defined in the Departments tab under Company Setup. A company can have up to five levels (CC1 > CC5) and totals will be provided for each.
The sort options of Id and Name reference employee data. Name is Last Name First Name order.
The Sort Order defaults to the most commonly used sort for that report. There will be a Drop Arrow for other common sorts (in most cases). Use the Drop List to change the Default Sort.
Below the Sort Order area, you will find the Groups (Totaled) area. This tells you where totals will be created based on your Sort Order. The Show column cannot be changed so totals will be created at all levels of the company structure.

If your Sort order is Id or Name, the Groups for totaling are listed.
Report Format
This area allows you to display the output in Detail or Summary format. Detail will contain the data that makes up the totals.
Summary suppresses the detail and the report is totals only. If the Sort order is Id or Name, there will be company totals only.

Due to their design, not all reports can be run in Summary Mode. Most Company Type reports, for example, have no details that can be suppressed.
Totals and Page Breaks settings

Totals Default is to "Show all Totals". The Page Breaks default is "No Page Breaks".
Page Break options are as follows:

Use these options to customize where page breaks are created.
- After Totals: will check all the Boxes under the column After in the Groups(Totaled) section and create page breaks after the total line for each sort.
- Before and After Totals: will check all boxes under the Before and After columns and create page breaks accordingly.
- Custom: lets you customize the page ejects. Your Sort Order must
be set to the Custom Sort Order. This allows you to set where there
are page ejects. In the example, there are totals for all levels of
the company structure, but the report only page ejects after Level
- Levels 2 and 3 will be sorted but no totals will be created for those levels.
You can use both Before and After options with this function.
Customize option
In the Totals area, there is an option called Customize. When you select this option, the Show field in Groups (Totaled) becomes available for manipulation.
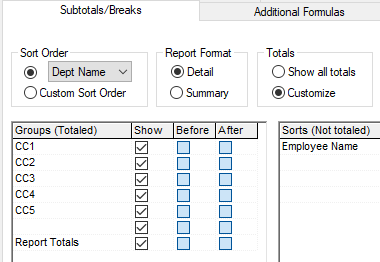
Removing a check box from any of the levels will eliminate report totals for that level.
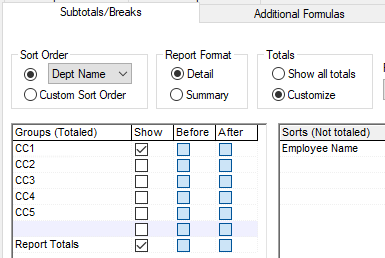
In this example, the totals will only be created after the first level of the company structure, even if they have additional levels.
If you want to completely customize where a report totals and ejects, select the Radio Button called Customize and set Page Breaks to Custom. This opens up all the check boxes in the Groups (Totals) area, allowing you to decide when to total and when to eject. In the example, there will be totals after both levels 1 and 2, with page ejects after each Level 1.
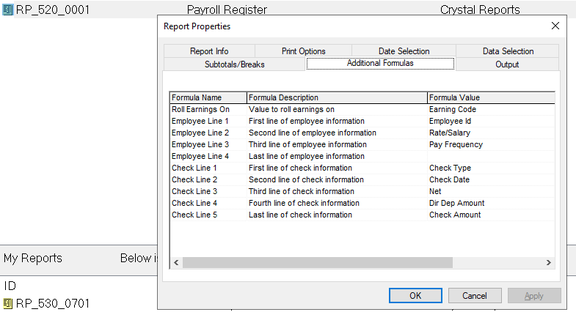
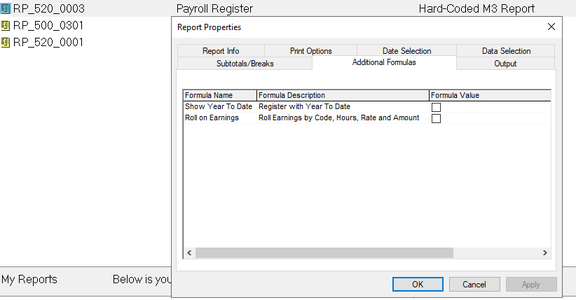
Additional Formulas
Additional Formulas are available on many reports and vary dependent on the report type. Some allow the user to change what data is on the report, what order it is in and the format of the data itself.
Additional Formulas are typically divided into three parts: Formula Name, Formula Description and Formula Value.
![]()
Formula Name and Formula Description define what the formula does.
Formula Value is the value you want to use for that formula. Formula Value fields can be text, check boxes or Drop Lists.
The best way to determine what an Additional Formula does is to preview the report, then change the Additional Formulas values. Preview the report again and compare the results.
Before settling on what report to use, review the Additional Formulas to see what options are available.
The snips below are the Additional Formulas tabs for the Crystal Payroll Register and the Hard Coded Register.
The Crystal version has a number of Additional Formulas while the Hard Coded Register does not.
Unless the client has specific requests, the Hard Coded Register is the better choice.
Output
The Output tab is used to define where the report goes when it is run (Printer, email, file, etc.), does it go to a specific system folder, and the format to use for the output.
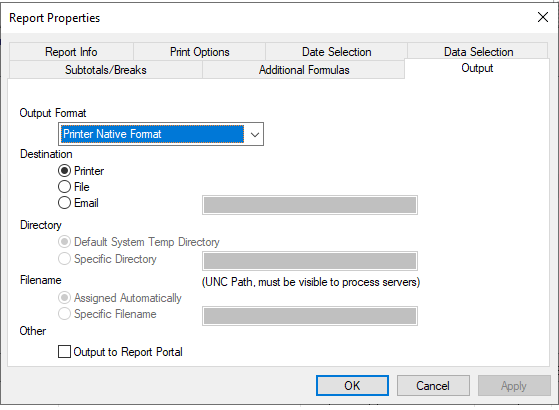
Output Format: There are numerous output formats listed in the Drop List.

Not all output formats are compatible with all reports. For some formats to work, the report must be designed to work with the selected format. For example, there is an Excel Output option available on all reports. If you run the GL Journal Entries report to Excel, the data is unusable without significant adjustments because of the title bars, shadow boxes and footers.
PDF and Printer Native formats are most commonly used when printing hard copy reports or sending to the portal.
Directory: Use when Destination is File and output is to a specific folder or the System Temp folder.

- Default System Temp Directory: Send the output to the Temp Directory as defined in ReadyPay.
- Specific Directory: Send the output to a specific folder. Path must be visible to Process Servers.
Filename: Use to define the file name of the output when the Destination is File or Email.

- Assigned Automatically: File will have a numeric, system generated file name with an extension based on the Output Format.
- Specific Filename: File will always have the name entered. File name must have a file extension entered.
ReadyPay supports a number of functions that let you enter dynamic values in the file name. Please see Reporting: Output File Naming Parameters.
Other: Check the box to send output to the Report Portal.
Additional Information
Display Information in all Reporting Areas
All reports setup in any of the reporting areas will show the following information:
Report ID, Name, Report Type, Copies, Output Format and Output Method.

When the payroll processes, the reports are created in the order they are displayed in the Reporting section under Company.
Use the Up/Down Arrow field to the right of the screen to change the order.
Multiple Versions of one report
You can set up multiple versions of the same report with each version reporting different data.
You simply repeat the steps from the Adding Reports section above as many times as needed.
When you add multiple versions of the report, the system will add them with the Report ID and a number in parentheses.

You can change the report id by left mouse clicking two times on the Report ID.
![]()
Type a new Report Id in the field.
![]()
Right Click on the report and go to Properties. Change the Report Title. You can add a Report Sub Title if needed.
![]()
Complete the new version by adjusting the Subtotals/Breaks and Data Selection tabs as needed.
Running Reports
The only reports that run automatically are those setup under Company
Reporting.
Reports in the other reporting areas must be run manually.
To run a report, right click on the report. This will display the Options Box.

Choose the Properties option and make adjustments to the date range, data selections and additional formulas as necessary. Click OK at the bottom when done.
Right click on the report again and choose how you want to run the report.

- Run Report will run the report based on the existing settings.
- Run Report... will display the contents of the Output Tab. Adjust accordingly then click OK.
- Preview will create a preview of the report.