Master Company Setup: Users
The User Tab provides a list of users specific to the company and the ability to delete, disable and maintain existing users.
You cannot add new users to this company from this tab. See below for instructions.
Users with multiple company code access that includes this company code are NOT displayed here. Those are found by accessing the Users option under System > Security.
Adding New Users
There are two ways to add a new user to the Users Tab.
1: The Create ReadyPay User function on the Master Company Setup > Contacts Tab.
New User must be setup as a contact for this method.
For more information about the Master Company Setup > Contacts Tab
click here.
2. The Users function found in the System > Security > Users. New User doesn't need to be listed as a company contact.
Creating a new ReadyPay User from the Master Company Setup > Contacts Tab
Select the contact needing to be setup as a User.
At the bottom of the screen. click the "Create New ReadyPay User" button.
![]()
Clicking the box will display the "Add New Company User" Dialogue Box.

User Name ; Field will include the Company Code and a back slash. Complete this field with the user name. Usernames must be alphanumeric.
Role : Select the User Role from the Drop List.
For a role to be included in this list, it must be updated by the Service Bureau via SQL Query.
In the SRole table, the field called clientRole must be set to 1.
![]()
Do not do this for client type roles intended to allow access to multiple company codes.
User Type : Select the User Type from the Drop List.

Initial Password : (Required) Temporary Password for the User. They will need to change the password upon first log in.
You cannot add the ReadyPay User without an Initial Password.

After completing the new company user setup, click OK.
The new user is added to the Master Company Setup > Users tab.
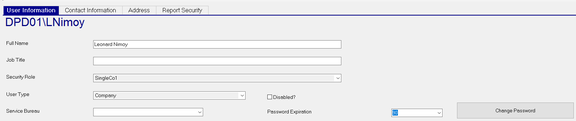
| Field Name | Information |
|---|---|
| Full Name | User's Full Name from Contacts Tab. Updating the Full Name on the Users Tab DOES NOT update the name on the Contacts Tab. |
| Job Title | Optional. Enter the Users Job Title. This is not copied from the Title field on the Contact record |
| Security Role | Use the Drop List to change the Security Role of the User. |
![]()
User Type: Use the Drop List to change the User Type of the User.
Service Bureau: Optional. Use the Drop List to associate the user with a specific Service Bureau entry

Disabled?: Check to disable the User or remove check to enable the user.
Password Expiration: Use the Drop List to establish the length of time before the User's password expires and must be reset.

Change Password: Use the Change Password Button to change the User's password.

This will display the "Change Password" Dialogue Box.

Enter the New Password and confirm it. If successful, the following message is displayed.

Creating a new ReadyPay User from the System > Security section
Assuming your user has access, go to Systems > Security. Select the Users option.

You are taken to the Users Tab.
Click the New (*) Button to display the "Add New User" Dialogue Box.

| Field Name | Information |
|---|---|
| Company | Select the appropriate company code from the Drop List. |
| User Name | Enter a User Name. Usernames must be alphanumeric (i.e., FirstName Initial and Last Name: JDoe) |
| Full Name | Enter the Full Name of the User. ie: Jane Doe |
| Role | Select the appropriate User Role from the Drop List. |
Click OK to create the new user.
The system takes you to the new user in the Users List.
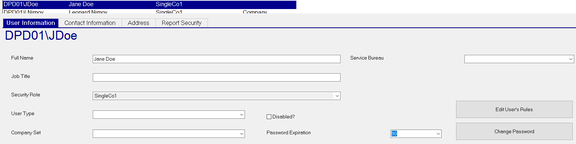
| Field Name | Information |
|---|---|
| Job Title | Optional. Enter the Users Job Title. |
| Security Role | Use the Drop List to change the Security Role of the User. The Drop List contains ALL Security Roles. |
| User Type | Use the Drop List to change the User Type of the User. The Drop List contains ALL User Types. |
| Service Bureau | Optional. Use the Drop List to associate the user with a specific Service Bureau entry |
Disabled? : Check to disable the User or remove check to enable the user.
Password Expiration : Use the Drop List to establish the length of time before the User's password expires and must be reset.
Edit User's Rules : Use this function to apply additional security settings specific to this user only .
Change Password : Use the Change Password Button to change the User's password.
This will display the "Change Password" Dialogue Box.
Enter the New Password and confirm it. If successful, the following message is displayed.
Due to the entry in the Company Field when the user was created, this user is now displayed on the Users tab for that company code.
![]()