Master Company Setup: Taxes
The Taxes (Company Tax Codes) Tab is used to manage all of the taxes related to the company. This includes all applicable Federal, state and local taxes. Options are available to set the tax rate (if applicable), the frequency for when the tax is paid and to whom.
Working with the Company Tax Codes Tab

The tab is divided into three sections. Access is by the Drop Arrow in the upper left of the screen. The default is Setup.
Each section has a "Hide Inactive items" check box. Use this to suppress entries that are not in effect based on the current check date of the company.
Code Mapping Function

This section is for a future enhancement and is currently not used.
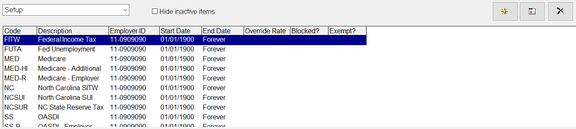
Setup Function
The upper section of the Setup Function contains a list of all tax codes set up on the company. It provides a snapshot of information from the Sub Tabs, including EIN, Start/End Dates. Also displayed is any override tax rates and if the tax is blocked or exempt. Select the tax you want to work on in the top section. Any needed changes are made in the Sub Tabs.
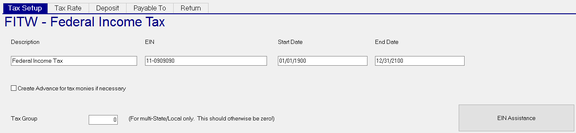
Tax Setup Sub Tab
| Field Name | Information |
|---|---|
| Description | Description of the Tax Code. Descriptions are auto-filled when a Tax Code is added. |
| EIN | The Employer Identification Code for this Tax Code |
| Start Date | Effective Date of the tax Code |
| End Date | Last date the tax is in effect. |
Create Advance for tax monies if necessary : When an employee's pay is such that the proper taxes cannot be withheld. the system creates an advance deduction which then allows all the taxes to be taken. This option "advances" the employee money so the taxes can be withheld. It is then up to the employer to collect the advanced funds from the employee.
Tax Group : Used with state and local tax codes for companies where their employees work in and are taxed in multiple states/cities within one paycheck. If not applicable, leave the Default value of zero.
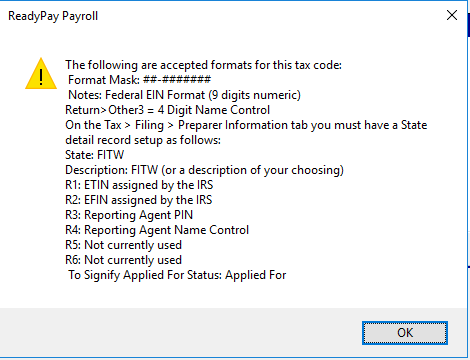
EIN Assistance : Click this button to display a ReadyPay Payroll dialogue box that contains various information that will help ensure of the tax code is setup accurately. Not all tax codes have EIN Assistance information
Tax Rate Sub Tab
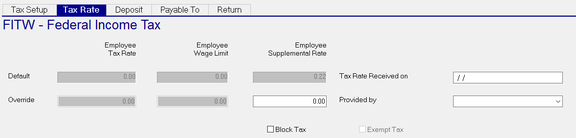
Use this tab to control the tax rate for this tax code.
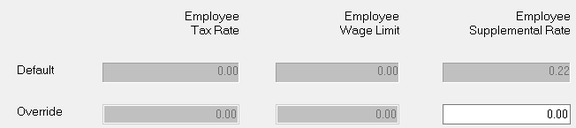
On the Default line, all fields ( Employer Tax Rate, Employer Wage Limit, Employer Supplemental rate are not active. These values are controlled from the Tax Database.
On the Override line, the Employer Tax Rate, Employer Wage Limit and Employee Supplemental Rate MAY be active and able to be overridden. This is dependent on the Tax Code. SUI Tax Rates and wage Limits can vary by company so the override option is needed.
Default Line
| Field Name | Information |
|---|---|
| Employer Tax Rate | Displays the default Tax Rate for this tax code. |
| Employer Wage Li mit | Displays the Default Employer Wage Limit for this tax code. |
| Employee Supplemental Rate | Displays the Default Employee Supplemental Rate for this tax code. |
Override Line
If the "Use Default Tax Rate" Radio Button (found below the Override line of fields) is selected, the Override Fields will not be active. If the "Override Tax Rate" Radio button is selected, the following fields will be active if applicable. Many Tax Codes do not have an Employee Supplemental Rate, so that field may not be active
| Field Name | Information |
|---|---|
| Employer Tax Rate | If the "Override Tax Rate" Radio Button is selected, an override to the Tax Rate can be entered. |
| Employer Wage Limit | If the "Override Tax Rate" Radio Button is selected, an override to the Tax Rate can be entered. |
| Employee Supplemental Rate | If the "Override Tax Rate" Radio Button is selected AND the tax Code allows for an override, an override to the Employee Supplemental Rate Rate can be entered. |

Tax Rate Received on : Enter the date when the Tax Rate Change notice was received. Use with UI Rate Changes.
Provided by : Use the Drop List to identify the source of th Rate Change.

Tax Code Override Options
![]()
Use Default Tax Rate : System will always use the Default Tax Rate. Using this option can be problematic with SUI Taxes as the default rate can change from year to year. However, an individual client rate may not, resulting in the client being taxed at the incorrect rate.
| Field Name | Information |
|---|---|
| Override Tax Rate | Allows for overrides to the Employer Tax Rate, Employer Wage Limit and, if applicable to the tax code, the Employee Supplemental Rate. When adding a new Tax Code where the tax rate and wage limits can be overridden, the system automatically selects Override Tax Rate. |
| Block Tax | if selected, the system records wages and taxable wages for the tax code. There is no withholding. |
| Exempt Tax | if selected, the system records wages for the tax code. There are no taxable wages and no withholding. |
Deposit Sub Tab
This Sub Tab controls how and when monies for this tax are paid.

| Field Name | Information |
|---|---|
| Deposit Freq | Select the Deposit Frequency from the Drop List. The options in the Drop List vary from one tax to the other. Some tax codes have multiple Deposit Frequency options. Many only have one. Some have no options on this sub tab as the "how and when" settings are controlled by another tax code. For example, Social Security and Medicare are paid with FITW. The settings on the FTW tax Code are used. In these cases, a disclaimer like the following will be displayed in the upper right hand corner of the sub tab. |
| Deposit Method | Select the Deposit Method from the Drop List. The options in the Drop List vary from one tax to the other. |
| Deposited With | In most cases, this field is unavailable as the Deposit With is controlled by the Tax Database. There are some cases where the Deposit With must be set. |
| Override Company Name (For EFT Only) | Use to override the Company Name for EFT files. |
| Agency Transit | if using EFT, enter the Transit ABA number for the Tax Agency. |
| Agency Account | If using EFT, enter the Bank Account for the Tax Agency. |
| Other 1/Other 2/Other 3 | For information on populating these fields, refer to the EIN Assistance option on the Tax Setup Sub Tab. |
Payable To Sub Tab
Use this Sub Tab to control the Payable To Name and Address information on a printed Tax Deposit Check.
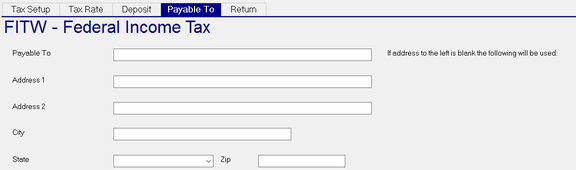
There is a statement to the right of the Payable To line that reads "If address to the left is blank the following address will be used". With taxes where the tax checks are sent to one address for the tax code, a default address will be present in the Tax Database. That address will be used unless overridden on this tab.

| Field Name | Information |
|---|---|
| Payable To | Name the check should be payable to. |
| Address 1 | Address where the check should be sent. |
| Address 2 | Additional address information. |
| City/State/Zip | City, State and Zip Code where the check should be sent. |
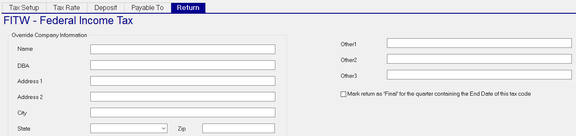
Return Sub Tab
Use this tab to override select Company Information fields on the tax return for this tax code.
| Field Name | Information |
|---|---|
| Name | Name to use on the return. |
| DBA | DBA to use on the return. |
| Address 1/Address 2/City/State/Zip | Address overrides to use on the return. |
| Other1/Other2/Other3 | See the EIN Assistance Button on the Setup Sub Tab for information on using these fields. |
Mark return as 'Final' for the quarter containing the End Date of this tax code : Does as stated.
Adding new Tax Codes
Periodically, there will be a need to add new Tax Codes to the company Tax setup.
From the Taxes Tab, click the New (*) Button to add a new code.
This will display the "New Tax Code" Dialogue Box.

Select the appropriate Radio Button for the Tax Code to be added.
Federal : Select the Federal Radio Button, then use the Tax code to add Drop List to see all available Federal Tax Codes.
Select the proper code from the list and click OK. Complete the setup of the new tax code by populating the sub tabs.
SITW : Select the SITW Radio Button, Next, select the state code from the State Drop List. Go to the "Tax code to add" Drop List and select the state from the available options. Click OK. The "Other Taxes" Dialogue Box will display. This will include other tax codes used in the state you selected. If you want to add the additional codes as well, click OK. If you do not need to add the additional codes, remove the check marks from the listed taxes, then click OK.
SUI : Select the SUI Radio Button. Next, select the state code from the State Drop List. Go to the "Tax code to add" Drop List.
A list of all the SUI type tax codes for the selected state will be listed. Select the code to add and click OK. Repeat this process to add as many SUI Tax Codes as are needed.
Local : Select the Local Radio Button. Next, select the state code from the State Drop List. Go to the "Tax code to add" Drop List and select the Local Tax code from the available options. The Drop List is blank for states with no locals. Repeat this process to add as many Local Tax Codes as are needed.
Deleting Tax Codes
A Tax Code can be deleted ONLY if it has never been used in the system in any way. Once usage has been recorded in Payroll and Tax Liabilities/Deposits, it cannot de deleted.
Maintaining existing Tax Codes
Ending Tax Codes : Update the End Date of the appropriate tax code on the Tax Setup Sub Tab. On the return Sub Tab, review the "Mark return as 'Final' for the quarter containing the End Date of this tax code" setting. Employees with this tax code should have their individual Taxes tab updated to reflect this end date.
Updating SUI Rates : Select the appropriate tax Code and then the "New Version" Button. This is the Calendar Icon in the upper right of the screen. This will display the "ER SUI Rate Change Wizard" Dialogue Box. The wizard walks the user through the steps necessary to properly make a SUI Rate change.

If the company being changed is a Child Company of a Parent/Child Multi Company Tax Setup, the following message will be displayed.
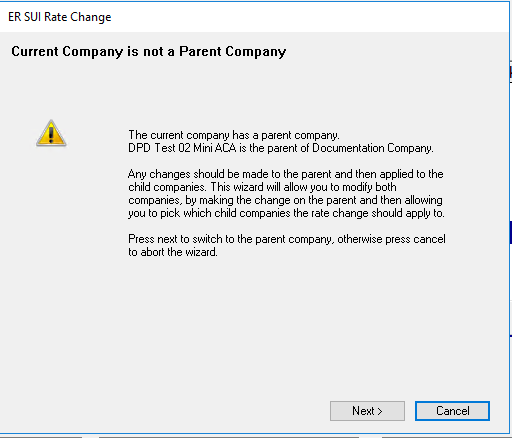
While not recommended, you can click Next and run the ER SUI Audit routine on the Child Company Code.
Complete the following fields.
Select the effective date for this change : Select the effective date for the rate change from the provided Drop List.
Tax Rate Received On : Enter the date the change notice was received. The default is today's date.
Provided By : Select the source of the change information from the provided Drop List.
![]()
Click the Next Button. The "ER SUI Rate Change - Tax Rate Change" Dialogue Box will be displayed.
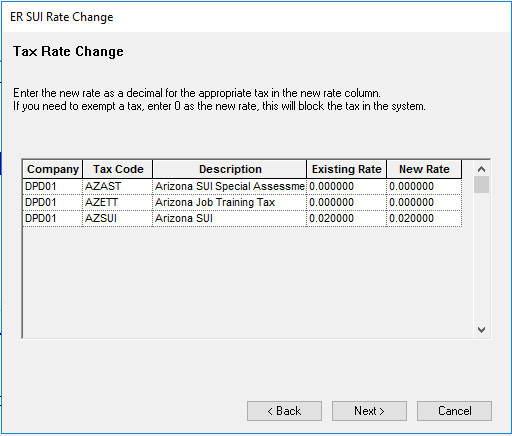
If the SUI Tax you selected contains multiple codes that are deposited with the primary SUI code, they will be included
Enter the new rate in the New Rate column for the appropriate tax code. In our example, the AZSUI Rate will be changed from 0.02 to 0.025.
![]()
Click Next. The "ER SUI Rate Change - Verify rate changes" Dialogue Box will be displayed.
Review the information and click Next if correct. Use the Back button if corrections are needed.

After clicking Next, the "ER SUI Rate Change - Results of Rate Change" Dialogue Box is displayed.
It provides a recap of the change just made.

Review the reported information, then click Next.
The "ER SUI Rate Change - Changes may result in under/over collected liabilities" Dialogue Box is displayed.

If the Rate change is for a future date, there are no liabilities to consider. In these cases the Rate change is completed. Click the Finish Button.
If the Rate change is back dated, click the check box titled :Add the Employer SUI Liability to my task list".
This will add a Employer SUI Audit Workflow job to your Tasks area. A Employer SUI Audit Workflow calculates how much money is due or to be refunded based on the Rate Change. It then provides steps on how to process the overpayment or amount due.
To access the Tasks area, you must select the Tree View and Tasks Icons from the Tool Bar.
![]()
Once selected, the Tasks area will be visible in the Tree View at the bottom of the screen.

To execute the Workflow, click on the entry in the Tasks area.
The "Employer SUI Audit Workflow" Dialogue Box will be displayed.

Click Next.
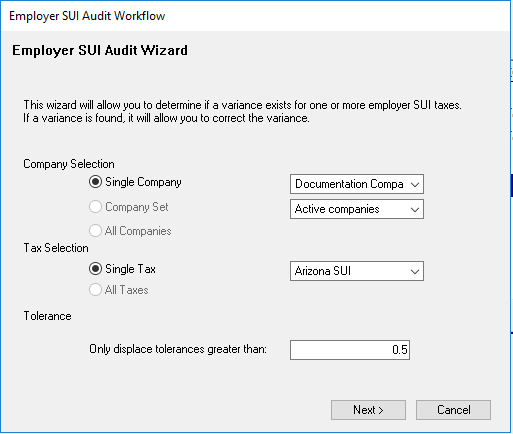
The "Employer SUI Audit Workflow - Employer SUI Audit Wizard" Dialogue Box is displayed.
| Field Name | Information |
|---|---|
| Company Selection | The Company Selection Radio button is automatically set to the company with the rate change. |
| Tax Selection | The Tax Selection Code is automatically set to the Tax Code you changed. |
| Tolerance | The Tolerance is defaulted to 0.5. Change as needed. |
DO NOT CHANGE THE COMPANY SELECTION AND TAX SELECTION SETTINGS.
Click Next.
If the company with the Rate Change is part of a Parent/Child tax setup, the "Employer SUI Audit Workflow - Selected company has children

To exclude the Child Code(s), remove the Check Mark in the update field. Click Next.
The "Employer SUI Audit Workflow - Correct Variances" Dialogue Box is displayed.
This provides a recap of the changes.

Click Next. The "Employer SUI Audit Workflow - Impound/Refund Funds" Dialogue Box is displayed.
This displays the amount to Impound or Refund based on the Rate change.

Click Next, The "Employer SUI Audit Workflow - Liability Date" Dialogue Box is displayed.
Use the provided options to set the date of the Liability record that will be created.

Click Next. The "Employer SUI Audit Workflow - Impound Date" Dialogue Box is displayed.
Use the provided options to set the date that the funds will be impounded or refunded.

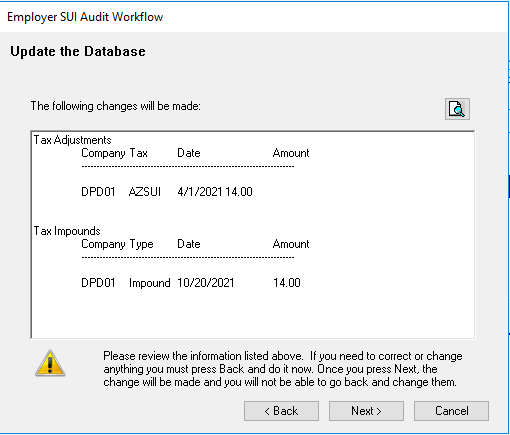
Click Next. The "Employer SUI Audit Workflow - Update the Database" Dialogue Box is displayed.
A recap of the Tax Adjustment and Impound/Refund information is displayed.
Click Next. The "Employer SUI Audit Workflow - Commit Changes" Dialogue Box is displayed.

Click Next. The "Employer SUI Audit Workflow - Run Reports" Dialogue Box is displayed.
Optional: Use the Preview or Printer Icon to run a report showing the adjustments.

Click Next. The "Employer SUI Audit Workflow - ER SUI Audit Workflow Complete" Dialogue Box is displayed.

Click OK to complete.