Master Company Setup: Status
The Status tab contains multiple sections that affect payroll processing. There are also some informational fields used for reporting across the database.
Status Tab Explanation
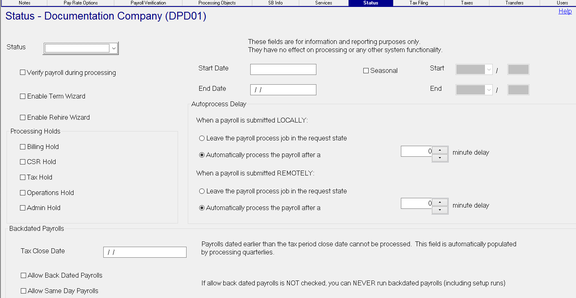

Status : Optional. Select the appropriate Status code from the Drop List. The options are hard coded. While technically an optional field, a Status should be assigned to ensure accurate database wide company reporting.

Only set a company to Nolog if you are in the process of deleting it. You cannot run payroll or make changes to a company with this status.
Verify payroll during processing : Optional. Use to activate the on-board verification and allow the use of entries found on the Master Company Setup > Payroll Verification Tab.
Enable Term Wizard: Optional. Check to activate the Term Wizard function. When an employee's status is set to Term, the Term Wizard provides functionality to allow a user to end date a number of employee settings. If not used, the changes must be done manually.

![]()
Enable Rehire Wizard: In RPD, there is a Rehire Wizard in the Employment Status section of the Employee Maintenance > Demographics Tab. The Rehire Wizard is always available in RPD. This is true even when the "Enable Rehire Wizard" box is unchecked.

This is a basic rehire function. It does not prompt the user through any employee maintenance. For the Rehire Wizard to be available in RPO, the box must be checked in RPD.
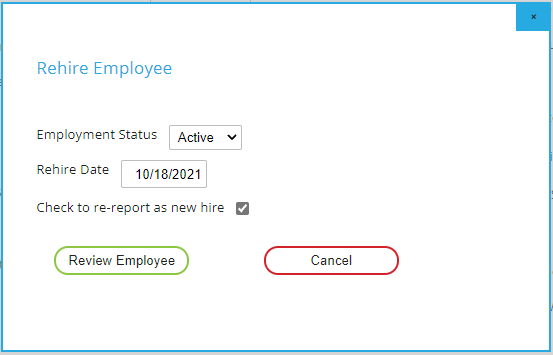
The Rehire Wizard in RPO has a "Review Employee" option. When selected, the user is prompted through the Demographics, Department and Status, Pay Settings and Taxes setup of the rehire.
Processing Holds Section
Use this section to put a payroll on hold. This prevents a payroll from processing until the reason for the hold is resolved and the hold is removed.

Companies are put on Hold to prevent their payroll from processing until the reason for the hold is addressed.
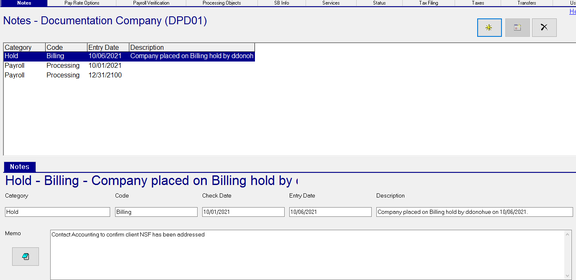
Regardless of which Hold Category is selected, the system will display a Hold Reason Dialogue Box. The Hold Reason is preceded by the name of the Hold being placed. In our example, Billing Hold has been chosen.

Enter instructions about the Hold in the Note field.
Enter a check date in the Expected Resolution Date. This is the check date when the Hold reason should be resolved.
Click OK.
An entry will be added to the Notes Tab with a Category of Hold.
The Code field is filled with the type of Hold.
The Check Date is populated with the value from the Expected Resolution Date.
The Entry Date is the actual date the hold was placed
Description is populated by the system. It indicates who placed the hold and when
Note is populated with the information entered in the Note field of the Hold Reason dialogue.
When a payroll is submitted for a company on hold, the SubmitPayroll Job with return an error. The text in the Note field from the Hold Setup will be displayed in the Summary, Progress Log and Error Log sub tabs of the Submit Payroll job. The note should be instructive to the people handling payroll processing so they know how to address the Hold.

When removing the Hold, a Dialogue Box titled "ReadyPay Payroll" will display.

Click Yes to remove the note associated with this Hold from the Notes Tab.
Click No to leave the note on the Notes tab.
Backdated Payrolls Section
The options in this section tell the system how to process (or not process) payrolls with back dated or same day check dates.
| Field Name | Information |
|---|---|
| Tax Close Date | This field is automatically populated by the Quarterly Processing function. If a payroll is run with a check date prior to or equal to this date, it should be included in an already processed quarter. The system will stop the processing, A determination on how to address must be made. This will either result in the check date being changed to a future date or the Tax Department being advised of the need to reprocess quarterlies after the payroll is processed. |
| Allow Back Dated Payrolls | If checked, a payroll with a check date prior to today's date can process. |
| Allow Same Day Payrolls | If checked, a payroll with a check date with today's date can process. |
Allow Back Dated Payrolls and Allow Same Day Payrolls should only be checked when there is a situation that necessitates running a back dated/same day check date. Best practices recommend these boxes NOT be checked. Back dated and same day check dated payrolls can cause significant tax issues if not actively and properly managed.
Dates

The Date fields in this section are for Informational purposes. They have no effect on the processing of the client.
| Field Name | Information |
|---|---|
| Start Date | Optional. Start Date of the Client. |
| End Date | Optional. The date the client terminated service. |
| Seasonal | Optional. Check if the client is seasonal. If checked, the Strat and End Fields become active. Use the Drop List to choose the Start and End months. Manually enter a year value in the provided fields. |
Autoprocess Delay
Options in this section determine when a submitted payroll will be processed.
Payrolls can either be submitted locally (in-house staff) or remotely (RPO or Client installation).
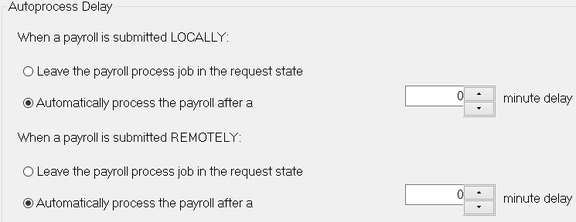
There are situations where a payroll that is normally submitted remotely is submitted locally.
Leave the payroll process job in the request state : Tells the system to not process the payroll. The payroll is added to the System > Operations > Job Requests tab and must be manually approved for processing.
Automatically process the payroll after a 0 minute delay: Use this option to allow the payroll to process immediately and without manual intervention.
Use the Up/Down arrow options to tell the system to automatically process the payroll after the selected number of minutes.

In the snip, we have set the field to five minutes. All jobs in the Job Queue are time stamped with the time they are submitted. Submit Payroll jobs are time stamped. Processing of the payroll will begin when the time equals the submitted time plus five minutes.