Master Company Setup: Delivery Settings
The Delivery Settings Tab is used to record the various addresses where packages may be delivered for the client. Each stored address can have detailed information regarding the deliveries to that address, including the delivery service (Courier, UPS, FedEx, etc) and notes/instructions particular to deliveries to that address. Currently, the data on the Delivery Settings tab is informational. In future iterations of RPD, there will be options tying those Delivery Setting records to specific functions in the system.
Setup
To add a new Delivery Setting record, click the New (*) Button.
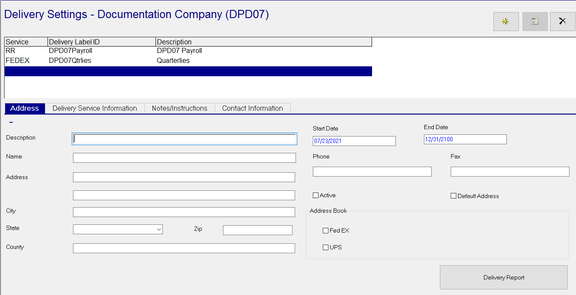
You are moved to the Address Sub Tab,
Address Sub Tab
| Field Name | Information |
|---|---|
| Description | Required. Enter a Description of the Delivery (Payroll, Quarterlies, etc). This is displayed in the grid under the Description Header. |
| Name | Optional. An informational name for the delivery |
| Address | Optional. Enter the address for this delivery. |
| Add'l Address | Optional. Additional address information (Suite #, etc) for this delivery |
| City | Optional. Enter the City for this delivery. |
| State | Optional. Enter the State for this delivery. |
| Zip | Optional. Enter the Zip Code for this delivery |
| Country | Optional. Enter the Country for this delivery. |
| Start Date | Required - Date the address becomes effective. |
| End Date | Required - Last date the address is in effect. |
| Phone | Optional - Phone Number for this address (field is not formatted as a phone number field) |
| Fax | Fax Number for this address (field is not formatted as a phone number field) |
| Active | Optional. Indicates if this address is active. |
| Default Address | Optional. Indicates this address as the Default Address for this company. |
Address Book Sub-Section (Optional)
Mark Fed EX or UPS as appropriate
Delivery Report Button : Click to print a Delivery Report for the selected address.
A Dialogue Box will appear with options for various report types, printers and check date.

Select the appropriate report and printer options.
Select Check Date if needed.
Delivery Service Information Sub Tab
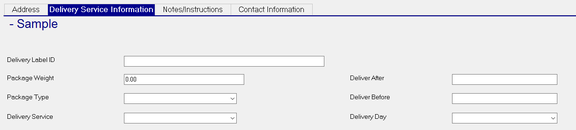
Use this sub tab to enter specifics about the delivery to this address.
| Field Name | Information |
|---|---|
| Delivery Label ID | Optional. Free Form identifier for deliveries to this address. This information is displayed in the Grid on the top of the tab. |
| Package Weight | Optional. Weight of package |
| Package Type | Optional. Select Package Type from Drop List |
| Delivery Service | Optional. Select Delivery Service from Drop List. |
You will find instructions on creating the options for the Package Type and Delivery Service drop lists after the explanation of this Sub Tab in the section titled Setting up of the System Level Package Type and Delivery Service Drop Lists
| Field Name | Information |
|---|---|
| Deliver After | Optional. Enter a time that the package should be delivered after. |
| Deliver Before | Optional. Enter a time that the package should be delivered before |
| Delivery Day | Optional. If applicable. choose a day of the week from the Drop List. |
Setting up of the System Level Package Type and Delivery Service Drop Lists
The available options in the Drop Lists for the fields Package Type and Delivery Service tab are created at the System level.
To populate these Drop Lists, go to System > Misc tab. Use the Drop List option to select Delivery Package Types or Delivery Services.
![]()
The Delivery Package Types uses data from the Delivery Services options. Populate the Delivery Services Types options first.
Adding Delivery Services
On the System > Misc Tab, select Delivery Services from the Drop List.
Click the New (*) Button. A dialogue box called "Enter Code for New Delivery Service". Enter the code. Click OK.
The code you entered will populate the Code field on the Sub Tab.
Enter a Description of the Delivery Service
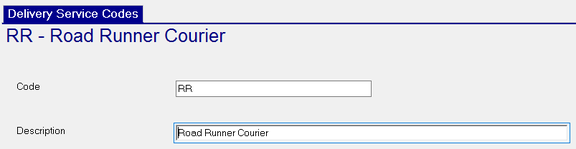
Continue adding Delivery Services as needed.
Adding Package Types
On the System > Misc Tab, select Delivery Package Types from the Drop List.
Click the New (*) Button. A dialogue box called "Enter Code for New Package Type". Enter the code. Click OK.
The code you entered will populate the Code field on the Sub Tab.
Enter a Description of the Package Type.
Use the Drop List to select the appropriate Delivery Service.
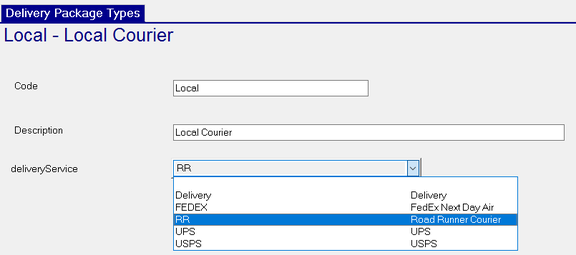
Continue adding Package Types as needed.
Notes/Instructions Sub Tab
Use this sub tab to enter notes and instructions for this delivery.
Both the Notes and Instructions are free form Text Fields.