Master Company Setup: Custom Form Tabs
Introduction
This article describes the use of and setup process of the Custom Form Tab in ReadyPay Desktop (RPD) and their use in both ReadyPay Desktop (RPD) and ReadyPay Online (RPO).
Note: In the document ReadyPay Desktop will be identified as RPD . ReadyPay Online will be identified as RPO.
Overview
Custom Form Tabs is found in Master Company Setup. This tab is where you create Company and/or Employee Level custom tabs specific to the needs of a client that are not met by the existing tabs. For example: The Gaming Industry requires employees to have certain identifying documents on their person at all times when working. An employee found with an expired document could result in the establishment being closed by the state's Gaming Commission. Trucking companies need to maintain accurate information regarding the Driver License information of their drivers. A company may need to track information about certain company licenses or plans critical to their business.
Creating Custom Form Tabs
There are two Sub Tabs used to create a Custom Form Tab: Custom Tab Setup and Fields.
The Custom Tab Setup Sub Tab controls the naming, location and display position of the tabs.
The Fields Sub Tab is used to setup the fields to include on the Custom Form Tab.
Custom Tab Setup Sub Tab
Go to Master Company Setup > Custom Form Tabs.
Click the New (*) button.
Enter a name for the Custom Tab. Be BRIEF but descriptive. The value entered here is how the tab will be named wherever displayed in the system. Spaces are allowed. Click OK.
Description: (Informational and optional) A description of the tab.
Tab Leve l: Select Company or Employee dependent on what type of data the tab will display.

Employee Type Custom tabs are added to the Employee tabs in Employee Maintenance.
Company Type Custom tabs are added to Company Maintenance > Company Setup in RPD.
Use Large Font : (Optional) Field Names and data within the fields are Bolded.

Sample with "Use Large Font" off
Sample with "Use Large Font" on
![]()
| Field Name | Information |
|---|---|
| Sequence | Default value is zero. If multiple custom tabs exist they are displayed in their respective sections of RPD in Tab Name order. If you want the custom tabs to display in a specific order, enter a numeric value here to control their display order. Zero (0) is the lowest value and will display to the left. On subsequent tabs, enter 1, 2, 3, 4 etc. They will be displayed in numeric order from left to right. |
| Columns | Defines the number of columns to display on the Custom Tab. Options are 3, 4 and 5. If left blank, no fields will be displayed on the tab, even if you have defined them. |
| Allow Web Access | Check this field if the tab should be available on RPO as well. See Allow Web Access Samples section below for samples Custom Tabs as they appear on RPO. |
| Allow Kiosk/Onboarding Access | When you want use a Custom Form Tab with Onboarding, there is an extra step. You must log into Kiosk with a user account that has the Admin role. Then, navigate to the Admin > Settings page. Scroll down until you get to the "Custom Tab Options" section. Check the Custom Form Tab you want to be available in RPO's Onboarding Customization page and click the "Save" button. |

Publish : Publishing a custom tab makes it available in the area designated by the "Tab Level" field
Unpublish : Unpublishes the Custom Tab, removing it from the area designated by the "Tab Level" field
As you are building your tab, you may find changes are needed to the setup. Best practice is to Unpublish the tab, make the necessary changes, the Republish. Repeat this process as many times as needed to ensure the tab is properly formatted.
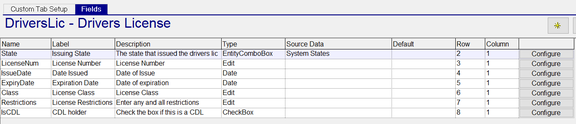
Fields Sub Tab
The Fields Sub Tab is used to establish the following:
1. The fields that will be displayed on the Custom tab.
2. Their placement/position on the tab.
3. The type of field.

Explanation of the Fields In the Fields Sub Tab
| Field Name | Information |
|---|---|
| Name | Name can be whatever makes sense in relation to the Custom Tab. It can also be a series of letters or number. The value entered in Name is not displayed on the Custom Tab. |
| Label | Enter what the field should be called on the actual custom tab. |
| Description | A description of the field. The value entered in Description is not displayed on the Custom Tab. |
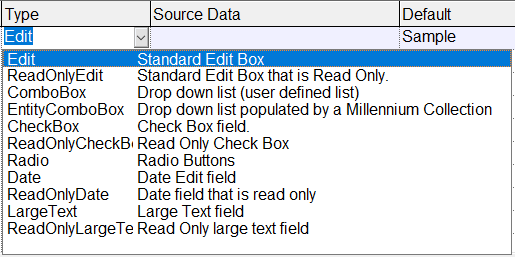
Type : Controls how the field will function on the Custom Tab. Options are:
An explanation of how each Type option functions is found at the end of this document in the section called
"Explanation of The Type Fields on the Fields Sub Tab".
Source Data : Certain Types allow you to select where the data for this field is pulled from in the database. Those Types are
Entity Combo Box, ReadOnlyCheckBox, ReadOnlyDate and ReadOnlyLargeText.
Each of these Types will have a Drop List Option available that is logical to the Field Type.
i.e. - the ReadOnlyDate Type provides a list of dates from the company and employee data.
| Field Name | Information |
|---|---|
| Default | (Optional)The default Value for this field on the Custom tab. |
| Row | Used to position the field on the Custom Tab. This is the number of Rows from the top of the screen where the field should be placed. Adjust the Row number to ensure adequate spacing between the row. |
| Column | Used to position the field on the Custom Tab. This is the column number (1 through 5) from left to right on the Custom Tab. No more than five (5) columns are allowed. Use in conjunction with the Columns field on the Custom Tab Setup Sub Tab. |
| Configure | The field type ComboBox is configurable. This allows for building a set of choices when accessing the field on the Custom tab. Click Configure to display the "Add Field Options" Dialogue Box. Use the New (*) button to enter the values for the field. Click OK. |


This will create a line in the Add Field Options grid. Enter a Description for the field. Click OK. Repeat as needed.

Sample

Following are examples of various combinations of Row and Column settings that demonstrate the use of the Row and Column fields and how they affect the layout of a Custom Tab.
Ex.1: All fields have different Row values but the same Column value.

Ex. 2: All fields have the same Row but different Column value


Ex. 3: Fields have the different Row Values and different Column values


Use the Row and Columns settings to ensure each field is displayed as you expect and that there is no field overlap.
Allow Web Access Samples (Displayed on RPO). Should the tab be available on RPO as well as RPD?
Following are sample of how Custom Tabs are displayed on RPO when the "Allow Web Access" is checked on the Custom Tab Setup Sub Tab in RPD.
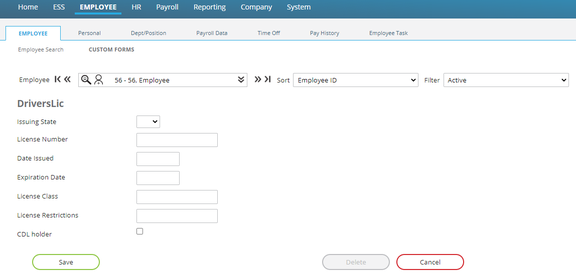
For Custom tabs with a Tab Level value of Employee, go to the Employee Module. Next to Employee Search, find and select the Custom Forms Sub Tab.

This will display a image of a File Folder with the name of the Custom tab to its right
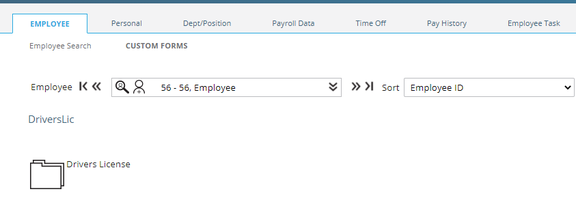
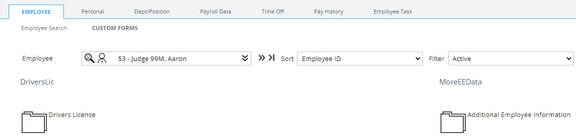
If there are multiple Custom Tabs, they will be displayed like this:
To access the Custom Tab, click on the picture of the File Folder for the Custom tab you wish to access.
This will display the contents of the Custom tab.
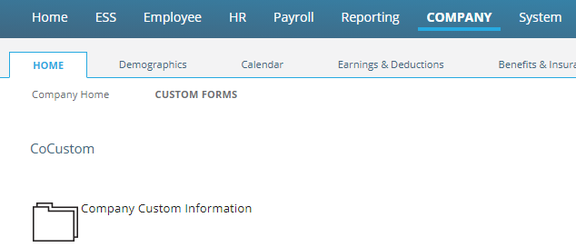
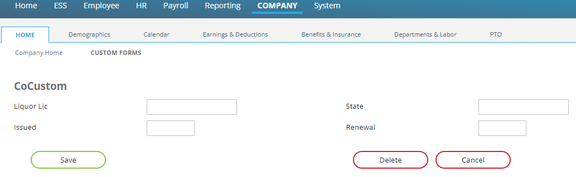
To access Company Level Custom tabs on RPO, go to the Home tab of the Company Module. Select the Custom Forms Sub Tab (to the right of the Home Sub Tab).
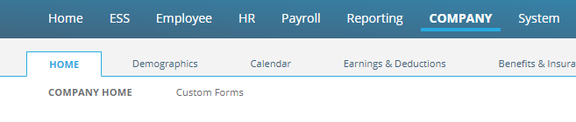
To access the Custom Tab, click on the picture of the File Folder for the Custom tab you wish to access.
This will display the contents of the Custom tab.
View and/or update as necessary
Custom Tab Reporting
None of the Crystal or Hard Coded reports included with RPD and RPO that can be used to report on Custom tabs data.
Reporting on Custom Tabs is, however, available in Report Writer.
If a Crystal report is needed, it must be developed as a custom report.
The following tabs would be used when building a Crystal Report based on Custom Tabs data.

This assumes the user has a working knowledge of Crystal reports and the inner workings of the ReadyPay database table structure.
Using Report Writer for Custom tabs data
Data for Custom tabs with a Tab Level of Tab Company is available in all Company Level Data Types Report Writers.
Select a Company Report Writer type report. Under Available Fields, click the Plus (+) sign next to the "co {Company Fields}" collection.

Scroll down to the end of the collection. Click on the Plus (+) sign next to Custom Form Tab Data.
![]()
If there are multiple company level Custom tabs, you must click the Plus (+) sign next to the appropriate tab name first.
To display the data, click on the Plus (+) sign next to the name of the Company Level Custom Tab.

Data for Custom tabs with a Tab Level of Tab Employee is available in all Employee Level Data Types Report Writers.
Select an Employee Report Writer type report.
Under Available Fields, click the Plus (+) sign next to the "ee {Employee Fields}" collection.

Scroll down to the end of the collection. Click on the Plus (+) sign next to Custom Form Tab Data.

To display the data, click on the Plus (+) sign next to the name of the Employee Level Custom Tab.

Go to the Fields tab to add the fields to the Report Writer report.
Double click on the desired fields to add them to the report.
Perform all necessary editing and formatting as with any Report Writer fields.
Data from Custom Tabs can be used for Filtering and Sorting.
Security
Access to the data in Custom Tabs is managed using standard Security functions and practices.
When you create a Custom tab, it does appear in the list of tables displayed on all Security Roles. They are not handled as company specific tables by the Security model.
Go to System > Security > Roles and select the role you wish to manage.
Go to the Edit Role Sub Tab.
Company level Custom Tabs will be listed first under the Company Setup section.

Employee level Custom Tabs will be listed first under the Employees section.

To deny complete access to any of the Custom Tabs, click the Box next to the Custom Tab name.
To limit access to certain fields or make them view only, standard Security practices are employed.
Using Security data collections, you can deny access to individua fields, make the data read only, etc.
There are five Company Level Security Collections used to manage security on Company Level Custom Tabs. (See example)
There are two for Employee level.

There will be no discussion of manipulating data in these collections using the RPD Security model.
Managing access to these Data Collections assumes the user has a strong working knowledge of Security.
Explanation of The Type Fields on the Fields Sub Tab
There are eleven (11) options available in the Type field Drop List on the Fields Sub Tab.
These options provide formatting options for the various fields being added to the Custom Tab.
Edit : Creates a field where a user can enter and/or edit the data in the field.
In our sample, our Edit Field is named Type of Car.
![]()
The data field is not greyed out. The data in the field can be changed or deleted.
ReadOnlyEdit : Use the options in the Source Date Drop List to display in this field. The chosen field will be displayed but in not editable. Our sample ReadOnlyEdit field is called Marital Status. Our Source Data selection is EE[MaritalStatus].
![]()
The data field is greyed out. The data in the field cannot be changed or deleted.
ComboBox : ComboBox fields must be configured to create the options that can be selected for the field. Our sample ComboBox field is called LeftieRightie. We have configured options for Left and Right Handed.

On the Custom Tab, the result is as follows:

EntityComboBox : Currently not supported
Check Box : Create a Check Box to indicate True or False, Our sample field is called Musician.
![]()
ReadOnlyCheckBox : Creates a Read Only Check Box that displays data based on the option selected in the Source Data field. The Drop List for ReadOnlyCheckBox includes only the fields that are Check Boxes in the software. Our sample field is called Pension EE. Our Source data selection is EE[pension]. This refers to the Retirement Plan on the Employee > Compliance tab.
![]()
Radio : Currently not supported
Date : Creates an editable Date field on the Custom Tab. Our sample date field is called Wedding Date. The Default value is set to 01/01/2021. The date field is not greyed out so can be changed or removed.
![]()
Read Only Date : Creates a Read Only Date Field Box that displays data based on the option selected in the Source Data field. The Drop List for ReadOnlyDate Field includes only the fields that are Date fields in the software. Our sample field is called Hired. Our Source data selection is EE[hiredate]. This refers to the Hire Date on the Employee > Demographics tab.
Large Text : Creates an editable Large Text Box that the user can use to enter data free form, Our sample field is called Large text. The Default value is LARGE. The date field is not greyed out so can be changed or removed.

Read Only Large Text: Creates an Read Only Large Text Box. User cannot edit or change the data form, Our sample field id called RO Large text. The Default value is "This is a sample of how the data from the Default tab is displayed in a Read Only Large text type field".

Additional Information: With both the Large Text and Read Only Large Text type fields, you can enter a large amount of characters. However, the data is displayed on a single line, not as a paragraph. User must use provided Slide Bars to scroll to the right to see the entire entry.
Working with erroneous values in the Default field : You cannot simply change a Default value once you have entered it in the Default field and published the Custom Tab. If you find you need to change or delete a Default value, you must delete the row for the field with the default value and unpublish the Custom Tab. Next, add back the row with the correct value in Default and publish the Custom Tab again.