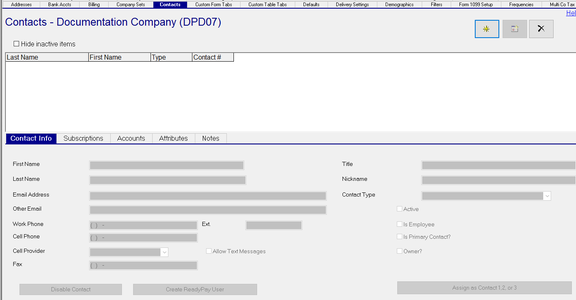
Master Company Setup: Contacts
The Contacts Tab is used to establish the individuals who would be communicated with for this client.
Contacts can be identified by Contact Type. Contact Types are used to associate the contact with a particular function.
This facilitates with determining the proper person with whom communication should be made.
No Contacts are created during the New Company Conversion process.
Adding New Contacts
Click the New (*) Button
The "Add New Contact" Dialogue Box is displayed.

New contact is an Employee of this company : Check if contact is an Employee of this company.
If Contact is not an employee, select the Contact Type (if applicable), then click the Add Contact button
at the bottom of the Dialogue Box.
Contact Type : (Optional) Choose Contact Type from Drop List.

The table of Contact Types is found in System on the Misc Tab. Use the Drop List and scroll to Contact Types
Employee Contact Search Section

The fields in this section are active ONLY when the "New contact is an Employee of this company" is checked.
Last Name : Type the Last Name of the Contact. Click the Search Button to the right of the Last Name Field. The entire Last Nam is not required for the search function to work,
Employee Drop List : If no employees are found that match the entry in the "Last Name" field, the field is not active.

If there are employees who match the entry in the "Last Name" field, the field becomes Active,
Click on the field to see the results. If multiple employees match the Last Name, they will be displayed in the Drop List.
Select the appropriate employee from the Drop List

Click Add Contact This will take you to the Contact Info Sub Tab
Contact Info Sub Tab
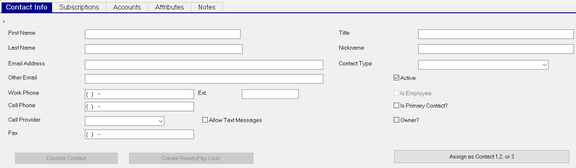
First Name : The First Name of the Contact. If the "New contact is an Employee of this company" option was used, this field is already populated.
Last Name : The First Name of the Contact. If the "New contact is an Employee of this company" option was used, this field is already populated.
An asterisk (*) next to the following field names indicate the field is optional.
Email Address* : EMail address of the contact.
Other EMail* : Alternate EMail for the Contact.
Work Phone : Work Phone of the Contact.
Ext: Work* : Phone Extension of the Contact.
Cell Phone* : Cell Phone Number of the Contact.
Cell Provider* : Drop List to identify the Cell Provider of the Contact. (The master list of Cell Providers is found in the System > Setup > Misc Tab. Scroll down in the Drop List to the Cell Phone Providers option)
Allow Text Messages Check Box* : Indicates Contact can receive texts.
Fax* : Fax number of the Contact.
Title* : Title of the Contact.
Nickname* : Nickname of the Contact.
Contact Type* : Contact Type of the Contact.
Active: Indicates if the Contact is an Active Contact. Must be selected to set Contact as Company Contact 1, 2 or 3.
Is Employee : Field cannot be updated. If the "New contact is an Employee of this company" option was used, this field is already populated. Otherwise it is inactive.
Is Primary Contact? : Use to identify contact as primary contact for this company
Owner* : Indicates the Contact is an Owner
Disable Contact : Future Enhancement
Create ReadyPay User : Allows creation of a new RPO user for this contact.
Clicking the box will display the "Add New Company User" Dialogue Box.

User Name ; Field will include the Company Code and a back slash. Complete this field with the user name.
Role : Select the User Role from the Drop List.
For a role to be included in this list, it must be updated by the Service Bureau via SQL Query.
In the SRole table, the field called clientRole must be set to 1.
Do not do this for client type roles intended to allow access to multiple company codes.
![]()
User Type : Select the User Type from the Drop List.
![]()
Initial Password : (Required) Temporary Password for the User. They will need to change the password upon first log in.
You cannot add the ReadyPay User without an Initial Password.

After completing the new company user setup, click OK.
The new user is added to the Master Company Setup > Users tab.
Assign as Contact 1, 2 or 3 : Used to assign active contacts as Contact 1, 2 or 3 on the Master Company Setup > Company Demographics Tab.
Click the "Assign as Contact 1, 2 or 3" box to display the "Assign Primary Contact" Dialogue Box.

Use the Drop List to select which contact number to assign

If you choose a Contact Number that is assigned to another contact, the Current Contact, Name, Title, Phone, EMail and ContactNumber fields are populated with that information from their Contact record.

If you choose a Contact Number that is not assigned to another contact, the Current Contact, Name, Title, Phone, EMail and ContactNumber fields are blank.

Click OK. The space above the "Assign as Contact 1, 2or 3" field now displays the Contact Number.

Subscriptions Sub Tab (optional)

The Subscriptions Sub Tab allows for contacts to receive various notifications from the service bureau.
The Subscriptions are built and managed using SQL Queries in RPD and functions found in Client Manager Pro (aka CPM.
CMP is a utility developed and provided by Taslar. Instructions on the setup and maintenance of Client Subscriptions are found in the Service Bureau Notifications User Guide.
To access the Service Bureau Notifications User Guide
click here.
Accounts Sub Tab (optional)

Use the Accounts Sub Tab to record the types of Application Accounts setup for this contact.
To add a new Account entry, click the New (*) Button.
The "Select Account Type" Dialogue Box will be displayed.
Select the Account Type from the Drop List.
Account Type is an editable list found at System > Setup > Misc Tab,
Scroll down the Drop List to the Contact Application Types option.

Username : Enter the User Name for the selected application.
Role : Enter the Role Code for the User Name
Attributes Sub Tab (optional)

The Attributes Sub Tab is used to associate the contact with various functions at the client..
To add a new Attribute, click the New (*) Button.
The "Select Attribute Type" Dialogue Box will be displayed.
Select the Attribute Type from the Drop List.
Attribute Type is an editable list found at System > Setup > Misc Tab,
Scroll down the Drop List to the Contact Attribute Types option.

Custom Field 1
: User discretion field.
Custom Field 2 : User discretion field.
Notes Sub Tab (optional)

The Notes Sub Tab is used to create free form notes associated with the contact. All Notes are informational only.
To add a new Note, click the New (*) button.
A new line is created in the Grid.
| Field Name | Information |
|---|---|
| Subject | Subject of the Note. This field is free-form. There is no Drop List available for the Subject field. |
| Notify | Field is already checked. This does not notify the contact. |
| Created Date | Filed is populated by the system when the record is saved |
Note : Click the word "Edit" to display the "Edit Message" Dialogue Box.
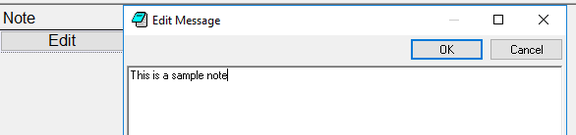
Add a new note or view/update any existing note information saved in this field.