Master Company Setup: Billing
The Billing Tab is used to establish how an individual company is charged for the services provided by the service bureau.
There are three sections to the Billing Tab: Commissions, Detail and Setup. When you access the Billing Tab, the default displays the Detail Tab. Use the Drop Arrow to the right of the word Detail to select the other sections.

While one can manually invoice a client, Billing is typically generated as part of a payroll processing.
Billing will be processed every payroll unless the option to "Block Billing" is invoked for a particular payroll.
This option is found at Company Setup > Calendar > Process Control Sub Tab.

Billing is based on the Billing Products found at the system level of RPD (System >AR > Billing Product Types).
Billing can be scheduled to occur every payroll, monthly, quarterly and annually. The scheduling can be at either the beginning or end of the month, quarter or year. Custom schedules and one-time billing are also supported. The schedules are based on the Frequencies found at Master Company Setup > Frequencies.
For more information on Frequencies.
click here.
Setup Tab (Billing Setup and Terms)
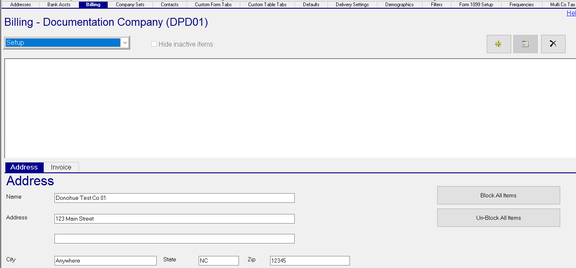
The Setup Tab is comprised of two Sub Tabs: Address and Invoice.
The Address Tab contains the Billing address for the client. When the company is created, the Address Sub tab is populated with the client address from the Master Company Setup > Demographics Tab.
The Invoice Sub Tab defines the Terms of the Invoice and other information regarding how the client is billed.
![]()
New, New Version and Delete Buttons : These buttons, found in the upper right of the screen, have no functionality on the Setup and Invoice Sub Tabs
Address Sub Tab
| Field Name | Information |
|---|---|
| Name | Billing Name |
| Address | Billing Address and additional address information |
| City | Billing City |
| State | Billing State |
| Zip | Billing Zip |
| Block All Items | Click this box and all items on the Detail Tab are blocked for Billing |
| Un-Block All Items | Click this box and all items on the Detail Tab are unblocked for Billing. |
Invoice Sub Tab
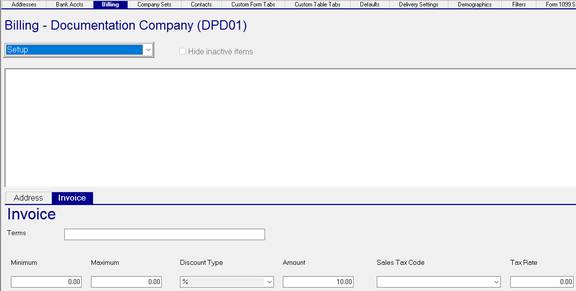
Terms: Terms of payment by the client
Minimum : After calculating Billing Detail amounts, the total of the Invoice must be at least this amount.
If not, the Invoice Total is set to this amount.
Maximum : After calculating Billing Detail amounts, the total of the Invoice must not exceed this amount.
If it does, the Invoice Total is set to this amount.
| Field Name | Information |
|---|---|
| Discount Type | Discount applied to the entire invoice. Options are Flat and Percentage (%) |
| Amount | Amount of Discount as defined by Discount Type field. |
| Sales Tax Code | Picklist based on data from System > Misc > Sales Tax Codes. |
| Tax Rate | Tax Rate assigned to the Sales Tax Code from System > Misc > Sales Tax Codes. |
Details Tab
The Details Tab is used to establish and maintain client billing.
On this tab, the New, New Version and Delete Buttons are functional.
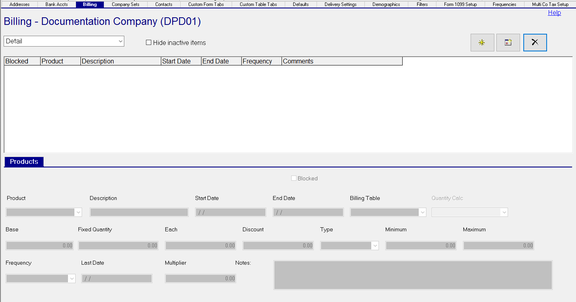
To add a new Billing Detail, click the New (*) Button. here is no dialogue box used to add new Billing Details
A new line will appear on the Products Sub Tab.

Blocked : Use this Check Box if Billing for this Billing Detail is to be blocked
Product : Use the Drop List to select the Product for this Billing Detail. The list of Products is found on the System >
Controller tab. Use the Drop List and select Products - Product Descriptions.
| Field Name | Information |
|---|---|
| Description | Description of the Billing Product from the Product found on the System > Controller tab. |
| Start Date | Enter the Start Date. If left Blank, the system will populate the field with 01/01/1900 when the record is saved. |
| End Date | Enter the End Date. If left Blank, the system will populate the field with 12/31/2100 when the record is saved. |
| Billing Table | (Optional) If applicable, use the Drop List to choose the Billing Table for this Billing Detail. Billing Tables are found on the System > Controller > Billing Tables tab. |
| Base | The Base Rate for this Billing Detail |
| Fixed Quantity | enter a number if billing is for a set number of items. Do not use with Billing Products based on a count as the count can vary. |
Each : Price for each item of the Billing Detail
| Field Name | Information |
|---|---|
| Discount | The amount of the discount for this Billing Detail item based on the setting in the Type Field. |
| Type | Blank (Flat Amount) or % (Percentage) |
| Minimum | After calculating the Billing Detail amount, the billed amount for this Billing Detail must be at least this amount. |
If not, the billed amount for this Billing Detail is set to this amount.
Maximum : After calculating the Billing Detail amount, the billed amount for this Billing Detail cannot exceed this amount.
If so, the billed amount for this Billing Detail is set to this amount.
| Field Name | Information |
|---|---|
| Frequency | use the Drop List to set the Frequency that this Billing Detail is billed. Blank means Every Payroll. |
| Last Date | The date this Billing Detail was last billed. The system updates this field when Billing is run during payroll. |
| Multiplier | Future Enhancement |
| Notes | Internal Notes from the person setting up the Billing Detail |
Commissions
(Optional) The Commission Tab is used to configure Sales Commissions for this account. The data on the Commissions Tab is used by the RPD Commission Report (RP_950_5501) to calculate commission amounts for Sales Representatives.
On this tab, the New, New Version and Delete Buttons are functional.
To add a new Commission entry, click the New (*) button. A new line will appear on the screen.
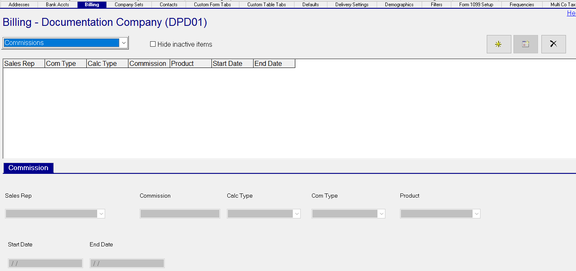
Sales Rep : Select the Sales Rep from the Drop List. The list of Sales Reps is found in the System > Setup > Misc Tab.
Using the Drop List on the screen under the word Miscellaneous, scroll to Sales Reps.
| Field Name | Information |
|---|---|
| Commission | The amount or percentage of the Commission based on the setting in the Calc Type Field |
| CalcType | Blank (Flat Amount) or % (Percentage) |
| Com Type | Select the Commission Type from the Drop List. The list of Com Types is found in the System > Setup > Misc Tab. |
Using the Drop List on the screen under the word Miscellaneous, scroll to Commission Types.
| Field Name | Information |
|---|---|
| Product | If Commission is based on the entire invoice, leave this field blank. I f the Commission calculation varies by Product, select a Product from the Drop List if the Commission calculation varies by Product. Add as many Commission entries as needed. |
| Start Date | Date to begin calculation of Commissions. |
| End Date | Date to end calculation of Commissions |
Ongoing Maintenance of Billing and Commission Setup
The New, New Version and Delete Buttons are available to use on both the Setup and Commissions Tabs.
![]()
New : Use the New Button to add a new Billing or Commission entry. Follow the steps noted above.

Delete :
Use the Delete Button to remove existing entries from the Details or Commissions tab. Select the entry then click the Delete button. Click Yes in the "ReadyPay Payroll" Dialogue Box (or No to cancel the deletion).

![]()
New Version :
The New Version button is a picture of a calendar.
Use the New Version button to create new Billing or Commission details based on existing Billing or Commission details.
To create a new version of existing Billing or Commission details, select the entry then click the New Version button.
A Dialogue Box called "New Effective Date" will be displayed. Note that the New Effective and Effective Through and Cancel fields are active. The two "Add New Record effective" fields are greyed out.

In our example, our existing Billing detail is for a Product called Checks.

Presently. Base is 20.00 and Each is 1.75. Due to a price increase, the new base will be 25.00 and Each will be 1.95.
These new prices are effective 08/01/2021.
In the New Effective Date Dialogue Box, enter 08/01/2021 in the New Effective Date field,
The Effective Through field defaults to 12/31/2100. You may change if necessary.
This will activate the two "Add New Record effective" fields.
![]()
Adds a new record using the New Effective Date value and sets the End Date to New Effective Date minus one (1).
![]()
Adds a new record using the New Effective Date value. The End Date from the existing record will be used.
You will need to manually adjust the existing record to prevent the change of double billing.
For our example, we select the "Add New Record/Change Old Record End Date" option.
Note the results: The old Record is ended 07/31/2021 (08/01/2021 minus one.
The new record has a Start Date of 08/01/2021 and is ended 12/31/2100.
![]()
One Time Billing
Situations will arise where a client must be billed for a One-Time event.
Go to the Details Tab.
Click the New (*) Button and complete using the steps described above.
Go to the Frequency Field. Using the Drop List, select O (One Time) from the available options.
Leave the Last Date field blank.
When the first payroll after the Start Date is processed, the Billing will happen. The Last Date will be populated.
Once the last Date is populated, there is no billing for any details with an O frequency.
If you need to reuse the billing detail, simply remove the Last Date.