Master Company Setup: Bank Accounts
The Bank Accounts tab is found at Master Company Setup > Bank Accounts. This tab is used for adding new and maintaining existing client bank accounts.
![]()
The Bank Accounts tab is used to identify any bank account associated with the client. There are two types of accounts that can be present on this tab:
Client : Account belongs to this specific client.
System Level : These accounts can be associated with multiple clients.
There are two types of system level accounts.
Client System Accounts : A single account that is shared by multiple company codes.
Service Bureau Accounts : Accounts belonging to the Service Bureau. These accounts are used to collect tax impounds, billing and other items that the service bureau pays on behalf of the client.
While System Level accounts are accessible on this tab, Service Bureau Accounts MUST NOT be setup here.
Service Bureau accounts are created and housed on the Bank Accounts Sub Tab in System > Controller > Cash.
Client System Accounts can be created from this tab as well.

Creating New Bank Accounts
Before starting, be sure to have a sample of the client check and the starting check number to be used.
If the client check has a logo or will be signed, you should complete the scanning process for new logos/signatures prior to creating the new Client Bank Account.
Click the New (*) Button to display the New Bank Account Dialogue Box.
The New Account Radio Button will already be selected. IN the field next to the Radio Button, enter an identifier for the account being created. Most common entries are the account number from the sample check or an alphanumeric identifier.
Below the Radio Button and the Account Identifier fields is a Check Box called "Make available for other company codes". Only check this when multiple company codes will share this account,
At the bottom of the Dialogue Box, note the Radio Button for System Account.
This is used to add existing system level accounts to the client.
As noted above: these can be client and/or service bureau system accounts

For our example, we will be creating an account called CLIENT1
Click OK. You are taken to the General Sub Tab. Complete the data in each Sub tab as needed.
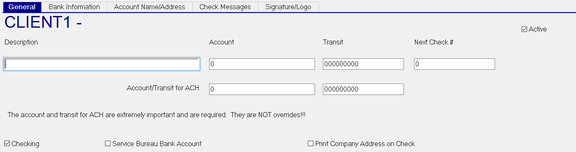
General Sub Tab
| Field Name | Information |
|---|---|
| Description | Enter a description that accurately identifies the account. |
| Account | This is the account number from the check sample provided by the client. This is the account number that will be displayed on the MICR line of a printed check. |
| Transit | This is the transit ABA number from the check sample provided by the client. This is the transit number that will be displayed on the MICR line of a printed check. |
Next Check # : Enter the starting check number provided by the client. During payroll processing, this field is automatically updated to the next available check number. (Last used check number plus one (1).
| Field Name | Information |
|---|---|
| Active | By default, this box is checked when adding a new account. |
| Account Transit/ABA for ACH | Transit/ABA numbers that will be assigned to ACH items for this account. Typically, this information is the same as the Account and Transit entered above. |
| Checking | Click this Check Box if this account is a Checking Account. If checked, ACH transactions for this account will be identified as Checking. Otherwise, they are identified as Savings Account transactions. |
| Service Bureau Bank Account | DO NOT CHECK THIS CHECK BOX. It is automatically set if the account you are adding to the client is a Service Bureau Account. |
| Print Company Address on Check | Check if the address to print on the check (and direct deposit voucher) is the address found on the Company > Demographics tab. |
Bank Information Sub Tab
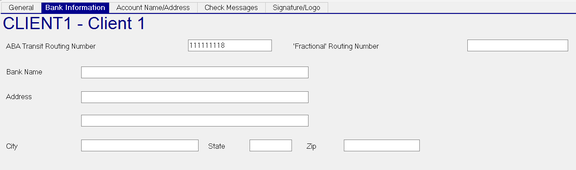
ABA Transit Routing Number : Prepopulated by the value from the non-ACH Transit field on the General Tab
'Fractional' Routing Number : This is a fractional representation of the Transit Routing number. It is t ypically found is the upper section of the check.
Address : Address of the bank. Use the blank field below for additional Address information. The bank address is not included on the check types provided in RPD. If needed, a custom check type must be created.
City : City of bank address.
State State of bank address.
Zip : Zip of bank address.
Account Name/Address Sub Tab
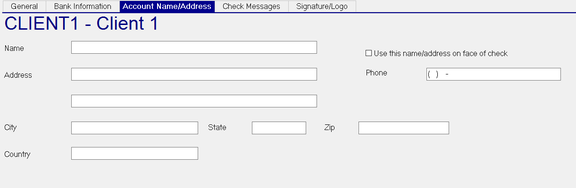
Complete this tab ONLY when the company name and address to be displayed on checks (Payroll/Agency) and vouchers is different from the name/address on the Master Company Setup > Demographics tab. Entries in this Sub Tab are specific to checks (Payroll/Agency) and vouchers and do not affect any other areas in the software using the Company Name and Address from Master Company Setup > Demographics.
Name : The name of the company to appear on checks (Payroll/Agency) and vouchers.
Use this name/address on face of check : Check this box so the company name/address data on this Sub Tab is used on the face of checks/vouchers. On the General Sub Tab, you must uncheck the box "Print Company Address on Check" .
| Field Name | Information |
|---|---|
| Address | Address of the client to appear on checks (Payroll/Agency) and vouchers. Use the blank field below for additional Address information. |
| Phone | The phone number to appear on the checks (Payroll/Agency) and vouchers. |
| City | City of the client address. |
| State | State of the client address. |
| Zip | Zip of the client address. |
| Country | Country of the client address. |
Check Messages Sub Tab
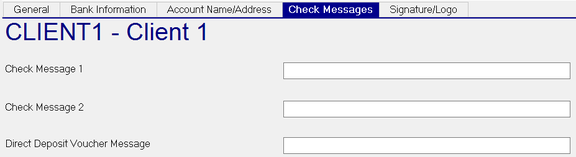
Check Messages are optional entries that allows for the display of short messages on the check or voucher face.
The Check Message field entries are only displayed on Payroll and Agency checks.
The Direct Deposit Voucher Message is displayed on Vouchers only
| Field Name | Information |
|---|---|
| Check Message 1 | appears above the Amount to Pay Line of the check. |
| Check Message 2 | appears below the Amount to Pay line of the check. |
| Direct Deposit Voucher Message | only appears on the Direct Deposit Voucher face above the Pay to Name and Address section. As the voucher face clearly notes that the document is a Direct Deposit Advice, this option is rarely used. |
Signature/Logo Sub Tab
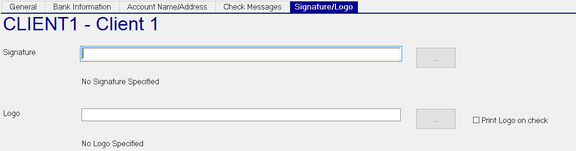
Use this Sub Tab if the checks for this bank account are signed OR if the checks (Payroll and Agency) or Direct Deposit vouchers require a Logo.
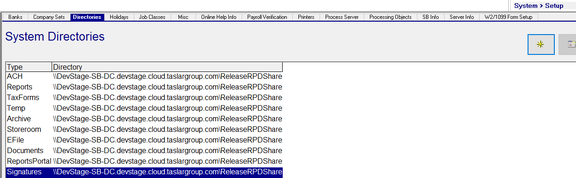
As noted above, signatures and/or logos must be scanned and stored in the Signatures directory defined in RPD under System> Setup >Directories.
The user must have network rights to that directory to add signatures and/or logos to bank accounts.
Signatures
Click the Search Box to the right of the Signature box and navigate to the Signatures folder defined above.

Note below the Signature box, the screen reads "No Signature Specified"
Choose the appropriate signature file from the list. Save the entry.
If successfully save, the entry reading "No Signature Specified" will be changed to the file path and file name for the signature file. If this does not happen, the signature will not appear on the checks.
![]()
Logos
Follow the same steps as for Signatures as defined in the above section but choose the logo file.
Print Logo on Check : Must be checked to display the logo on checks (payroll and agency) and vouchers.