Employee Maintenance: Retirement (previously 401k)
The Retirement tab allows you to set up information used on the employee Retirement tab in Employee Maintenance. The tab’s use was expanded with ReadyPay 3.75 to include Plan features related to Secure Act 2.0. The 2 legacy options were retained for backward compatibility. Some sub-tabs and message boxes still use the verbiage “401(k)”. However, their use is not limited to just 401(k) retirement plans. The Retirement tab includes the 3 options shown in Fig. 1.
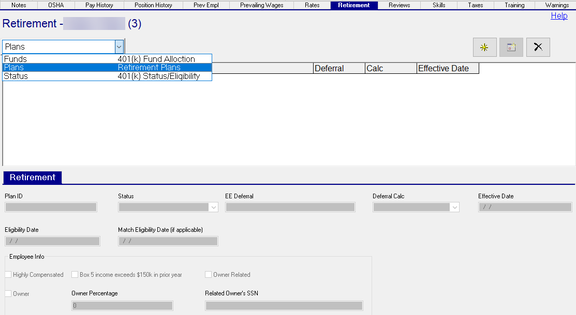
Fig. 1
The Drop List on the upper left of the tab provides access to sub-tabs used to define the following:
-
Funds (Legacy): A list of Funds offered by the plan in which the employee may participate.
-
Plans (NEW): This option allows you to define retirement plans to be added to employees.
-
Status (Legacy): A list of codes to identify the status of the employee regarding the retirement plan.
IMPORTANT : Company Retirement Plans must be set up before you can add them to employees. Click here for the Company Setup solutions article.
Funds option (Legacy)
Use the Funds option (Fig. 2) to record the funds the employee selects for investing their retirement contributions. The entries in this area are used for reporting purposes only.
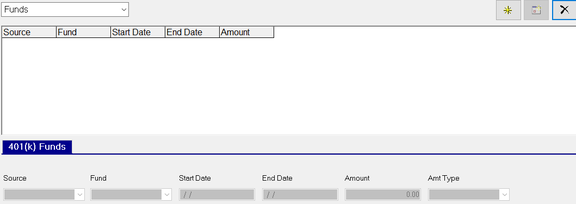
Fig. 2
To add an entry to the 401(k) Funds Sub Tab, click the new (*) button. Then, complete the fields.
| Field Name | Information |
|---|---|
| Source | Pick from one of the hard-coded options (EE, ER, or Profit) |
| Fund | Pick from one of the Funds you previously setup on the Company Setup > Retirement tab. |
| Start Date | When the employee started participating in the fund. |
| End Date | When the employee stopped participating in the fund. Use “12/31/2100” when the employee is actively participating. |
| Amount | Enter an amount of the contribution to the fund. |
| Amt Type | Pick from one of the hard-coded amount options. “Blank” for a flat Amount, or “%” for a percentage Amount. |
Plans option (New)
The Plans option allows you to add and change one or more Retirement plans for the employee (Fig. 3). Plans drive the employee’s deductions and the employer match (memo earning) on the employee’s check. Additionally, some fields are provided for reporting purposes.
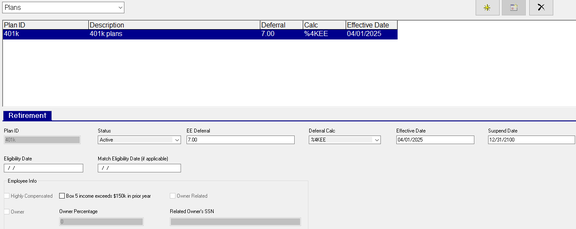
Fig. 3
To add an entry to the Retirement Plans option, begin by clicking the new (*) button. Then, select one of the company’s retirement plan(s) and click the “OK” button (see Fig. 4).

Fig. 4
Next, complete the fields on the Retirement sub-tab (Fig. 5).

Fig. 5
| Field Name | Information |
|---|---|
| Plan ID | This field is read-only |
| Status (optional) | Select one of the company-level status codes. This field is used for reporting purposes. |
| EE Deferral | Select the amount the employee wants to have deducted from their paycheck. |
| Deferral Calc | Most often, you will use the Calc Code that was specified on the Match Setup subtab of the company’s plan. You can also select from the Blank option (i.e. a flat amount), or “%” for a percent of all the employee’s earnings. |
| Effective Date | This is the start date of the plan and the employee’s linked deduction record. |
| Suspend Date | This is the end date of the plan and the employee’s linked deduction record. If you leave this field blank, ReadyPay will automatically save “12/31/2100” in the field. |
| Eligibility Date (optional) | This field is used for reporting purposes. |
Match Eligibility Date (if applicable, optional) : This field is used for reporting purposes.
Important : The bottom of this tab contains a section labeled “Employee Info”. The “Box 5 income exceeds $150k in prior year” checkbox controls catch-up contributions for high wage earners. When the checkbox is checked, catch-up contributions are made to a Roth-type account. This checkbox will be automatically checked when you process the last payroll of the year.
The remaining fields are set using the Status option, which is covered in the next section.
Linked employee deductions
Retirement plans have linked deduction records. This is similar to how ReadyPay’s Insurance plans work. Fig. 6 contains an example of the linked deduction record created when the plan in Fig. 5 was added to employee ID 3. Notice how most fields are read-only and the font is blue. This indicates that the deduction is linked to a Retirement Plan record. To make changes, you must change the employee’s Retirement Plan information. The linked deduction record will automatically be updated.
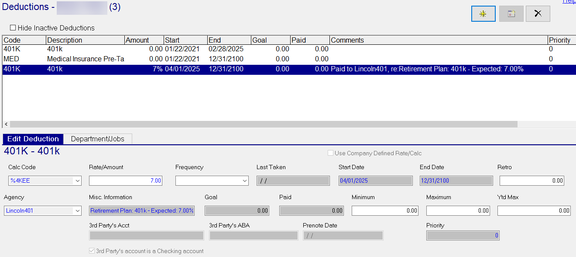
Fig. 6
Status option (Legacy)
The Status option (shown in Fig. 7) is used for reporting purposes. Entries made here have no effect on the employee’s participation in any Retirement Plan (e.g., deferrals or employer match). You can complete as many or as few of the fields on the 401k Setup sub-tab as you wish. You can also leave this area blank.
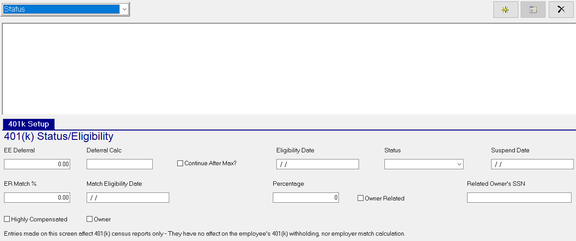
Fig. 7