Employee Maintenance: Rates
The Rates tab houses all of the rates currently in use for an employee.
It is also used to display a rates history for the employee.
Additionally, this tab houses the employee's Pay Frequency, their Default Hours (if used) and indication if the employee has a locked in Salary or number of hours per pay period.
Each employee must have a Base Rate. Employees can have a number of other rates using different Rate Codes as well.
For information about Company Level Rate Codes.
click here.
Adding a new Rate to an employee
Click the New (*) Button.
The New Pay Rate box is displayed.
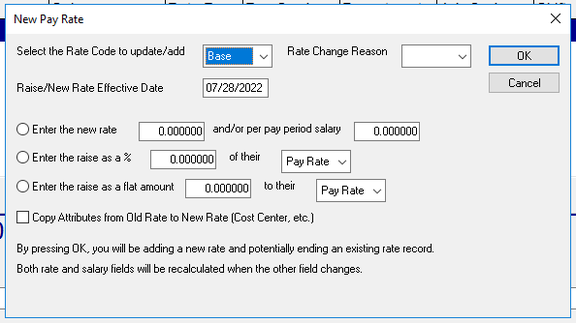
Select the Rate Code to update/add : The Default value is Base. Use the Drop List to select the Rate Code to be used.
Rate Change Reason : Optional. Use the Drop List to select the reason for the Rate Change.
The Rate Change reasons are housed in the Rate Change Codes option on the Miscellaneous Tab under Company Setup.
For information about the setup of Rate Change Codes,
click here.
Raise/New Rate Effective Date : Date the new Rate goes into effect. The date will be populated based on the settings in the Rate Options found on the Master Company Setup > Pay Rate Options.
If entering a new version of an existing Rate Code, the Effective Date is the end date of the existing rate plus one.
If you manually enter an effective date, the end date of the existing rate is adjusted to that date minus one.
Enter the new rate and/or pay period salary : Selecting this Radio button disables the other Radio buttons on the screen. Use the provided fields to enter an hourly rate OR a salary amount for the pay period.
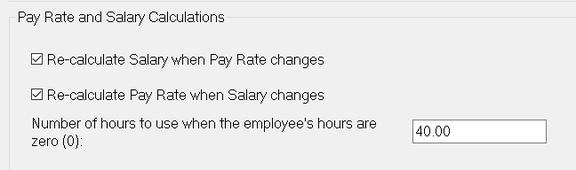
Use the options in the Pay Rate and Salary Calculations section of the Master Company Setup > Defaults tab to help with completion of this field. These will make the system calculate the pay period salary if an Hourly Rate is entered.
If a Salary amount is entered, an hourly equivalent is calculated.
In our example, I enter a new rate of $30.00. When I tab off the new rate field, a pay period salary amount is created using the settings above.
![]()
Enter the raise as a %___of their___ : In the amount field, enter the numeric percent increase. Selecting this Radio button disables the other Radio buttons on the screen. Use the Drop List to apply the percent increase to the associated Hourly Rate or Salary Amount. The Hourly rate and Salary are adjusted by the percentage indicated.
Enter the raise as a flat amount ___ to their ___ : Selecting this Radio button disables the other Radio buttons on the screen. In the amount field, enter the flat amount increase. Use the Drop List to apply the flat amount increase to the associated Hourly Rate or Salary Amount. The Hourly rate and Salary are adjusted by the flat amount indicated.
Copy Attributes from the Old Rate to the New Rate (Cost Center, etc.) ; Check this box to copy existing attributes of the old rate to the new Rate. This includes the following fields: Rate Per, Pay Grade, all Cost Center entries, Job Code and Shift Code.
Note the disclaimer at the bottom of the New Pay Rate box:
![]()
After a Rate is entered and saved, the screen looks like this
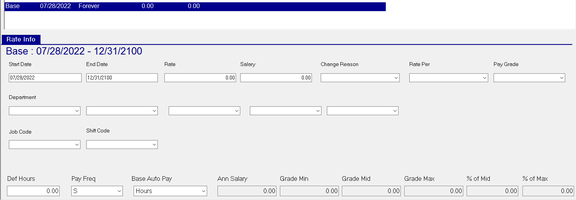
If need be, you can add or alter the values for the following fields:
Change Reason
Rate Per
Pay Grade
The Department or Cost Center fields
Job Code
Shift Code
At the bottom of the screen, there are several fields that are displayed, regardless of which rate is selected in the upper section of the tab.
Def Hours : Enter a number of hours here when an employee typically works a consistent number of hours. (i.e.: 40, 80, etc).
This field works in conjunction with the Base AutoPay field and the Reduce Auto Pay option on company level earnings.
| Field Name | Information |
|---|---|
| Pay Freq | Use the Drop List to select the frequency with which the employee is paid. (W, B, S, M, Q) |
| Base Auto Pay | Use this option if the employee is to be paid the number of hours entered in Def Hours or the Salary amount found on the active Base Rate. Select Hours or Salary as appropriate. Leave blank if there is to be no automatic paying of hours or a salary. |
| Ann Salary | Projected Annual Salary. Is present if |
1: Def Hours are entered, Pay Freq is populated, a Base Rate is present, and Autopay is Hours.
2: Pay Freq is populated, a Base Salary is present, and Autopay is Salary.
| Field Name | Information |
|---|---|
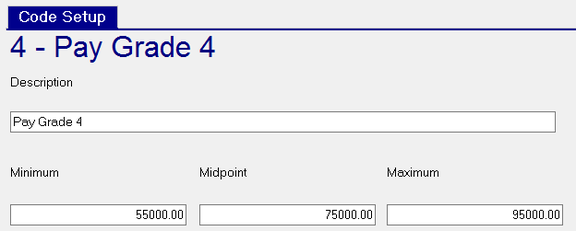
| Grade Min | Data is populated if the Rate has a Pay Grade assigned AND the Company Level Pay Grades are set up with a Minimum Value. |
| Grade Mid | Data is populated if the Rate has a Pay Grade assigned AND the Company Level Pay Grades are set up with a Midpoint. |
| Grade Max | Data is populated if the Rate has a Pay Grade assigned AND the Company Level Pay Grades are set up with a Maximum Value. |
Sample Pay Grade Setup (Company Stup > Misc > Pay Grades)
% of Mid : Percentage of Annual Salary as related to Pay Grade Midpoint.
% of Max : Percentage of Annual Salary as related to Pay Grade Maximum.
Additional Information

The New Pay Rate Wizard should be used with all Rate changes and additions. Manually changing the Start and End Dates of existing rates can be problematic. If done incorrectly, there may be Rate Codes with overlapping dates. This can cause payroll and reporting issues. The system is designed to recognize and report situations where the manual rate change may result in an issue.
Delete an existing Rate by selecting the Rate then clicking the Delete (X) button.
The following ReadyPay Payroll box will be displayed.

Click Yes to delete the selected Rate.
![]()
When working with the rates Tab, use the Hide Inactive Rates check box to eliminate the display of rates that are not active based on the check date in the payroll module.