Company Setup: Retirement (previously 401k)
The Retirement tab allows you to set up information used on the employee Retirement tab in Employee Maintenance. The tab’s use was expanded in 2026 to include Plan options related to Secure Act 2.0. The 5 legacy options were retained for backward compatibility.
Pro tip : If you're only interested in the new Secure Act 2.0 options, review the Eligibility and Plans sections of this article.
The Retirement tab includes the 6 options shown in Fig. 1. Each option is covered in the order it appears in the drop list.

Fig. 1
The Drop List on the upper left of the tab provides access to sub-tabs used to define the following:
-
Eligibility Rules (Legacy and New) - used to determine when an employee becomes eligible to participate.
-
Funds (Legacy): A list of Funds offered by the plan in which the employee may participate.
-
Match (Legacy): Provides access to the 401(k) Wizard
-
Plans (New): This option allows you to define retirement plans to be added to employees. Retirement plans are how the Secure Act 2.0 features are implemented in ReadyPay.
-
Source (Legacy): Identifies the origination point of the funds being credited to the employee.
-
Status (Legacy): A list of codes to identify the status of the employee regarding the retirement plan.
Pro tip: Before you set up an end client company to use the retirement tab’s options, you must decide if they will use the new Plans method or the legacy deduction-only method. The Match Wizard settings will only work for one method per company. However, if you use paycheck calculator scripting for the employer match, then you can use both methods for a single end client.
Working with the Retirement Tab
Eligibility option (Legacy and New)
Beginning with ReadyPay version 3.75, the settings on this option can be used with Retirement Plans to automatically enroll employees.
Choose Eligibility from the Drop List.
Click the New (*) Button to add an Eligibility Rule. The "Enter code for new 401(k) Eligibility Rule" Dialogue Box as shown in Fig. 2.

Fig. 2
Codes support alphanumeric values. Enter a code and click OK. In our example, we will use NewFT .
You are moved to the Eligibility Setup Sub Tab (Fig. 3).
Eligibility Setup Sub Tab
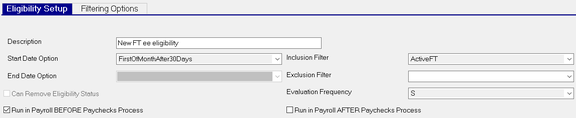
Fig. 3
| Field Name | Information |
|---|---|
| Description | Enter a description of the Eligibility Rule. |
| Start Date Option | Use the Drop List to assign the date the Eligibility Rules is effective. Choices are showin in Fig. 4. |

Fig. 4
| Field Name | Information |
|---|---|
| End Date Option | Not supported |
| Can Remove Eligibility Status | Checkbox not supported |
| Inclusion Filter | Use the drop list to determine which employees the Eligibility Rule should include. The options are found in the Emp Filters option on the Company Setup > Misc Tab. |
| Exclusion Filter | Use the drop list to determine which employees the Eligibility Rule should exclude. The options are found in the Emp Filters option on the Company Setup > Misc Tab. |
| Evaluation Frequency | Use the Drop List to determine the Frequency the Eligibility Rule is run. The options are based on entries found in the Frequencies tab in Master Company Setup. |
For more information on frequencies, click here .
Run in Payroll BEFORE Paychecks Process checkbox : You must check this checkbox for the eligibility rule to run automatically.
Run in Payroll AFTER Paychecks Process checkbox : Checkbox not supported.
Filtering Options Sub Tab
The Filtering Options Sub tab, shown in Fig. 5, allows the expansion of the Eligibility Rules to accommodate more complex requirements. As this Sub Tab allows for expansion of the Eligibility Rules, all fields are optional.

Fig. 5
| Field Name | Information |
|---|---|
| Minimum LOS | Number of Days, Weeks, Months or Years the employee must be employed to be eligible. |
| Length Of Service Type (Fig. 6) | Use the Drop List to define the basis of the Minimum LOS value. |

Fig. 6
| Field Name | Information |
|---|---|
| Minimum Age | Employee must be this value or older to be eligible. |
| Age Calc Option (Fig. 7) | Use the Drop List to control how the age is calculated. |

Fig. 7
| Field Name | Information |
|---|---|
| Last Check | This field is automatically populated when payroll is processed. |
| Hours Calc Method (Fig. 8) | Use the Drop List to control the basis of an Hours Based Eligibility requirement. |

Fig. 8
| Field Name | Information |
|---|---|
| Hours Code Group | Use only when hours from certain earnings should be counted towards eligibility. Select the appropriate Code Group from the Drop List. The Drop List contains all Code Groups setup on the company. Add one if necessary. |
| Minimum Hours | If an employee must work a number of hours to be eligible, enter it here. |
| Maximum Hours | Maximum number of hours to consider for eligibility. |
For information on using Code Groups, click here.
Pro tip : You can view a record of employee eligibility changes in the Progress Log of the CompanyEligibility.Net job that runs before payroll is processed. A record of the changes are also stored in the EEmployeeEligibilityLog database table.
Funds option (Legacy)
Use the Funds Setup function to record information regarding the funds elected by the employee for the investment of their retirement contributions. The entries in this area are free form. There are no system or company levels tables associated with this function.
401k Funds Sub Tab
To add an entry to the 401k Funds Sub Tab, click the new (*) button.
The "Enter code for new 401(k) Fund' Dialogue Box is displayed (Fig. 9). Enter a code for the retirement fund name and click OK.

Fig. 9
You are taken to the Description Field of the 401k Funds Sub Tab (Fig. 10). Enter a Description of the fund.

Fig. 10
Repeat as needed to establish all funds any employee may use for investment of their retirement contributions. A sample list is shown in Fig. 11.

Fig. 11
Match option (Legacy)
The Match Setup function is used to set up an employer Match that will automatically be applied to an employee’s deferral during payroll processing. By default, a note exists on this Sub Tab (Fig. 12) and reads "Using VBScript for 401(k) match or no match is set up. This indicates the 401(k) Wizard is not being used for this account. There may, however, be a "match" VB Script in use for this account that this sub tab cannot identify. To determine if there is (or is not) a match calculation in place, go to the MISC tab under Company Setup. Find the Scripting option in the Drop List in the upper left of the tab.
If the requirements of the Match routine exceed the capabilities of the 401(k) Wizard function, a VB Script will be have been written and placed here.
Important: The Match options described in this section are disabled when the Plans option is used.

Fig. 12
If the 401(k) Wizard Function is in use, the note on the screen will reflect the logic of the match built in the wizard (as shown in Fig. 13).

Fig. 13
Using the 401(k) Wizard
The 401(k) Wizard is used for employer matches that are not complex. Employer matches with advanced requirements (Age, Length of Service, Hours Worked, Employee Type, etc) need to be developed using the Paycheck Calculator Scripting option noted above.
There are two basic Match options supported by the 401(k) Wizard.
-
The Match is a percent of employee contribution up to a percent of eligible earnings.
-
The Match is a percent of the eligible earnings. This option provides, if needed, a tiered match logic.
Example: The match is 100% of the first 3 percent of earnings, the 50% of the next 3 percent of earnings.
Before proceeding with either option, be sure you have reviewed documentation from the end-client detailing the match logic. Before starting any setup you must know the following:
-
Which match calculation option to use.
-
What are the "Eligible Earnings"? Is the Match based on all earnings or specific earnings codes? Are code groups needed?
-
Will Agency Payments be created? If so, create the Agency setup.
-
Are any other employee indicators needed?
-
Is the Employer Match Earnings Code set up?
Complete the setup of any these prerequisites before executing the Wizard. If the match has no advanced requirements, click the 401(k) Wizard button (Fig. 13).

Fig. 13
The "401(k) Employer Match Wizard has multiple “Pages”. Page 1 is where you select the type of Match calculation (Fig. 14). Based on the documentation received from the client, select the appropriate two Radio Button to start the Wizard Process.

Fig. 14
For our example, we are using the first option. Click Next.
The "401(k) Employer Match Wizard Page 2: Entering the Percentages” dialogue Box is displayed (Fig. 15).
Our example Match is 50% of employee contribution up to 6% of earnings.

Fig. 15
Click Next.
The "401(k) Employer Match Wizard Page 3: Gathering Codes" Dialogue Box is displayed (Fig. 16).
Complete the fields in the Dialogue Box.
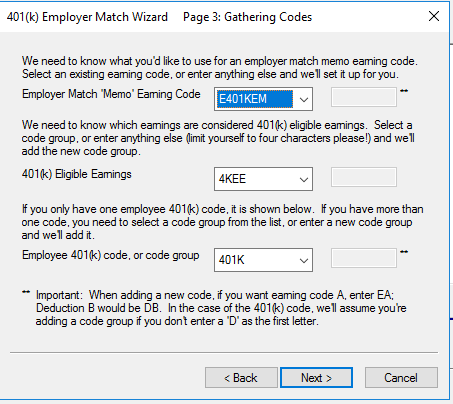
Fig. 16
Employer Match "Memo" Earnings Code: If it exists, the field is prepopulated with the ER Match Type Earnings Code from the Earnings Tab in Company Setup.
If there are multiple ER Match Codes in place, the Wizard selects the first ER Match code in the list of Earnings Codes. If necessary, select the ER Match Code from the Drop List. The Drop List displays code group names that contain any "Memo" type earnings codes setup on the company.
If a Match Memo Earnings Code does not exist, you can use the "New--> option" and then enter a code in the available field to create it now (as shown in Fig. 17). A New Code must begin with “E” for Earnings.
![]()
Fig. 17
401(k) Eligible Earnings : Use the Drop List and select the appropriate Code Group or individual earnings code that represents Eligible earnings.
If a Match Eligible Earnings Code Group does not exist, you can use the "New--> option" to create it now. Select the "New Code Group" option at the very top of the list of Code Groups option then enter a code in the available field (as shown in Fig. 18). The new Code Group code is limited to four alpha-numeric characters.
![]()
Fig. 18
Employee 401(k) code, or code group : Select the appropriate deduction code or deduction based Code Group from the Drop List.
If the 401(k) deduction code or code group does not exist, you can use the "New--> option" to create it now. Select that option then enter a code in the available field (as shown in Fig. 19).
![]()
Fig. 19
Note : Read the warning at the bottom of the Dialogue Box.
![]()
Click Next. The "401(k) Employer Match Wizard Page 4: Agency Check" is displayed (Fig. 20). IMPORTANT : REVIEW THE EXPLANATIONS ON THIS SCREEN CAREFULLY BEFORE MAKING ANY SELECTIONS.
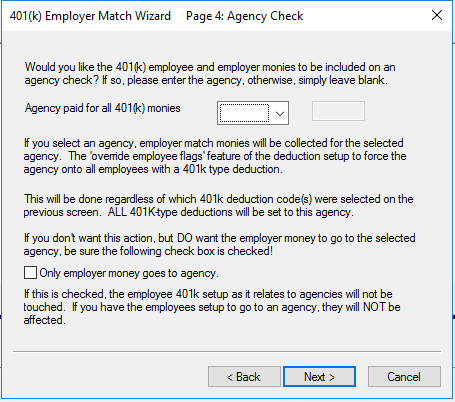
Fig. 20
The “Agency paid for all 401(k) monies” drop list contains all Agency records setup on the company. Examples in Fig. 21. Use the Drop List to assign an Agency payment (if needed). Leave blank for no Agency .

Fig. 21
Use the New--> option (Fig. 22) to create a new Agency on the Agencies Tab in Company Setup.
Enter the code in the provided field.
![]()
Fig. 22
Only employer money goes to agency : Use this checkbox based on the information provided on this screen. Then, click Next.
The "401(k) Employer Match Wizard Page 5: VB Script or Internal Calc" Dialogue Box is displayed (Fig. 23). You must select one of the two options.
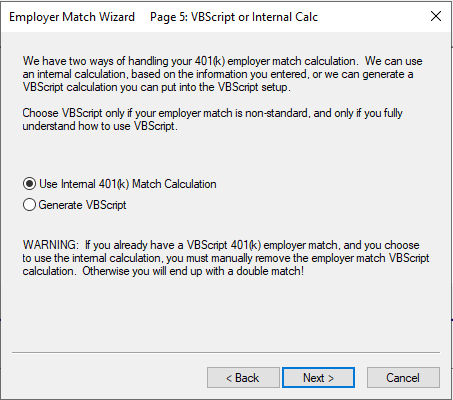
Fig. 23
Using the "Use Internal 401(k) Match Calculation" Radio Button
Carefully read the Disclaimer at the bottom of the Dialogue Box (Fig. 24).

Fig. 24
Click Next. The " Employer Match Wizard Finished!" Dialogue Box is displayed (Fig 25).
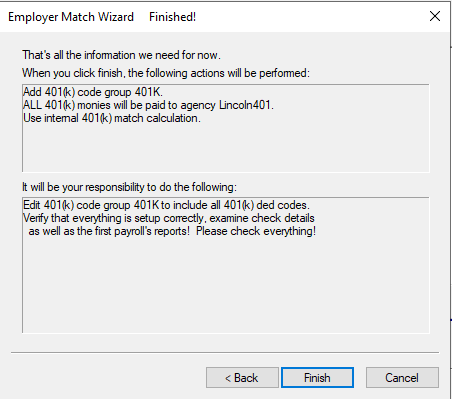
Fig. 25.
The “Employer Match Wizard Finished!” dialog box is divided into two sections.
THE INFORMATION IN BOTH SECTIONS WILL VARY DEPENDENT ON THE OPTIONS SELECTED IN THE WIZARD.
The top section is a recap of how the match will be configured. The bottom section, titled "it will be your responsibility to do the following," is a recap of any tasks that you need to complete. For example, we used the "Add new code--> option on multiple items.
Those items are noted and must be set up for the Match to work properly.
Using the "Generate VBScript" Radio Button
Use this option if you want ReadyPay to generate a VB Script for the Match Logic. The VB script then needs to be added to the company’s Paycheck Calculator script. This option is most often used because additional logic needs to be applied to the system-generated VBScript. This could include a cap to the YTD match, LOS, Age or other conditions.
Note: Unless the VB Script is edited, it works exactly the same as the 401(k) Match Wizard.
After you select the "Generate VBScript" Radio Button, click Next.
The "401(k) Employer Match Wizard Page 6: Generated VBScript" Dialogue Box is displayed (Fig. 26).
Carefully follow the instructions provided at the top of the Dialogue Box.
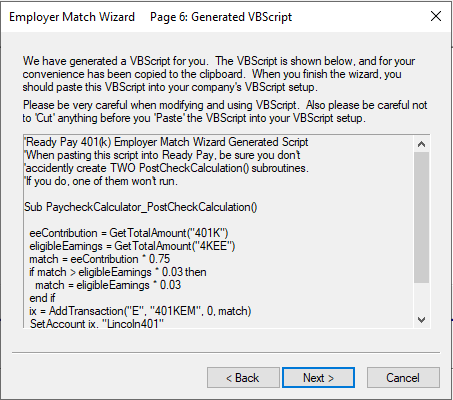
Fig. 26
Copy the generated VB Script by right-clicking in the results box and choose "Select All". Then, Right click in the box again and choose Copy.
Click Next.
The "401(k) Employer Match Wizard Finished!" Dialogue Box is displayed.
This box is divided into two sections:
The top section is a recap of how the match will be configured.
The bottom section is called "it will be your responsibility to do the following".
This is a recap of any items still needing to be completed.
Click Finish
Go to the Misc Tab in Company Setup and insert the copied VB Script Code into your PaycheckCalc script.
For more information regarding advanced Employer Match logic, click here.
Plans option (New)
The Plans option allows you to define one or more Retirement plans for the end client. Plans are designed to automate certain employee maintenance tasks. For example, deferrals to a Roth-type account for high-income employees (per Secure Act 2.0). This flexible feature allows you to set up multiple plans and multiple plan types for each end client company. Plans can even be of different types. For example, you can set up a 401a plan and a 403b for the same company. Plans have two sub-tabs (Plan Setup and Match Setup).
Important: Before you begin setting up Plans, you must add and configure the company’s deferral deduction codes, employer match earning codes, and related code groups. Deduction codes must use the deduction type that corresponds to the type of retirement plan. Employer match earning codes can use any one of the available “Memo” earning types.
Plan Setup subtab
The Plan Setup subtab is where you define each plan type and which deductions and earnings apply to the plan.
To add an entry to this sub-tab, click the new (*) button (see Fig. 27). Enter the Plan ID (up to 20 characters). Then, select the Plan Type and click “OK”.

Fig. 27
After you add the new plan, complete the rest of the fields that apply to the plan (see Fig. 28). All fields are required unless otherwise noted.
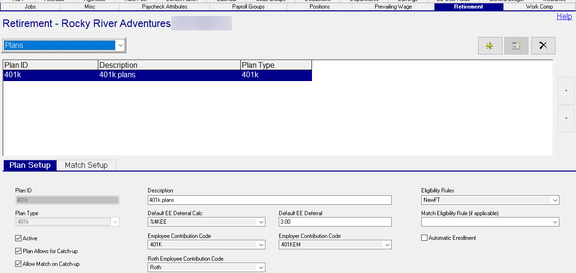
Fig. 28
| Field Name | Information |
|---|---|
| Plan ID | The value you entered when you added a new record. This value cannot be changed. |
| Description | Add a brief description of the plan. |
| Eligibility Rules (optional) | Select an eligibility rule if you want the plan to apply to a specific group of employees. Can be used with the Automatic Enrollment checkbox. |
| Plan Type | The value you selected when you added a new record. This value cannot be changed. |
| Default EE Deferral Calc (optional) | Pick a calc code to be used as the default calc code for the employees' deferral. |
| Default EE Deferral (optional) | Enter the default amount that employees will defer when the plan is added to them. You can override this default on a per-employee basis. |
| Match Eligibility Rule... (optional) | Use this field to add a separate eligibility rule for end clients that have a separate rule for employer matches |
| Active (optional) | Only active plans can be added to employees. |
| Plan Allows for Catch-up (optional) | Check this box when the plan allows employees to make age-based catch-up contributions. |
| Allow Match on Catch-up (optional) | Check this box to enable employer matching of employee catch-up contributions. |
| Employee Contribution Code | Select the deduction code that will be used for employee deferrals. The deduction codes available for you to choose will match the Plan Type. |
| Employer Contribution Code | Select the memo earning code that will be used for the plan’s employer match. |
Note : Each Plan can have its own Employer Contribution Code, or you can “reuse” the same
Employer Contribution Code for multiple plans.
| Field Name | Information |
|---|---|
| Plan allows for catch-up (optional) | This field indicates if the plan allows for ANY type of catch-up. The checkbox is checked by default. |
Note : Deduction types control the catch-up age bands and amounts for each age band. This
checkbox can be used as an override to disable the standard deduction type catch-up logic.
| Field Name | Information |
|---|---|
| Automatic Enrollment (optional) | Use this checkbox to automatically enroll all employees in the plan. This option works with the Eligibility Rules you selected. When unchecked, it only updates the employee's Eligibility Date field. |
| Roth Employee Contribution Code (optional) | The value in this field is used to define the Roth contribution deduction code that high-income earners will use for catch-up contributions (per Secure Act 2.0). |
Match Setup subtab
The Match Setup subtab (Fig. 29) uses the same screens and logic as the legacy Match Option.

Fig. 29
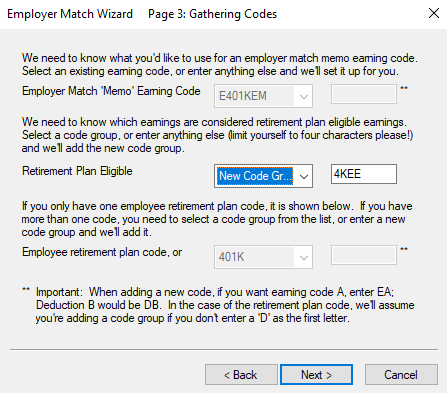
Fig. 30
For instructions on adding Retirement Plans to employees, click here.
Source option (Legacy)
Use the Source option to identify the source of the funds credited to an employee's retirement account. The information you enter here can be used for reporting purposes.
Click the New(*) button to display the "Enter code for new 401(k) Contribution Source" Dialogue Box (Fig. 31). Enter a code, then Click “OK”.

Fig. 31
You are taken to the Description field on the 401k Sources Sub Tab. Enter a description of the Source.
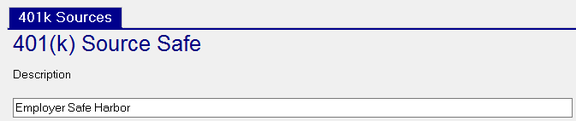
Fig. 32
Repeat as necessary. Example shown in Fig. 33.

Fig. 33
The values from the Funds, Source and Status Functions are used when populating the Retire tab in Employee Maintenance.
Status option (Legacy)
Use the Status Setup function to maintain a list of employee Status Codes relating to their participation.
Typically, all companies contain a basic list of status values. These are copied from the template company used during the company creation process. Adjust the list as necessary.
To add a new Status, click the New(*) Button (Fig. 34).
The "Enter code for 401(k) Status" Dialogue Box is displayed. Enter the code and click OK.

Fig. 34
You are taken to the Description Field on the Retirement Status Codes Sub Tab (Fig. 35). Enter a Description.
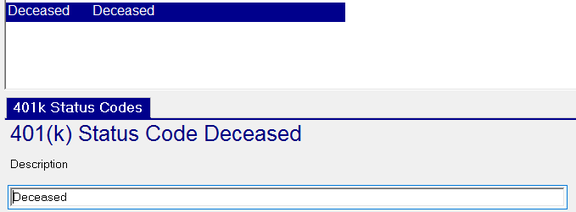
Fig. 35