Company Setup: Misc | Advanced Time Imports
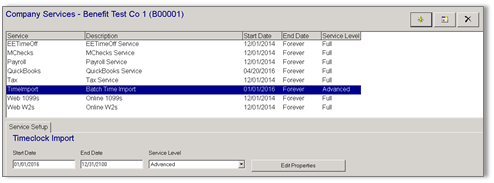
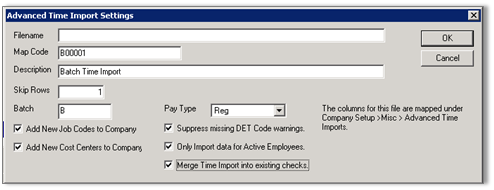
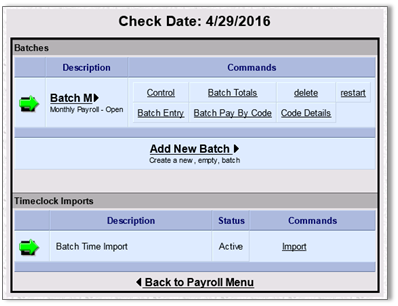
The below information should be used to set up the Timeclock Import service when the ‘Advanced’ Service Level is chosen. The ‘Advanced’ level is used for time import file types that fall outside the system’s ‘Generic’ import capabilities – usually when there is advanced filtering and column data that falls outside normal DET entries. Service Setup To begin the setup of the Advanced Time Import, proceed to Master Company Setup > Services. Add a TimeImport Service with a Service Level of ‘Advanced’ with the appropriate date range the import will be used for. Click the Edit Properties button to set options on how the import file should be treated: Field Name Information Filename Enter the UNC path and filename to import (unless on RPO where the file is selected each time) Map Code Enter an ID that will be associated with the column mapping of your import file (to easily find the instance of file mapping in step 2) Description Enter a brief description of the import’s use Skip Rows Enter the number of rows used in the file that do not contain information to be imported (ie. header row) Batch Enter the payroll Batch ID from the company’s Calendar that the mapping will be used for. Pay Type Select the Check Type that will be used for any created checks or to import into. Add New Job Codes to Company Mark if Job Codes will be included in the time file for this import and any Job Codes that have not been added into ReadyPay but exist in the time file should be automatically added. Add New Cost Centers to Company Mark if Cost Centers (CCs) will be included in the time file for this import and any CCs that have not been added into ReadyPay but exist in the time file should be automatically added. Suppress Missing DET Code Warnings Mark to ignore any instances that DET codes were not mapped for importing. Only Import Data for Active Employees Mark to import time data for active employees only. Merge Time Import Data Into Existing Checks Mark to have time data placed into existing checks based on the Pay Type and Batch option entries. Import Mapping Found in Company Setup | Miscellaneous, the Advanced Time Import Files page provides the ability to map the columns of import files. Select the appropriate Import ID in the upper page grid to be mapped. Then click the add button in the Column Settings area to begin mapping by entering lines for each column to be imported from the file. Data Types There are three data types available for importing: Employee – Data to identify the employee whose data will be imported Paycheck – Data that identifies parameters of the check PayDetail – Actual timekeeping/payroll data for check calculation Field Name, Filter, Filter Value When a Data Type is chosen, applicable Field Names can be selected based on the Data Type: Employee - ID, SSN, Clock Paycheck - CheckNumber, VoucherNumber, WW, CC1-5, WCC, BeginDate, EndDate, PayItem PayDetail - Det, DetCode, Rate, Hours, Amount, RateCode, TCode1-4, BeginDate, EndDate, Shift, WCC, CC1-5, Job Code, Comment, Group The Filter type should be identified once the Field Name is selected. Each line item can be filtered up to 4 times by selecting a Filter type and Filter Value. When selecting the Employee Data Type, no Filters are typically selected. Remember you will choose only a Filter value only once for each line – you wouldn’t, for instance, select two DET codes as a column in the file is for just one. As an example, see an example of a time file below: Co Code Batch ID File # Pay # Shift Reg Hours O/T Hours Misc Code 1 Misc Hours 1 MISC Code 2 MISC Code 2 Amount 155 2 6 1 1 24 VAC 8 155 2 6 1 2 8 155 2 8 1 1 40 155 2 10 1 3 40 0.75 155 2 3 1 1 SICK 40 155 2 3 2 1 Bon 150 The file would be mapped as: Column Data Type Field Name Filter 1 Filter 1 Value Filter2 Filter 2 Value 3 Employee ID 4 Paycheck Pay Item 5 PayDetail Shift 6 PayDetail Hours DET E DETCode Reg 7 PayDetail Hours DET E DETCode OT 8 PayDetail detCode DET E Group 1 9 PayDetail Hours Group 1 10 PayDetail detCode DET E Group 2 11 PayDetail Amount Group 2 The use of Group (in above example) as a Filter type is necessary for E-Time files and it based on Code Groups with the applicable number selected as the Filter Value. The file setup below uses an extra layer of Filters to show that a column contains information for a specific cost center. Column Data Type Field Name Filter 1 Filter 1 Value Filter2 Filter 2 Value Filter3 Filter 3 Value 1 Employee ID 2 PayDetail beginDate 3 PayDetail Hours DET E DETCode Reg 4 PayDetail Hours DET E DETCode OT 5 PayDetail Hours DET E DETCode DT 6 PayDetail Hours DET E DETCode HOL 7 PayDetail jobCode 8 PayDetail Amount DET E DETCode Tips CC1 Bart 9 PayDetail Amount DET E DETCode Tips CC1 Serv Importing Files The time import is performed exactly like those of a ‘Generic’ Service Level through the Payroll Module. If a check date doesn’t contain a Batch that is used in an ‘Advanced’ import setup, no import option will be present.