Company Setup: Calendar Schedule Setup
The Calendar Schedule Setup is a series of instructions used by the software to build the client's calendar.
When a new company is created in ReadyPay, the client must provide information about their Pay Frequency, Check and Period Begin. This information is entered as part of the Company Creation Process.
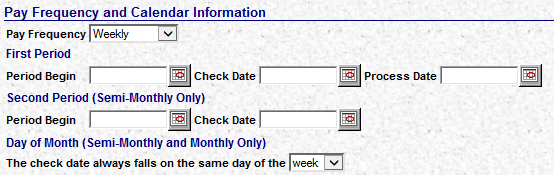
Based on this information, the system will build a calendar for the next twelve calendar months.
The resulting information is housed on the Calendar Tab in Company Setup.
The entries from the initial Company Creation are also stored as instructions on how to continue to build the calendar as payrolls are processed. These instructions are housed on the various tabs of the Calendar Schedule Setup.
As payrolls are processed for a company. the calendar entry for the payroll is moved to a status of Processed when the payroll completes. Concurrently, the instructions in Calendar Schedule Setup are used to generate a new entry in the calendar. This process ensures that the company calendar always has a calendar projected twelve months into the future.
Schedule Tab Overview
Single payroll frequency clients will have one entry on this screen.
Multi-frequency clients MAY have more than one entry on this screen.
Multi-frequency clients usually have different check dates (and period dates) for each of the frequencies.
Throughout the calendar year, the frequencies MAY have the same check date
The client must advise you how to handle this scenario,
The options are to combine the frequencies into one check date entry on the Company calendar or to have two distinct entries for the overlapping check date.
If the client says combine the overlapping frequencies under one check date. you will have one entry on the Schedule Tab.
If the client wants individual payrolls for each check date, you will setup multiple Schedules.
Example: The client is a Bi-Weekly/Monthly company.
If the client says you can merge the payrolls whenever the dates overlap, set up one Schedule and use the details functions to control the settings for both frequencies. The check date will be listed once in the Company calendar.
Setup is like this: One master schedule

Two Batch setups

If the client does not want the check dates merged into one payroll, setup two schedules. Use the Details function on each schedule to control the settings of the frequency associated with the schedule. The check date will be listed twice on the Company calendar.
Setup is like this: Two Master schedules.

Under the Details of each master schedule, there will be a single batch.

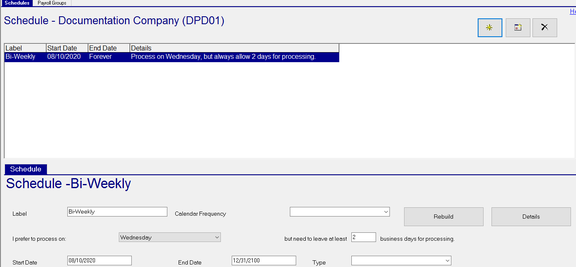
Schedule Sub Tab

| Field Name | Information |
|---|---|
| Label | A name for the Schedule |
| Calendar Frequency | Optional. Used for Reporting Purposes. Select the applicable Frequency from the Drop List. The selection in this field has no effect on the building of the calendar. |
| I prefer to process on | Select the desired day of the week to process from the Drop List. Only applies to Weekly and Bi-Weekly calendars. Otherwise, use the "any day" option. |
but need to leave at least N business days to process : Enter a number of days. This is the number of days your service bureau mandates a client must input before check date. When projecting new calendar entries, this may override the value in the "I prefer to process on" field when considering holiday dates. Ex: Process is on Wednesday and "but need to leave at least N business days to process" is set to 2. On a Friday holiday, the process day will be moved from Wednesday to Tuesday.
| Field Name | Information |
|---|---|
| Start Date | The start date of this schedule |
| End Date | The End Date of this schedule |
| Type | Optional. Select the Type of Payroll associated with this payroll from the Drop List. The Drop List is populated by the entries in the "Payroll Run Types" found under the System > Setup > Misc tab. |
| Rebuild | Use the Rebuild Button whenever changes have been made to the Schedule Tab or the Details of the Schedule Tab. |
Payroll Groups Tab
Payroll Groups are SQL Statements used to identify groups of employees for inclusion in Payrolls.
All companies should have a Payroll Group for Active Employees.
A client may have several payroll groups dependent on their structure and how payroll is input.
It is recommended that the needed Payroll Groups be built before populating the Details of each Schedule.
Adding a New Payroll Group
Click the New (*) Button. The "Enter label for payroll group" box is displayed. Enter a name (be brief) for the payroll group and click OK.

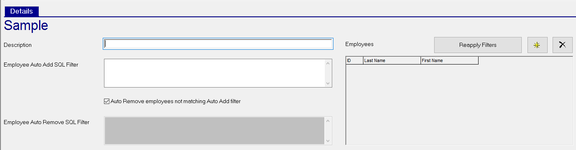
You are taken to the Description field on the Details Sub Tab.
| Field Name | Information |
|---|---|
| Description | Enter a description of the Payroll Group. |
| Employee Auto Add SQL Filter | Enter the SQl that will include the proper employees in the Payroll Group. |
| Auto Remove employees not matching Auto Add filter | If checked. employees not meeting the filter will be removed from the Payroll Group. If unchecked, the Employee Auto Remove SQL Filter box becomes active and is populated with a "NOT" version of the Employee Auto Add SQL Filter. |
Employee Auto Add SQL Filter . If used, alter the newly added NOT version of the SQL to meet your requirements.
| Field Name | Information |
|---|---|
| Reapply Filters | Use to test the SQL statements used with the Payroll Group. |
| New (*) Button | Use with Payroll Groups where the group cannot be populated by a SQL Statement. In these cases, the Employee Auto Add SQL Filter will be blank. Click new (*) to see a list of employees and add the appropriate ones to the group. |
| Delete (X) Button | Payroll Groups with no SQL Filters must be maintained manually. Use the Delete (X) Button to remove employees from those Payroll Groups. |
For more information about Payroll Groups, click here .
Details of each Schedule
You must compete the Details section of each Schedule for the calendar to be properly built.
Each Schedule will have a least on Details entry but can have multiple based on the client's needs.
To add the Details, click the Details Box.

You are moved to the Batches / Moves Tab
![]()
The Batches Tab gives access to the Batches set up under the Schedule.
The Moves Tab gives access to functions that control what the system should do (if anything) if it projects a Check Date onto a Weekend or a Holiday.
The Batches Tab
The upper section of the Batches Tab lists all Batches setup within the Schedule.
Select a Batch in the upper section to see its details in the Lower Section on the Batch Sub Tab
The Batch Sub Tab contains instructions used to project new calendar entries.
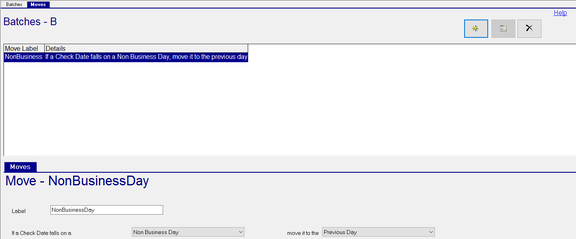
The Moves Tab
Moves are used to tell the system what to do with the check date if it falls on a weekend or holiday.
The upper section contains a list of existing Move "Labels".
Select the "Label' to see the details on the Move label in the Moves Sub Tab.
To add a new Move, click the New (*) Button
The "Enter the new move's label" Dialogue Box is displayed.

Enter a label. The label should describe what is causing the move. Typical entries are Saturday, Sunday and Non Business Day.
Click OK. You are taken to the Moves Sub Tab. Use the options to tell the system how to move the check date on a certain day of the week.
Note: Non Business Day means Saturdays, Sundays and any holiday listed under System > Setup > Holidays.
If the Check Date falls on a __ : Use the Drop list to choose any day of the week or Non Business Day.

move it to the__ : Use the Drop list to select which day to move the check date to.

Exercise caution when creating Move labels to ensure they do not conflict with each other.
Example: If a check date falls on a Sunday, my move says move it to the next day (Monday)
My next move says to move the check date for a Non Business Day to the previous day.
On a Monday holiday, these moves would be in conflict.
Batches > Batch Sub Tab
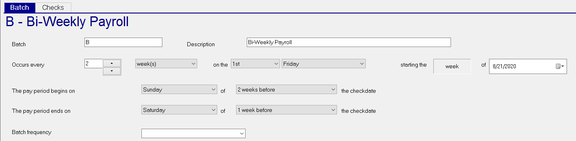
The Batch Sub Tab is used to control the Check, Period Begin and Period End Dates of the Batch.
| Field Name | Information |
|---|---|
| Batch | Code for the Batch. Brevity is recommended |
| Description | Full Description of the Batch. |
| Occurs every N | Use the Drop List to set how often the batch will be run. To the right of the N field is a Drop List for Weeks or months. The combination of the two fields controls its frequency. |
Weekly is one batch with a combination of 1 plus week(s),
Bi-Weekly is one batch with a combination of 2 plus week(s).
Monthly is one batch with a combination of 1 plus month(s).
Semi Monthly requires two Monthly Batches. One for each semi-monthly period in the month.
starting the week/month o f : The Week Month Field is populated with week or month based on the pervious selection. Use the provide field to enter the Start Date of the Batch. The Start Date of the Batch cannot be prior to the Start Date of its associated schedule.
The pay period begins on __ of __ the check date : Use the provided Drop Lists to set the day and when values for the pay period begin date.
The pay period ends on __ of __ the check date : Use the provided Drop Lists to set the day and when values for the pay period end date.
For both these fields, the values in the Drop Lists vary based on the previous selection of week(s) or month(s).
For week(s), the selections are the actual days of the weeks in conjunction with a number of before or after weeks option.
For month(s), the selections are the numeric values of the days of the months in conjunction with a number of before or after months option. The period begin and end dates must be within the period begin and end dates on the Schedule tab.
Batch Frequency : Optional and informational. Use the provided Drop List to assign a Frequency.
Note when working with Semi-Monthly clients: In order to properly create a calendar for a semi-monthly account, you must have two batches under the initial schedule. One Batch is for the first semi-monthly period in the month. The other batch is for the second pay period in the month. In the Occurs every __ field, the settings must be 1 and months.

Set the remaining date fields to the appropriate days of the month for the check, period begin and end dates of each batch.
Checks Sub Tab
The Checks Sub Tab is used to determine which employees are included in the Batch.
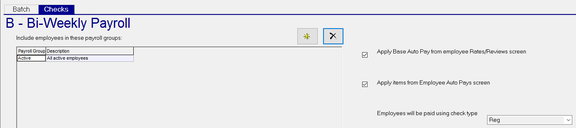
Use the New (*) button to add Payroll Groups to the Batch.
The "Enter New Payroll Group" Dialogue box is displayed.

Use the provided Drop List to select the appropriate Payroll Group.
Click OK.
Apply Base Auto Pay from the Employee Rates/Reviews screen: Use this box to "auto pay" employees in this batch who have an entry in the Base Auto Pay field on the Employee Maintenance > Rates Tab.

Apply items from Employee Auto Pays screen: This refers to entries on the Auto Pays Tab in Employee Maintenance.

Employees will be paid using check type: Use the Drop List to select the Check Type to apply to all entries in this batch.

NEVER SET THE DEFAULT CHECK TYPE TO 3PTY (IF AVAILABLE).
3PTY Checks MUST be created using the New Third Party Sick Pay Wizard in Payroll Entry,

Updating a Client Calendar using the Calendar Schedule Setup
Use the Calendar Schedule Setup when there are significant changes to the client schedule. This would be a change in Processing Frequency, adding a new batch or moving of the check date to a new day of the week or date in the month.
One-time changes and off cycle payrolls should be managed using the functions available with the Company Setup > Calendar.
After making any changes to the Calendar Schedule Setup, the calendar must be rebuilt to reflect those changes.
Use the Rebuild Button on the Schedules Tab.
![]()
Clicking the Rebuild Button will display the "Rebuild Calendar Schedule" Dialogue Box.

Note the explanation of what rebuilding the calendar will do.
The current check date field is set to the check date on the Payroll Icon.
The rebuild will skip that check date in the rebuild process.
The Payroll Group option in this Dialogue Box is inoperable and slated for removal.
Once your review is complete, type YES in the provided box. This will activate the OK Button
Click OK.
The "Schedule rebuild job submitted" Dialogue Box is displayed. Click OK.
If it does not display, the Cancel button on the previous step was inadvertently chosen.
Go to System > Operations > Job Queue.
A Calendar Generator Job for your company will be listed in the Queue.
If the Job State is Error, review the Error Log to determine the cause of the error.
![]()
Rectify and submit another Rebuild Calendar job.
If the Job State is Done (Green Progress), go to Company Setup > Calendar.
![]()
Review the results to ensure the results are as expected.
If not, adjust the Calendar Schedule Setup and submit another Rebuild Calendar job.