Company Setup: Auto Posts
Auto Posts are used to simplify payroll entry by prepopulating the Payroll Entry Grid with commonly used entries.
By prepopulating the Payroll Entry Grid, the time to key and enter payroll is reduced.
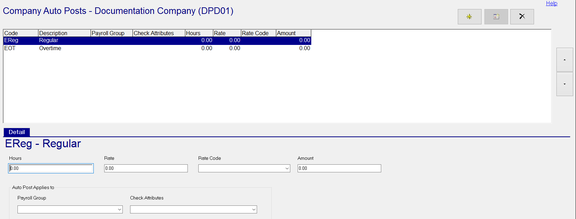
When no Auto Posts are setup, the Payroll Entry Grid looks like this:

There are no codes in the Code Column. The user must use the Drop List on the Code field and select the appropriate earnings, deduction or, in some cases, tax code on each line.
By using Auto Posts, the Payroll Entry Grid can be prepopulated, reducing the time to enter payroll.

A common use of Auto Posts is to handle Holiday hours. When doing payroll that includes a paid holiday. the user may need to enter 8 hours of holiday pay for all employees. Use of an Auto Post eliminates that need by creating a line in the Payroll Entry Grid for 8 hours of Holiday pay
![]()
Auto Posts are automatically applied to the Payroll Entry grid with each payroll.
The only way to prevent this from happening is to delete them.
The Auto Posts Tab is divided into two sections.
The upper section displays all of the Auto Post Entries.
The lower section contains the details of the Auto Post highlighted in the upper section of the tab.
Adding new Auto Posts
Click the New (*) Button. The "Please choose a DET code" Dialogue Box is displayed.
DET stands for D eductions, E arnings, T ax.
The Dialogue Box contains a Drop List of every ACTIVE Deduction, Earnings and Tax Code setup on the company.

Select the appropriate code from the Drop List and click OK. In Our example, we will use EReg.
The Detail Sub Tab becomes active.
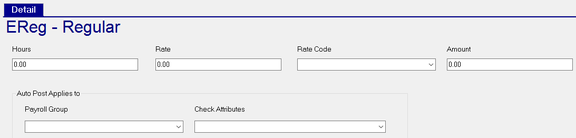
If you simply need to add a line for EReg with no overrides, save the record.
The record will look like this:
![]()
Add other records as needed. In addition to Regular, our sample client keys Overtime and PTO.
Here is the result in the Company Auto Post tab.

Here is the result in the Payroll Entry Grid.

Use the following fields to expand the amount of data prepopulated in Payroll Entry.
Overrides to these fields must be in place PRIOR to starting payroll.
If added after the fact, they can be applied by restarting the affected payroll batch or batches. Any data already entered will be lost as a consequence. DO NOT RESTART THE VM BATCH if present.
Hours : Enter a number of hours for the line in Payroll Entry. Most often used when Holiday hours are being paid.
![]()
The result in the Payroll Entry Grid is as follows:
![]()
Rate : Enter a Rate for the Hours on this line to be paid.
![]()
In cases where you need multiple lines for the same code with different rates, the setup is as shown.
![]()
The result in the Payroll Entry Grid is as follows:

Rate Code: Assign a Rate Code to the line in Payroll Entry using the provided Drop List.
Note: Blank uses Base rate.

In our sample, Rate Code 2 is used.
![]()
The result in the Payroll Entry Grid is as follows:
![]()
Amount : Enter an amount you want prepopulated in the payroll entry grid. This option is used when a preset amount is given to a large group of employees. In our example, employee are given a $175.00 Profit Sharing pay out.

The result in the Payroll Entry Grid is as follows:
![]()
Auto Post Applies to Section
Use these options to apply the Auto Posts to specific groups of employees or when a particular Paycheck Type is used.
Payroll Group : Use the Drop List on this field to apply this Auto Post to a specific Group of Employees.

Payroll Groups are found on the Payroll Groups Tab in Company Setup.
For more information regarding Payroll Groups, click here .
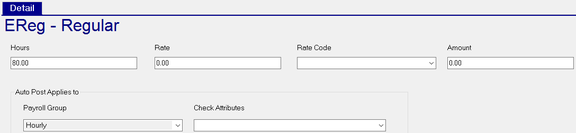
In our sample, we want to have 80 hours displayed for all employees in the Hourly Payroll Group (Autopay = Hours).
The entry is as follows. It is only applied to employees with an Autopay of Hours.
The result in the Payroll Entry Grid is as follows:
![]()
We want to add a Commission Earnings Line for all employees in the Marketing Payroll Group.
The entry is as follows. It is only applied to employees in the Marketing Department
![]()
The result in the Payroll Entry Grid is as follows:
![]()
Check Attributes
Auto Posts can be applied when a specific Paycheck Attribute is used in Payroll Entry.
Paycheck Attributes are found on the Paycheck Attributes Tab under Company Setup.
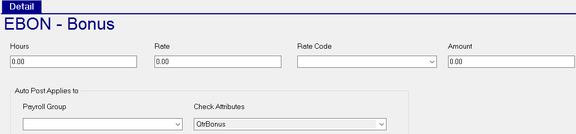
In our example, we want a line in Payroll Entry for earnings code BON (Bonus) when the Paycheck Attribute is QtrBonus.
Use the Drop List to select the appropriate Paycheck Attribute.

The entry will look like this:
The result in the Payroll Entry Grid is as follows:

For the Check Attributes option to work, you must have a batch specified in the calendar where the desired Check Attribute is assigned prior to starting the payroll.
![]()
Order of Display in Payroll Entry
Auto Posts are displayed in Payroll Entry in the order they are displayed on the Auto Posts Tab.
When you add a new Auto Post, it is added to the bottom of the list by default.
If you need to reposition the new entry in the list, do so by highlighting the line in the grid.
To the right of the grid, there are Up and Down Arrow buttons.

Use these buttons to reorder the existing Auto Post entries as needed.
Additional Information
The most common problem with Auto Posts is with Auto Posts where the overrides are in use.
Sometimes those overrides are meant for a single payroll. The most common is with Holiday hours.
If not removed from the Auto Posts in a timely manner, the hours may be auto posted to a non-holiday payroll.
If this happens, update the Auto Post and restart the payroll.
If a company has a Time Import, the payroll entries from the Time Import are listed BELOW the Auto Post entries.
In these cases, consider removing the Auto Posts or filtering them so they only appear on employees who are not paid via the Time Import.
There is an option in the system for employee specific Auto Pays.
They provide the same general functionality as Company Auto Posts, but with more options.
These are found on the Auto Pays tab in Employee Maintenance.
For information about Employee Auto Pays, click here .
On the Payroll Entry grid, the employee specific Auto Pays are displayed below the Company Level Auto Posts
and above the (if any) the Time Import entries.