Company Setup: Accruals
The Accruals Tab is used to setup and manage any Time Off policies the client may have.
Most Time Off plans can be handled using the various sections of the tab. Some, due to unusual requirements, can not.
The Time Off Plans set up on this tab control how the plans function. This includes:
Calculating and awarding earned time off.
Reducing available time due to usage.
Managing carryover and clearing.
Description of Terms used in this document
| Field Name | Information |
|---|---|
| Available Dollars | The value of the employee's available hours based on the employee's base pay rate. ** |
| Available Hours | The number of Hours the employee has available for the Time Off Policy. ** |
| Carryover | Some Time Off Policies allow the carryover of some available hours as the Plan Year resets. Carryover happens at the time specified by the Clearing setting. |
| Clearing | The point in time when the available and used values will be reset as per the Time Off Policy. |
| Frequency Based Accrual | Time Off Policy that accrues on a preset frequency such as Employee Anniversary, every payroll, first payroll of the year, etc. |
| Per Hour Accrual | A Time off Policy that accrues based on a number of worked hours. |
| Plan Year | The Clearing Setting determines the plan year. If the Time Off Policy clears at the beginning of the year, the Plan year is January through December for all participating employees. If Clearing is Employee Anniversary, the plan year varies by employee. The Plan Year begins on their Hire Date Anniversary and ends one day before their Anniversary in the next year. |
| Probation | A measure of time after being hired during which the employee cannot take time off. Accruing may happen in this timeframe. |
| Used Dollars | The dollar amount paid out paid to the employee for this Time Off Policy. ** |
| Used Hours | Number of Hours the employee has taken for the Time Off Policy. ** |
** The values in these fields are affected by payroll processing and the clearing and carryover rules of the time off policy. They can also be manually adjusted by the client.
Before setting up a new Time Off Policy
Following are some best practice recommendations for setting up a new Time Off policy.
1. Acquire a written copy of the actual Time Off Policy from the client.
2. Review the policy and resolve any questions regarding how it works. For a number of reasons, a single Time Off policy may result in the creation of multiple Time Off policies in the system.
3. Be sure the policy contains how the client actually books time off. An employee may receive 80 hours of vacation in a year, but it is awarded each payroll at a prorated amount.
4. Review your understanding of the policy with the client. Confirm that they agree with your understanding.
5. Add any needed Company level Earnings Codes and Code Groups prior to setting up the Time Off policy.
Adding a new Accrual Policy
Click the New (*) Button.
The "Enter new benefit accrual code" Dialogue Box is displayed.

Enter the code for the Time Off policy. Brevity is recommended. Use of special characters should be avoided. Click OK.
The cursor is moved to the Accrual Setup Sub Tab.
Accrual Setup Sub Tab
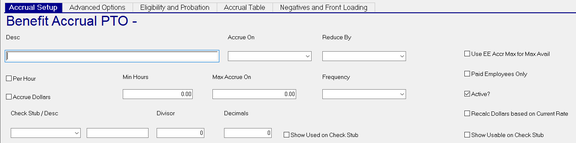
Description : Description of the Time Off Policy
Accrue On : Use with Hourly Accruals only. Establishes the hours that will be the basis of the Per Hour accrual.
Select the appropriate Code Group or individual Earnings Code from the available Drop List.

Reduce By : Defines what earnings will be used to reduce an employee's available hours and update their used hours.
Select the appropriate Code Group or individual Earnings Code from the available Drop List.
| Field Name | Information |
|---|---|
| Per Hour | Indicates the Time Off Policy is based on hours worked. Referred to in this document as an "Hourly Accrual". |
| Accrue Dollars | Time Off Policy will accrue dollars instead of hours. |
| Min Hours | Hourly Accruals only. Employee must work at least this many hours to receive accrued hours. |
| Max Accrue On | Hourly Accruals only. The most hours in a pay period that can be accrued on. |
Important: This is a per-check limit. Any employee who receives more than one check in a pay period will have the Max Accrued On limit applied to each check separately.
Frequency: Use when the Time Off Policy is not based on worked hours, Select the appropriate Frequency from the provided Drop List. The Drop List contains all Frequency Codes set up on the company, plus the EE Ann option. The EE Ann Frequency is only available for use with accrual setups.

If a Frequency is selected, the Per Hour Box is disabled. A Time Off policy CANNOT be both Hours and Frequency Based.

Check Stub / Desc : This is a two part field. Use the Drop List to select the option that controls what is displayed on a check stub for this Time Off policy.
Enter a free form value in the untitled field to label the display on the Check Stub.
![]()
When setting up a new Accrual Policy, it is recommended to not display this information on the employee check stubs until the client has verified the policy is functioning correctly.
| Field Name | Information |
|---|---|
| Divisor | Divides the Available Hours by this number. Typically will be a one (1). If my Desc value say PTO Days, an entry of 8 here would result in available hours divided by 8. Forty (40) available hours would be five (5) PTO Days. |
| Decimals | Number of decimals place when displaying available hours or dollars . |
| Show Used on Check Stub | Check to show used data on the check stub. |
| Use EE Accr Max for Max Avail | If this check box is checked, the system uses the amount in the Accrual Maximum field as the maximum available balance amount. If used, all employees must have an Accrual Maximum entered. T he Accrual Maximum field is found on the Accruals Tab in Employee Maintenance. |
| Paid Employees Only | Frequency Based accruals accrue on all employees who are active in the Time Off Policy, even if they are not paid in the payroll where the accruing occurs. Use this option when the employee must be paid in order to accrue. |
Important: Termed employees automatically do not accrue, even when they are paid.
| Field Name | Information |
|---|---|
| Active | Indicates whether the Time Off Policy is Active or Inactive. When unmarked, the policy will no longer be used. |
| Recalc Dollars based on Current Rate | Adjusts the dollar value of the accrual based on the employees’ current rates. |
| Show Usable on Check Stub | Prints data from the Total Usable field on the employee's Accrual Tab in Employee Maintenance instead of the data from the Available Fields. Total Usable is invoked by the Max Accrued value on the Accrual Table Sub Tab of the company Time Off Policy. |
Advanced Options Sub Tab
The Advanced Options Sub tab should be completed for policies that include Clearing requirements.
The Clearing requirements are defined using the options in the Clearing Options and Bank Rollover Sections of the Sub Tab.
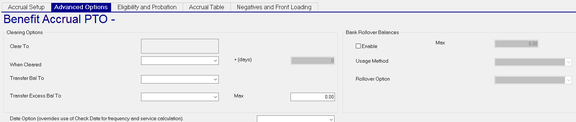
Clearing Options Section
Clear To : Displays the C/O Max (Carryover Max) value from the Accrual Table Sub Tab. If the Accrual Table has multiple rows, the field is populated with "Review Table".
When Cleared : The date when the employee’s available balance is to be cleared. There are options for the employee’s anniversary or any day during the year.
+ Days : If using the employee anniversary option, you can add a number of days as a grace period before the balance clears.
| Field Name | Information |
|---|---|
| Transfer Balance To | Works in conjunction with the When Cleared field. If you want to carry over balances to the same accrual code from year to year, you must specify the accrual code to which you are transferring. |
| Transfer Excess Bal To | If an employee has excess available time above the specified carryover max, the excess can be moved to another accrual policy, such as taking vacation above the carryover max and applying it to their sick balance. |
| Max | Set the number of excess hours to be carried over to the secondary policy. |
Bank Rollover Balance Section

The fields in this section are inactive until the Enable Box is checked.
Once checked, the Max, Usage Method and Rollover Option fields become active.
In the Clearing Options Section, the Transfer Excess Bal to and the associated Max field become inactive.
Max : Set the maximum number of hours that can be banked. All hours banked stay within the policy they are banked under.

Usage Method : Use the available Drop List . Within a plan year, state whether ‘Available’ hours or hours in the ‘Bank’ are used first when an employee uses time.
![]()
Rollover Option : Use the Available Drop List. This will recalculate the employee’s banked hours by dividing their current balance of dollars / current rate of pay
Date Option (overrides use of Check Date for frequency and service calculation) : If the policy frequency should be based on something other than check date (and the policy is in use for other areas of the system), you may choose an alternate selection. It will look at Period Begin or Period End date for the accrual.
Eligibility and Probation Sub Tab
Use this Sub tab to establish any Eligibility and Probation guidelines associated with this Accrual Code.
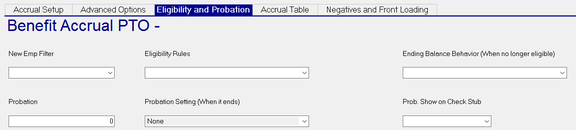
New Emp Filter : Optional. Allows you to automatically add the accrual code to an employee if the employee meets the criteria of a certain condition. You define filters in Company Maintenance > Company Setup > Misc tab > Emp Filters. If a filter is selected, all employees who meet the criteria of the filter and do not have the benefit set up in their file will have the accrual added during the next payroll processing.
Eligibility Rules : Eligibility Rules are used when the New Emp Filter option does not meet the filtering requirements of the Accrual Policy. Select the applicable Eligibility Rule that pertains to the policy. These replace the New Emp Filter option.
Instructions for setting up Eligibility Rules are found at the end of this article
| Field Name | Information |
|---|---|
| Probation/Probation Setting | The two fields are used together to detail a period of time during which the employee cannot use time off but would accrue. Those hours are added to their Probation balance and would not be available to them for use until the Probation period expires. |
| Probation | Enter the number of days for the Probation period. |
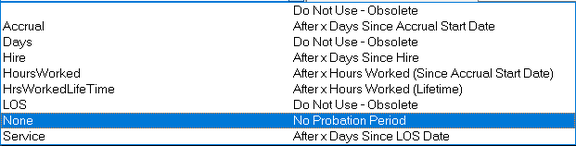
| Probation Setting (When it ends) | Controls the length of the Probation period. Select the appropriate entry from the available Drop List. Avoid the entries noted as "Do Not Use - Obsolete". |
Prob. Show on Check Stub : Mark to show accrued probation hours on check stubs.
Accrual Table Sub Tab
The Accrual Table Sub Tab is used to control the amounts to accrue, and establish other rules regarding the accrual.
Dependent on the policy, the Accrual Table can have one or many rows of entries.
To add a new row, click the New (*) Button. An active row is added to the grid.
![]()
>=Month : The minimum months of service that the employee must work before being eligible to accrue at the rate specified in this row. When calculating the accrual, ReadyPay uses the employee "hire date" and the current check date to determine the length of service (in months).
Rate : The actual rate of accrual the employee will receive based on the policy’s frequency.
Rate Per (hours) : Works in conjunction with the rate Field. The number entered here indicates the number of hours to be worked for the employee to receive the value in the Rate Field.
Example 1: The end client allows employees to accrue 15 minutes (i.e., 0.25 hour) of time off for every 8 hours worked. This example is common for hourly wage employees. You enter 0.25 in the Rate field and 8 in the Rate Per (Hours) field. If the employee works 40 hours in the pay period, the accrual will be 40 / 8 = 5.0 Then, 5 x 0.25 = 1.25 hours accrued. With this plan, an hourly employee who works 40 hours each week will earn 65 hours of time off in a year.
Example 2: The end client allows employees to accrue 3.08 hours of time off in a biweekly pay period as long as they worked sometime during the pay period. This example is common for salary wage employees. You enter 3.08 in the Rate field and leave the Rate Per (Hours) field at zero. With this plan, an employee who works each pay period will earn 80 hours of time off in a year.
Example 3: The end client allows employees to accrue 1.667 hours of sick time in a semi-monthly pay period. However, the employee must work at least 80 hours in the pay period to accrue the time off. You enter 1.667 in the Rate field and 80 in the Rate Per (Hours) field. With this plan, an employee who works at least 80 hours each pay period will earn 40 hours of sick time in a year.
IMPORTANT: The Rate and Rate Per calculations are done on a per-pay basis. Employees who are paid two or more checks in the same pay period may accrue time off on more than one check in the pay period.
| Field Name | Information |
|---|---|
| Balance Max | The maximum balance of available hours that an employee can have on file for this accrual plan. Once the balance equals this value, accrual for that employee ceases until the balance is reduced (by using time). |
| Total Max | The maximum balance of accrued value an employee can have at one time (the sum of available hours and used hours). Once the employee’s balance has reached the maximum, they no longer accrue until the accrual is cleared. |
| C/O Max | The maximum amount that can be carried over when the accrual is cleared. If the carryover maximum isn’t set, nothing will be transferred, regardless of anything being set in the Transfer Bal To field. If the entire balance can be carried forward, enter 9999. |
| Ceiling | Similar to the Balance Max, a ceiling allows you to have a maximum total available balance through the policy while also transferring hours from an old policy (grandfathering) so they do not lose time. |
| Max Negative | Enter the number of hours in the negative an employee may use; when used in conjunction with Usage Restrictions – any hours over this maximum can be coded as unpaid time in payroll automatically. |
| Max Used | Limits the number of hours someone may use per plan year. |
| Max Accrued | Limits the number of hours someone may accrue per plan year. |
Negatives and Front Loading Sub Tab

Note the disclaimer at the top of the Sub Tab BEFORE proceeding to use these options
The Sub Tab is divided into the Usage Restrictions and Front Loading Options Sections
Usage Restrictions Section
Processing Behavior : Only used if other fields in the section are populated, select what the system should do as a result of the setting in the section.

| Field Name | Information |
|---|---|
| Adjust Option | Allows system to adjust paid time off hours if it would result in the employee balance exceeding the Negative Balance cap. |
| None | Same behavior as the "Blank" option. |
| Verify | Informational. You are required to set up a Payroll Verification to flag usage information in Payroll. |
| Unpaid Hours Code | If selecting ‘Adjust’ as the Processing Behavior, choose the Memo earnings code to be used to track the negative time over what is allowed. |
Prevent Employee Balances from Going Negative (up to Max Negative Allowance Value) : Select if any negative hours (above the Max Neg) should be changed to Unpaid hours using the Unpaid Hours Code selected.
Front Loading Options Section
Front Load Hours : Enter the number of hours an employee should be credited at the time the policy is added.
Front Load Dollars : Enter the number of dollars an employee should be credited at the time the policy is added.
Creating Eligibility Rules
Eligibility Rules are accessed by selecting ‘Eligibility’ in the pull-down menu at the top of the Accruals page.

You must complete the Eligibility Setup before using the Filtering Options Sub Tab.
There are two Sub Tabs used with setting up Eligibility Rules.
![]()
Click the New (*) Button to create a new line in the Grid on the Eligibility Setup Sub Tab.
To add a new Eligibility Rule, click the New(*) Button.
The "Enter a new accrual eligibility code" Dialogue Box will be displayed.

Enter a code that is a brief description of the Eligibility Rule. click OK. Our rule will be called ActSal.
Eligibility Setup Sub Tab
Description : Enter an informative description of the Eligibility Rule.
Start Date Option : Use the Drop List to define the Start D ate of the Eligibility Rule.
End Date Option : If applicable, Use the Drop List to define the End D ate of the Eligibility Rule.
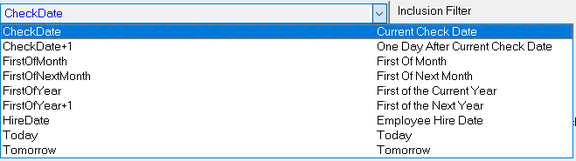
Inclusion Filter : Use the Drop List to identify employees to be included in this Eligibility rule. The options in the Drop List are housed in the Emp Filters option under the Misc Tab in Company Setup.

Exclusion Filter : Use the Drop List to identify employees to b excluded from this Eligibility Rule.
Our Sample is called ActSal. Our inclusion filter is Active. Our exclusion filter is Hourly.
By excluding Hourly employees, we include only Salary employees who are Active.
| Field Name | Information |
|---|---|
| Can Remove Eligibility Status | I f the employee no longer meets the eligibility rule, it will stop the accrual. |
| Evaluation Frequency | Use the Drop List to establish how often the Eligibility Rule is applied. |
| Run in Payroll BEFORE Paychecks Process | Eligibility Rule will be applied prior to actual paycheck processing. |
| Run in Payroll AFTER Paychecks Process | Eligibility Rule will be applied after actual paycheck processing. |
Filtering Options Sub Tab
This Sub Tab provides additional options to address more complex Eligibility requirements.

| Field Name | Information |
|---|---|
| Minimum LOS | Enter the minimum Length of Service value. Works in conjunction with Length of Service Type. |
| Length of Service Type | Use the Drop List to identify the Minimum LOS as Days, Weeks, Months or Years. |
| Minimum Age Option | If required, enter the minimum age (in Years) the employee must be. |
| Age Calc Option | Use the Drop List to establish what date is used as the basis of the Minimum Age calculation. |
| Last Check | Populated by the system during Payroll Processing. |
| Hours Calc Method | If the policy has a Minimum Hours Worked requirement, use the Drop List to select the appropriate option. |

| Field Name | Information |
|---|---|
| Hours Code Group | Use with the Hours Calc Method. Select the appropriate code group to determine hours worked. |
| Minimum Hours | Enter the number of hours the employee needs to have worked for the Eligibility Rule to apply. |
| Maximum Hours | Typically not used with time off policies. |
Employee Setup
Once the Company Level Time Off Policy is setup, it must be added to existing employees.
Click here for more information regarding the set up and maintenance of employee accruals.
Common Causes of Issues with Accruals
1. The most common cause of issues with Accruals is caused by failure to follow the steps outlined above in the sections titled " Before setting up a new Time Off Policy ". Following these guidelines greatly reduces the potential for errors. If anything, it provides the ability to place responsibility for the issue with the client if they've signed off on how the policy works.
2: Incorrect Code Groups on Hourly Accruals: Each time a new earnings code is added to a company, the Code Groups should be reviewed to determine if the new code should be included in the Code Group. If omitted, accrued benefits and/or usage may be incorrect.
For more information on Company Setup > Code Groups,
click here.
3. Incorrect Frequency in use. For Frequency Based accruals, there should be a custom Frequency in place to control when the Time Off policy accrues. These Tax Frequency codes (A, B, D, M, Q. S, W) should not be used to control accruing.
Example: A Time Off Policy accrues with the first payroll of January each year. Use of the Frequency code "A" will not work as it does not tell the system WHEN in the year it needs to accrue. Use the Base Frequency options found in Master Company Setup > Frequencies to create a proper Annual Frequency for Accruals. This logic is true for monthly and quarterly Accruals as well. M or Q do not indicate when in the month or quarter that the accruing should occur.
For more information on Master Company Setup > Frequencies,
click here.
Correcting Issues with Accruals
There are multiple ways to address issues with Accruals. Your choice may be dictated by when the issue is discovered.
If the issue is discovered in-house and the timing is such to allow use of a Delete Process, the simplest way to address is to run the Delete Process, correct the root cause of the issue then reprocess the Payroll.
If, due to circumstances, this approach is not feasible. the issue can be corrected manually. Any needed changes to the Company Level accrual setup should be made. Next, manually adjust the available, used and probation hours and dollars as appropriate. Check Subs and reports can be reprinted to reflect the changes. The biggest issue with manual adjustments is with the accrual history data. Accrual History data is not updated when a manual adjustment is entered on an employee's Time Off policy tab. Therefore, reports based on the Accrual History records may disagree with reports based on the Employee Accrual Tab.
In cases where large employee counts are involved, manual correction can be very time consuming and subject to user error. In these cases, utilizing the Revert Accruals and Recalculate Accruals jobs may be your best option.
These options only work with accruals that were processed through payroll. You cannot add a new Time Off policy then use these jobs to populate data . They can only be used to correct existing data.
These jobs allow you to correct employee accrual balances without the need to delete and reprocess payrolls. They can be used to solve multiple issues. For example; accruals being calculated when they shouldn’t have, or policy/employee setup changes which cause the need to recalculate balances for an entire payroll process.
This is accomplished by using the RevertAccruals.NET and RecalcAccruals.NET jobs. The jobs are designed to be used according to the following two use cases:
-
A payroll was processed for a company, but the accrual plans were not properly set up. You need to correct the accrual plans and then the employee accruals. The process for this use case works like this: Run the Revert Accruals job -> Make the necessary changes to your accrual policies -> Run the Recalculate Accruals job.
-
A payroll was processed for a company and accruals should’ve been blocked, but they weren’t. You need to correct the employee accruals. The process for this use case works like this: Run the Revert Accruals job.
To enable this feature, add the following section in your ProcessServerNet.exe.config file(s) directly under <configuration>: <runtime> <assemblyBinding xmlns="urn:schemas-microsoft-com:asm.v1"> <dependentAssembly> <assemblyIdentity name="System.ComponentModel.Annotations" publicKeyToken="b03f5f7f11d50a3a" culture="neutral" /> <bindingRedirect oldVersion="0.0.0.0-4.2.1.0" newVersion="4.2.1.0" /> </dependentAssembly> </assemblyBinding> </runtime>
Database tables and columns have been added to support this feature.
-
Table EAccrBalanceHistory has been added.
-
Table EAccrHist contains new columns IsReverted and RevertedTimestamp.
-
Table EEmployeeEligibilityLog contains new columns IsReverted and RevertedTimestamp.
Using theRevertAccruals.NETjob
-
When you want to roll back accruals from a payroll process without deleting a payroll, you add a job to the job queue by clicking on the yellow star icon.
-
Select the RevertAccruals.NET job class, company code, and State (i.e. Active or Ready) option.
-
The job properties will be displayed allowing you to set additional options on what you want to revert. The options are explained below the image.

-
IgnoreTransfers is an optional value used to revert accrual codes (i.e. BCode) that are configured to transfer to or receive transfers from other accrual codes. Values of 0 or blank are used for accrual codes with no transfers. A value of 1 is used for accrual codes with transfers.
-
Recalc is an optional value used to immediately recalculate the reverted accruals after the revert accruals is done. Only use this option when you have already made the necessary adjustments to the accrual plan(s). Values of 0 or blank are used when you do not want an automatic recalc. A value of 1 is used when you want ReadyPay to automatically recalculate the reverted accruals.
-
BCode is an optional value used to specify a specific accrual code to revert. Accrual codes are case sensitive. Leave this option blank to have the revert process all accrual codes.
-
EmployeeId is an optional value used to specify a specific employee you want to revert accruals on. Since all employee IDs are 6 characters, the proper spacing needs to be manually keyed in. Meaning, an employee id of 123 would have 3 leading spaces followed by the numbers 123. Leave this option blank to have the revert process all employees.
-
RevertToProcess requires a value . This property instructs the job how far back to revert the accruals. This is generally the value shown on the company calendar’s “Process #” field for the oldest check date you wish to roll back to. For example; you want to roll back the accruals from a company’s most recent check date. You would enter the process number for the check date BEFORE the company’s most recent check date. In other words, you Revert Accruals back to the last known good checkdate. The RevertAccruals.NET job can only make changes for processed checkdates.
-
A RefreshCache job for the company selected will automatically run after the RevertAccruals.NET job completes.
Using theRecalcAccruals.NETjob
-
When you want to recalculate accruals without the need to process a payroll you add a job to the job queue by clicking on the yellow star icon. Recalculating accruals is used after you have Reverted Accruals from one or more previous payroll processes and made the desired changes to the accrual codes necessary.
-
Select the RecalcAccruals.NET job class, company code, and State (i.e. Active or Ready) option.
-
The job properties will be displayed allowing you to set additional options on what you want to recalculate. The options are explained below the image.

-
RecalcFromProcess requires a value. This property instructs the job how far back to recalculate accruals. This is generally the value shown on the company calendar’s “Process #” field for the check date you wish to start recalculating from. For example; you want to recalculate the accruals from the most recent check date. You enter the process number from the check date that was processed BEFORE the most recent check date. Unless you are skipping over a checkdate, you would enter the same process # that you used for the RevertAccruals.NET job. The RecalcAccruals.NET job uses the process # as the starting point. The job will Recalc Accruals for every processed checkdate that comes after the process # you entered.
-
Bcode is an optional value used to specify a specific accrual code to recalc. Accrual codes are case sensitive. Leave this option blank to have the recalc process all accrual codes.
-
EmployeeId is an optional value used to specify a specific employee you want to revert accruals on. Since all employee IDs are 6 characters, the proper spacing needs to be manually keyed in. Meaning, an employee id of 123 would have 3 leading spaces followed by the numbers 123. Leave this option blank to have the revert process all employees.
Important Notes:
-
Accrual codes are case sensitive. A company accrual policy code of “PTO” is not the same as an employee code of “pto”. The new jobs require the company and employee accrual codes to match.
-
You cannot revert accruals for payroll processes that have already been reverted.
-
You cannot recalculate accruals for payroll processes that already exist, you must revert them first.