Creating a QSF File for Support
Troubleshooting some issues may require EarnIn Payroll's Support staff have access to the end client data. The Support Engineer who is assigned to your issue may request a copy of the data in a QSF file. This document describes how you create a QSF. QSF files are encrypted and securely transmitted to an FTP server that EarnIn Payroll support staff have access to.
Start by logging in to ReadyPay and navigating to the System > Synchronization > Create Quickstart tab as shown in Fig. 1. Each field on this tab is explained below.
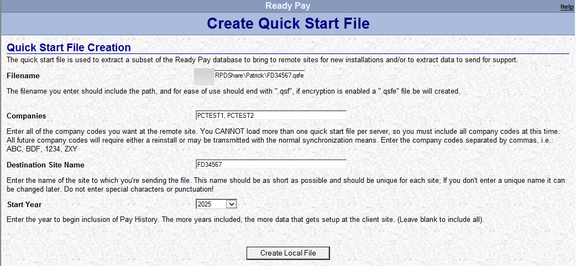
Fig. 1.
- Filename: Enter the full folder path AND filename that is required.
Use a full path that is accessible by yourself and by ReadyPay. This
filename must end with ".qsfe". Please include your Freshdesk ticket
number in the filename. For example:
\\your_server_name\RPDshared_foldername\FD34567.qsfe. - Companies: Enter one company or multiple company codes. When including multiple companies, separate each company code with a comma and a space.
- Destination Site Name: This can be anything, but should make sense and be unique for each site. A good practice is to perhaps use the filename that you specified earlier (example shown above).
- Start Year: This will be "All History" by default. We recommend only creating a qsf that contains the pay history data needed for troubleshooting the issue you have. The Start Year means that all data, including that year and onward, will be included. For example, "2025" will include all history for 2025 through the current year.
Once you have entered these values, click the Create Local File button. The message box (Fig. 2) will be displayed:

Fig. 2.
Click the OK button. The message box (Fig. 3) will be displayed:

Fig. 3.
Click the Yes button, and the process will begin. Please be patient because the file creation can take several minutes, and there is no progress indicator. A message similar to Fig. 4 is displayed when the file is created. You must copy the Encryption Key and Encryption IV and provide these to Support, as they are required for Support to decrypt and load your file.
EarnIn Payroll recommends saving these values to a text file that you will include with the QSF.

Fig. 4.
Click the Close button and a message (Fig. 5) is displayed telling you the file has been created.

Fig. 5.
Click the OK button.
Now that your qsf file has been created, create a ZIP file that includes the QSF and the Encryption information. Include the Freshdesk ticket number in your ZIP file's filename.
Upload the ZIP file to your service bureau's folder on the FTP site. Lastly, update your Freshdesk ticket once the file upload is complete so your assigned Support Engineer knows the file is ready for them.