Company Setup: Client G/L 3 — Reporting Options
Introduction
This article is a discussion of the various reports available to assist with General Ledger setup and reporting.
Most reports have configurable options that allow the user to alter how the reports work. They vary from one report to another. To review these options, select the report and right click. Next choose Properties.
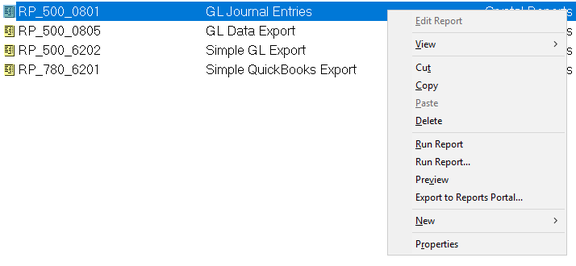
This will display the Report properties Dialogue Box.
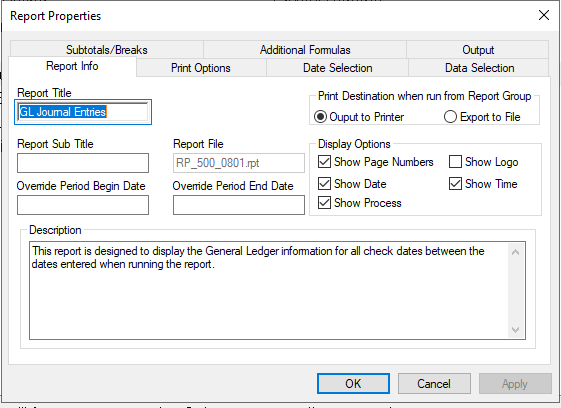
Review the Subtotals/Breaks, Additional Formulas, Data Selections and Output tabs to review the options available for each report.
RP_100_2102 | GL Rules Report
Overview
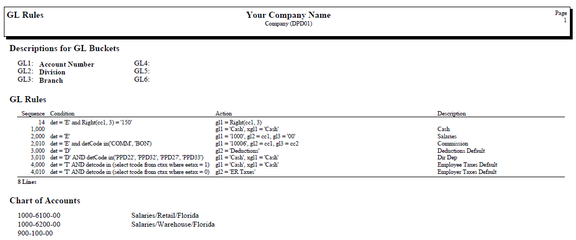
The GL Rules report (RP_100_2102.rpt) lets you see the data setup for a company on the three Sub-Tabs found in Company > Company Setup.

The data is displayed in the same order as the Sub-Tabs from Company > Company Setup > General Ledger.
It always displays the current G/L Setup information. There are no historical lookup options.
Other Information
Due to the space limitations on the General Ledger Sub-Tabs, reviewing the General Ledger setup on the screen can be problematic. The report displays all the relevant setup data in one easy to read format.
- The Descriptions for GL Buckets are displayed in numeric sequence 1 through 6.
- GL Rules are displayed in sequence orders.
- Chart of Accounts are displayed in the order they were entered on the screen. There are no sorting options for this section.
Configurable Options
As the report uses current data only, there are no configurable options under the Properties option.
RP_500_0801 | GL Journal Entries
Overview
The GL Journal Entries Report (RP_500_0801.rpt) provides data on Debits and Credits based on the G/L Rules and G/L Accounts set up in those respective sub-tabs in Company > Company Setup > General Ledger.
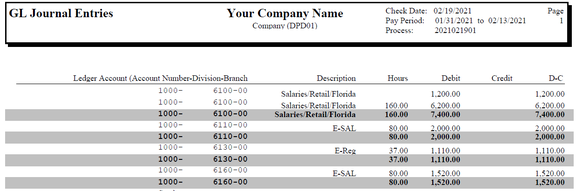
The sample above is based on the default configurations for the report. The default sort order for data is GL Account. This is a concatenation of the values from GL1 through GL6. Totals (in BOLD) are provided after each GL Account.
Report Totals are provided for the Hours, Debit and Credit Columns.
Many clients use this report to make manual journal entries into the General Ledger. This is typically the case when they have no means of importing the data.
The report can also be used to review the G/L Setup for accuracy.
Any entries that have no G/L account assigned will be displayed first, allowing the user to easily identify them and update the G/L setup.
All entries are shown as either a Debit or Credit value. If an item displays as a Debit but should be a Credit, there is an issue with the GL1
GL6 or XGL1 > XGL6 assignments. Use the following chart to assist with correcting those items.

Configurable Options
This report has a significant number of options to alter the way the report is produced as compared to the default.
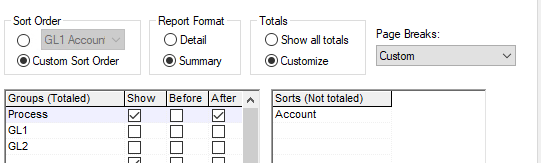
Subtotals/Breaks
Sort Order / Report Format: Use the options under Sort Order and Report Format to control how the report will display.

The default sort is the entire GL Account. The Default Report Format is Detail. Detail provides detail lines of all the entries that make up a total. Use Summary if you need the Totals without Details.
Use the Drop List to change the Default Sort. Canned Options are for GL1 and combinations of GL1 through GL6.

Custom: Use this option if none of the canned sort options meet your requirements. Use the Drop List to select the needed Group (sort order).

Totals will be generated for each group you select.

Totals and Page Breaks settings.

Totals Default is to "Show all Totals". The Page Breaks default is "No Page Breaks".
Page Break options are as follows:

Use these options to customize where page breaks are created.
- After Totals will check all the Boxes under the column After in the Groups(Totaled) section and create page breaks after the total line.
- Before and After Totals will check all boxes under the Before and After columns and create page breaks accordingly.
- Custom lets you manually set how the report will sort/total and page eject. Your Sort Order must be set to the Custom Sort Order. This allows you to set when there are Totals and when there are page ejects. In my example, I have three sorts. My totals and page ejects happen after Level 1. Levels 2 and 3 will be sorted but no totals will be created for those levels.
Additional Formulas
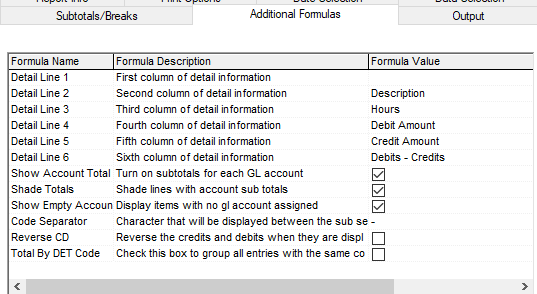
Detail Line 1 through Detail Line 6: Use the Drop List to set what displays in the first six columns of the report (starting on the left of the page).

The same options are available for Detail Line 1 through Detail Line 6.
Detail Line 1 through Detail Line 6 can be blank if needed.
Show Account Total: Click Check Box if you want totals after each account number. This is independent of your settings on Subtotals/Breaks tab.
Shade Totals: Click Check Box if you want sub totals highlighted on the report.
![]()
Show Empty Accounts: Click Check Box if you want to see G/L Entries with no accounts assigned. These will show at the top of the report.
Code Separator: Enter the character to display between the sections (GL1 > GL6) of the account number. Most commonly used value is a dash. Do not use if you have included the separator character in the Action of your G/L rules.
Reverse CD: Credits are displayed as debits, debits as credits.
Total by DET Code: Check Box to group all entries with the same code together.
Data Selection
Use this sub-tab to filter the report by the various data options provided.

Range 1 and Range 2 are Drop Lists that let you filter the report.

The From and Thru fields have Drop List options that are based on values in the Range 1 or Range 2 fields.
Complete the values for the Range 1 line. To select one value, enter it on both the From and Thru fields.
To select a range of values, set the Thru value to something sequentially higher than the From value.
If you need multiple Data Selections, select the appropriate value (AND/OR) from the Drop List in the field called OR.
Date Selection
GL Journal Entries is based on historical data. As a result, the report can be run for a number of date ranges.
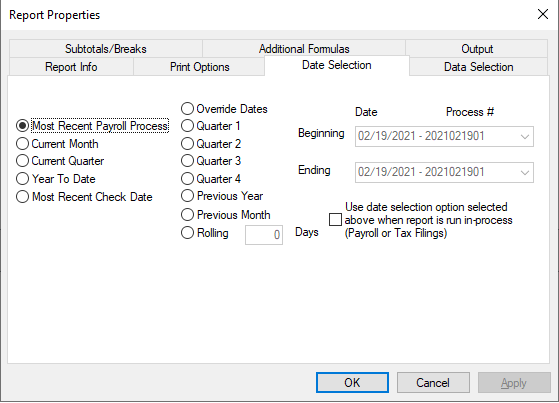
- Most Recent Payroll Process: Uses the most recent process number if a check date has multiple processes.
- Current Month: Selects the begin and end days of the month based on the check date of the last processed payroll.
- Current Quarter: Selects the begin and end days of the quarter based on the check date of the last processed payroll.
- Year To Date: Selects the begin and end days of the year based on the check date of the last processed payroll.
- Most Recent Check Date: Uses the most recent check date. Sets the Beginning Date to CheckDate01 and Ending to CheckDate99. ie: An 11/25/2020 Check Date would use 2010112501 through 2020112599 as process numbers.
- Override Dates: Select the Radio button to manually enter a range for your report to use. Beginning and Ending fields become active Drop Lists that display all processed check dates.

- Quarter 1, Quarter 2, Quarter 3, Quarter 4: Selects the Quarter Begin and End Date based on the check date of the last processed payroll. Allows for all process numbers in that date range.
- Previous Year: Selects the dates for the previous year based on the check date of the last processed payroll.
- Previous Month: Selects the dates for the previous month based on the check date of the last processed payroll.
- Rolling: Enter a number of days and the report will include data for the most recent check date and check dates that are within the timeframe of current check date minus # of Rolling Days. ie: Current Check Date is 02/19/2021 and Rolling value is 60. Report will include check dates between 12/19/2020 and 02/19/2021.
Use data selection option selected above when report is run in-process (Payroll or Tax Filing). Check this option if your report included data that is not covered by the Reports Folder where the report resides. ie: you want to run a YTD Labor Distribution report in the Every Payroll folder. Set the date option to Year to Date and check this option.
Output
The Output tab is used to define where the report goes when it is run (Printer, email, file, etc.), if it goes to a system folder and the format the output will be in.
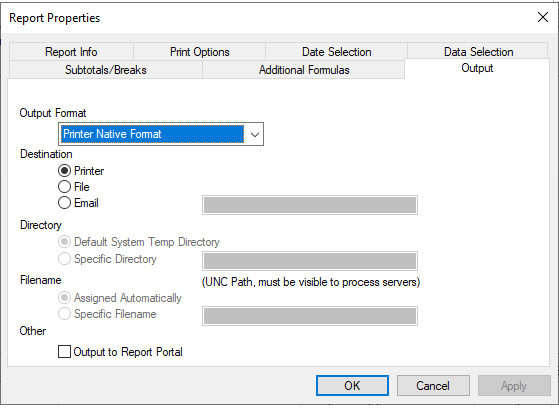
Output Format: There are numerous output formats listed in the Drop List.
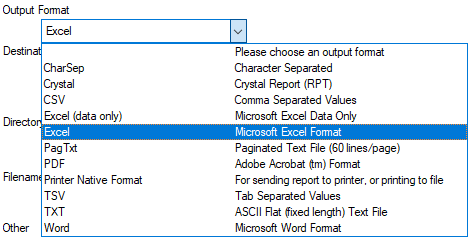
Not all output formats are compatible with all reports. For some formats to work, the report must be designed to work with the selected format. For example, there is an Excel Output option available on all reports. If you run the GL Journal Entries report to Excel, the data is unusable without significant adjustments because of the title bars, shadow boxes and footers.
PDF and Printer Native formats are most commonly used when printing hard copy reports or sending to the portal.
Directory: Use when Destination is File and output is to a specific folder or the System Temp folder.

- Default System Temp Directory: Send the output to the Temp Directory assigned for ReadyPay.
- Specific Directory: Send the output to a specific folder. (Path must be visible to Process Servers.)
Filename: Use to define the file name of the output when the Destination is File or Email.

- Assigned Automatically: File will have a numeric, system generated file name with an extension based on the Output Format.
- Specific Filename: File will always have the name entered. File name must have a file extension entered.
Other: Check the box to send output to the Report Portal.
RP_500_0805 | GL Data Export
Overview
The GL Data Export report (RP_500_0805) allows you to export GL data to a variety of output formats.

There are limited options for altering the output of the report.
Subtotals/Breaks: The default sort is employee last name/first name within the GL account number. Totals are by GL account. Report can be run in Detail or Summary mode. Page Ejects are not supported.
Additional Formulas: Option to filter the report data to only include earnings, deductions or Taxes. The Default (All) includes all three items.

Data Selection: Numerous options are provided and supported.
Date Selection: This report uses historical payroll data and can be run for various dates and date ranges.
RP_500_6202 | Simple GL Export
Overview
The Simple GL Export (RP_500_6202) can create an output file in either CSV or Fixed format. The format is flexible, allowing it to be imported to various accounting systems (except QuickBooks).
Sample Simple GL Export in csv format:

The order of the fields within the export is adjustable.
The output file can contain up to 10 data fields in a variety of formats: Text, Number and Date.
There are no Sort, Totals or Page Break options. Output file format is configured using the Additional Formula tab.
After defining the File Type (CSV/Fixed) the Additional Formulas are organized into logical groups:
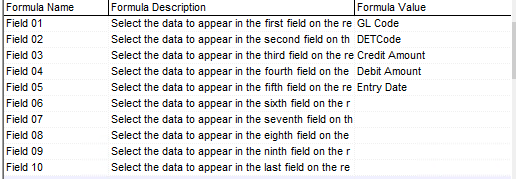
First group (Field 01 > Field 10): Select/define the fields to include in the file. Scroll through the Drop List under Formula Value to see the entire available fields list.

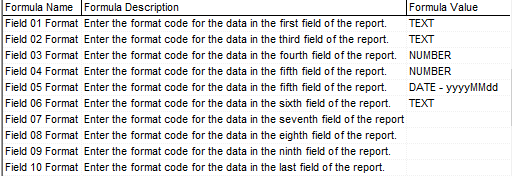
Second group (Field 01 Format > Field 10 Format): Format the fields you defined in the first group. Default values are TEXT, NUMBER and DATE
-
yyyyMMdd.
-
TEXT by default will display all the characters in the Text field. Its length will vary. If you want to limit or expand the number of displayed characters, use a command like this:
TEXT X(06). If the field has five characters, there will be an open space at the end of the field. If the field has 15 characters, it will be truncated at six positions. Change the length of the field by entering the appropriate number in the command:TEXT X(15),TEXT X(25). -
NUMBER fields by default are not zero filled, include the decimal and two decimal places. Change the format by adding formatting commands at the end of the NUMBER command. Use
NUMBER 9(09)V99for a zero filled, 9 positions to the left and 2 positions to the right of the decimal. The decimal place is assumed. UseNUMBER 9(09).999for a zero filled, 9 positions to the left and 3 positions to the right of the decimal. The decimal is included. -
DATE - yyyyMMdd is the default format of a 4 digit year, 2 digit month and two digit day (ie 20200930). Other date formats are supported, such as yyMMdd, ddMMyyyy, MMddyyyy, Mdyy, dMyy, yyMd. Use yyyy for a 4 character year. Use yy for 2 character year. Use MM for a zero filled 2 character month. Use M for a single character month (October, November, December will display 2 characters). In either case, the M must be capitalized. Use dd for a zero filled, 2 position day value. Use d for a single character day value (10–31 will have two characters).
If you require slashes or dashes in your dates, enter the slashes/dashes in the appropriate place in the field as in the example:
DATE - MM/dd/yyyy DATE - MM-dd-yyyy
Third Group (Additional Data 1 > Additional Data 4): Format any Additional Data fields used in Field 01 > Field 10 selections.

Additional Data fields are used to populate fields with the same data on every line.
Fourth Group: Additional Formatting options.

Fifth Group (Field 01 Title > Field 10 Title): Enter the Title you want for each column in the file. Leave all blank if no headers or titles are required.

Absolute value for numbers: Check box to force absolute values for numeric fields.
Data Selection: Use this sub-tab to filter the report by the various data options provided.
Range 1 and Range 2 are Drop Lists that let you filter the report.
The From and Thru fields have Drop List options that are based on values in the Range 1 or Range 2 fields.
Complete the values for the Range 1 line. To select one value, enter it on both the From and Thru fields.
To select a range of values, set the Thru value to something sequentially higher than the From value.
If you need multiple Data Selections, select the appropriate value (AND/OR) from the Drop List in the field called OR.
Date Selection. Simple GL Export is based on historical data. As a result, the report can be run for a number of date ranges.
- Most Recent Payroll Process: Uses the most recent process number if a check date has multiple processes.
- Current Month: Selects the begin and end days of the month based on the check date of the last processed payroll.
- Current Quarter: Selects the begin and end days of the quarter based on the check date of the last processed payroll.
- Year To Date: Selects the begin and end days of the year based on the check date of the last processed payroll.
- Most Recent Check Date: Uses the most recent check date. Sets the Beginning Date to CheckDate01 and Ending to CheckDate99. ie: An 11/25/2020 Check Date would use 2010112501 through 2020112599 as process numbers.
- Override Dates: Select the Radio button to manually enter a range for your report to use. Beginning and Ending fields become active Drop Lists that display all processed check dates.
- Quarter 1, Quarter 2, Quarter 3, Quarter 4: Selects the Quarter Begin and End Date based on the check date of the last processed payroll. Allows for all process numbers in that date range.
- Previous Year: Selects the dates for the previous year based on the check date of the last processed payroll.
- Previous Month: Selects the dates for the previous month based on the check date of the last processed payroll.
- Rolling: Enter a number of days and the report will include data for the most recent check date and check dates that are within the timeframe of current check date minus # of Rolling Days. ie: Current Check Date is 02/19/2021 and Rolling value is 60. Report will include check dates between 12/19/2020 and 02/19/2021.
Use data selection option selected above when report is run in-process (Payroll or Tax Filing). Check this option if your report included data that is not covered by the Reports Folder where the report resides. ie: you want to run a YTD Labor Distribution report in the Every Payroll folder. Set the date option to Year to Date and check this option.
Output. The Output tab is used to define where the report goes when it is run (Printer, email, file, etc.), if it goes to a system folder and the format the output will be in.
Output Format: There are numerous output formats listed in the Drop List.
Not all output formats are compatible with all reports. For some formats to work, the report must be designed to work with the selected format.
PDF and Printer Native formats are most commonly used when printing hard copy reports or sending to the portal.
Directory: Use when Destination is File and output is to a specific folder or the System Temp folder.
- Default System Temp Directory: Send the output to the Temp Directory assigned for ReadyPay.
- Specific Directory: Send the output to a specific folder. (Path must be visible to Process Servers.)
Filename: Use to define the file name of the output when the Destination is File or Email.
- Assigned Automatically: File will have a numeric, system generated file name with an extension based on the Output Format.
- Specific Filename: File will always have the name entered. File name must have a file extension entered.
Other: Check the box to send output to the Report Portal.
RP_780_6201 | Simple QuickBooks Export
Overview
The Simple QuickBooks Export (RP_780_6201) creates an export file to be imported into the QuickBooks Desktop version. The export file from this report cannot be used with the Online QuickBooks solution.
The file can be used to debit and credit the net of a check/voucher to the accounts specified on the Additional Formulas of the report setup. This includes employee vouchers, paper checks, agency checks and transfer amounts (Billing/Taxes, etc.).
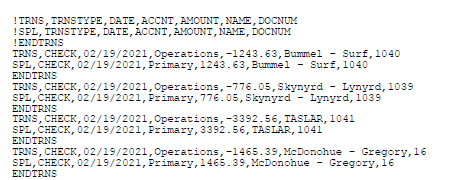
The format of the export file is adjustable. The fields listed in the !TRNS and !SPL lines are the fields selected in the Additional Formulas tab.
![]()
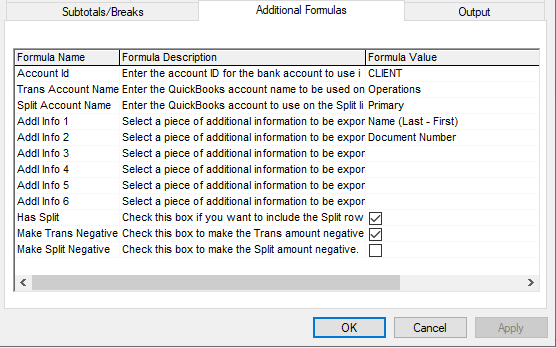
- Account Id: The account ID for the bank account to use in the file. (Must exactly match the account ID set up in ReadyPay.) These are found in Master Company Setup > Bank Accounts.
- Trans Account Name: Enter the QuickBooks account name to be used on the Trans line.
- Split Account Name: Enter the QuickBooks account to use on the Split line.
- Addl Info 1 > 6: Select a piece of additional information to be exported.
- Has Split: Check this box if you want to include the Split row in the export.
- Make Trans Negative: Check this box to make the Trans amount negative.
- Make Split Negative: Check this box to make the Split amount negative.
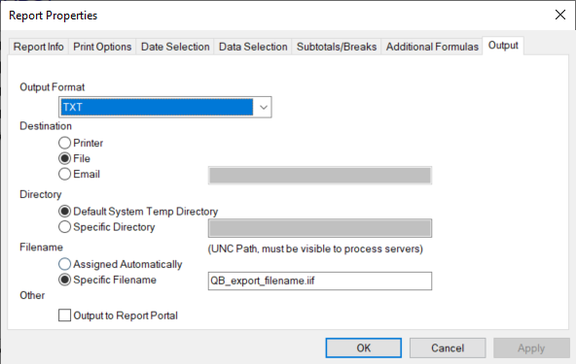
Output
The Output tab is used to define where the report goes when it is run (Printer, email, file, etc.) and if it goes to a system folder. The output format of the Simple QuickBooks Export has the following two requirements: the Output Format is always "TXT", and the filename must have the file extension of ".iif".
Report Writer
You can use the following Report Writer Report Types to build custom Company Level G/L reports:
- Company GLRules
- Company GLAccounts
There are no options that allow employee level G/L reporting.